
User guide


34
CHAPTER 3
NOTE: You must check both checkboxes to
be allowed access to the i.LON 10 only after
you have completed its configuration.
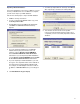
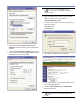
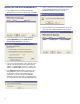
9. Click the Setup link on the left side navigation menu.
The Setup page appears.
10. In the Hostname field, enter the name of the i.LON
10 that you wish to communicate with the network.
The name must begin with ilon, followed by a dash -,
followed by a number in sequence. For example, the
first i.LON 10 name would be ilon-1, a second would be
ilon-2, a third ilon-3, and so forth.
CAUTION: Ensure that no spaces or other
characters are included in the name of the
i.LON 10. For example, ilon - 1 or ilon 1 are not
acceptable.
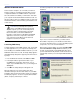
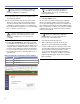
11. Click the Specify IP Address radio button and enter
the IP addresss for this i.LON 10. The IP address must
use a sequence corresponding to the IP address of your
computer, with the last digit changed to correspond to
the name of the i.LON 10. For example, the IP address
for ilon-1 would be 192.168.1.101; for ilon-2, it would
be 192.168.1.102; for ilon-3, 192.168.1.103; and so on
(see Table 2.4).
Table 2.4 Example names and IP addresses for three i.LON 10s
Name IP Address
ilon-1 192.168.1.101
ilon-2 192.168.1.102
ilon-3 192.168.1.103
TIP: Putting an actual physical label on
the i.LON 10 showing the IP address is
recommended in case access is needed to that
i.LON 10 in the future.
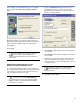
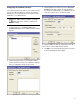
12. Click Save & Exit to finish.
You have now successfully configured your i.LON 10
with its own unique IP address name. Make sure that
you document IP addresses for both your computer and
each i.LON 10 on the network, as well the i.LON 10 name.
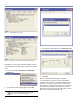
Next, you will need to configure your computer’s i.LON 10
LonWorks information so that it knows where to find the
i.LON 10 on the network.
NOTE: If you experience configuration
problems, you may need to perform a
security reset. Follow these steps:
1. Hold down the i.LON 10 service pin.
2. While continuing to hold down the service pin,
apply power to the i.LON 10 Ethernet Adapter.
3. Continue holding down the service pin for about 10
seconds until the Wink and Connect LEDs illuminate.
This means that you have performed a security
access reset and restored the default IP address:
192.168.1.222. You will now be able to access the
i.LON Configuration pages stored on the i.LON 10
Ethernet Adapter.