AP-1301 Operator’s Guide
AP-1301 i/t Operator’s Guide Document Revision: 100102 Copyright Notice Copyright ©2002 by MediaFORM, Inc. USA. All rights reserved. This manual and the accompanying illustrations may not be copied, reproduced, electronically transmitted, or translated into another language, in whole, or in part, without the written consent of MediaFORM, Inc. USA MediaFORM, Inc.
AP-1301 i/t Operator’s Guide Document Revision: 100102 Table of Contents COPYRIGHT NOTICE ............................................................................................................................................. 1 ABOUT MEDIAFORM DUPLICATION SYSTEMS............................................................................................. 4 WHAT TO EXPECT FROM YOUR MEDIAFORM PRINTING SYSTEM ..............................................................................
AP-1301 i/t Operator’s Guide Document Revision: 100102 COMMENTS ....................................................................................................................................................... 28 OPEN, SAVE AND SUBMIT JOB .................................................................................................................................. 28 STATUS SCREEN......................................................................................................................
AP-1301 i/t Operator’s Guide Document Revision: 100102 About MediaFORM Duplication Systems Thank you for purchasing MediaFORM’s AP-1301 i/t automated CD Printing system. MediaFORM manufactures a wide variety of CD duplication equipment, including a variety of manual and fully automatic CD duplicators and printers. We hope you will consider us for all of your duplication needs.
AP-1301 i/t Operator’s Guide Document Revision: 100102 Getting Started Carefully remove your new CD printing system from the shipping container. Please inspect the contents and verify it against your packing slip. Be sure to report any errors in shipping as soon as possible. What’s In The Box Your new AP-1301i or t includes the following: • AP-1301 base unit • Power cord • Three spindles.
AP-1301 i/t Operator’s Guide Document Revision: 100102 Setup Before the unit can be operated, you will need to setup the different components. What you will need You will need the following • MediaFORM AP-1301 base unit • MediaFORM Spectrum2 CD Printer (Requires the MediaFORM AP1301t PDS docking station) or Primera Signature III or IV printer (AP1301i). • Parallel printer cable (included with printer) • Various included cables • Quality blank CD-R’s.
AP-1301 i/t Operator’s Guide Document Revision: 100102 Attaching a Monitor Place the monitor on either side of the AP-1301. Connect the male DB-15 (15-pin) connector of the monitor cable to the female DB15 connector on the AP-1301 base unit. Connect the monitor’s power cable to the AC wall jack. Reference the documentation that accompanied the monitor if you need help Attaching the Mouse Either a Microsoft compatible serial or P/S2 mouse may be used.
AP-1301 i/t Operator’s Guide Document Revision: 100102 Attaching the Keyboard Connect the keyboard to the large DIN located on the back of the AP-1301 base unit. Attaching the Network Cable If you wish to connect the AP-1301 to your network, connect a suitable patch cord to the RJ-45 network port on the back of the AP-1301 base unit. Use a category 3 or better patch cable for 10Base-T and category 5 for 100Base-TX.
AP-1301 i/t Operator’s Guide Document Revision: 100102 Attaching the Printer Cable Connect the printer cable included with your printer to the female DB-25 connector on the back of the AP-1301 base unit. Connect the other end to the port on the back of the printer. Use only IEEE-1284 compatible printer cables. With you printer placed on the deck of the Ap-1301, attach the printer and power cables.
AP-1301 i/t Operator’s Guide Document Revision: 100102 The Best Place To Put Your System The best place for your unit is in a climate-controlled area, free of dirt, dust, humidity, excessive heat, and electronic or electromagnetic interference. As your AP-1301 is network ready, you may want to locate it near a network jack. Place the AP-1301 i/t on a firm and steady work surface, allowing sufficient room for all of your work materials.
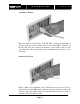
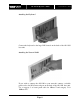
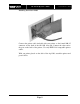
AP-1301 i/t Operator’s Guide Orientation to the Different Parts - AP-1301i Front View Rear View Page 11 Document Revision: 100102
AP-1301 i/t Operator’s Guide Document Revision: 100102 Orientation to the Different Parts – AP-1301t Front View (front bracket) Rear View (rear bracket) Page 12
AP-1301 i/t Operator’s Guide Document Revision: 100102 Removing Packing Restraints The AP-1301 ships with a picker mechanism restraint, to ensure that the unit is not damaged in transit. This restraint must be removed before operation or power-on. If you have not already done so, remove the restraint before turning the unit on. Save the styrene restraint, in the event that you need to transport the unit. Input and Output Spindles The spindles serve as the containers to store the blank and printed CD-R’s.
AP-1301 i/t Operator’s Guide Document Revision: 100102 Spindle Designations The AP-1301 uses three spindles. Spindle 1 is dual purpose, and is used for both input and output. Spindle 2 is for output only. Spindle 3, like spindle 1, is also dual purpose and is used for both input and output. To start, place the desired number of discs to be printed on spindle 1. If you wish to do a quantity greater than one spindle allows, place the remainder on spindle 3.
AP-1301 i/t Operator’s Guide Document Revision: 100102 System Startup Locate the switch on your SVGA monitor and turn it to the on position. Next, locate the printer power switch (refer to separate printer documentation if you need help). Next, we must verify that the voltage selector switch is set correctly on each module; it is located between the two power receptacles. The AP-1301 supports both 115 VAC and 230 VAC at 50 ~ 60 Hz.
AP-1301 i/t Operator’s Guide Document Revision: 100102 • Now that you have confirmed the proper voltage setting, it is time to turn the unit on. • Make sure you power on the unit using the switch seen below, which is located on the back of the AP 1301. • The AP-1301 is Windows NT based and may take a couple of minutes to start up. Upon a successful startup, you will be greeted by the Windows NT Logon screen.
AP-1301 i/t Operator’s Guide Document Revision: 100102 Be sure to close all applications, especially the CD-3703 application itself, as it will conflict with the Printer Alignment Utility. Locate the “Printer Alignment” ICON depicted to the left, on the desktop. Double-click on it to Printer Alignmen launch the Printer Alignment Utility. The splash screen t Utility below will be displayed. • Place a disc on the input spindle. This is the spindle at the right front side of the unit. Click on Perform Test.
AP-1301 i/t Operator’s Guide Document Revision: 100102 • Follow the on-screen instruction and then click on Yes. If you click on No, the process will be aborted. You will be asked: • Once the printer’s tray is fully extended, click on Yes to continue or No to abort the process. • Check the positioning of the disc in the tray. If not perfectly centered, adjust the printer’s position by loosening the screws that hold the brackets in place, and then adjust the printer in the appropriate direction.
AP-1301 i/t Operator’s Guide Document Revision: 100102 Startup the AP-1301 Software When the system restarts, logon as you did before. After logging on, click the AP-1301 ICON to bring up the main AP-1301 application.
AP-1301 i/t Operator’s Guide Document Revision: 100102 Operation If you have not already done so, be sure that you have read the section entitled “Getting Started”. This section walks you through the preliminary setup of the unit, which must be accomplished prior to operation. The AP-1301 is broken up into three tabs. The Status Tab, the Job Tab, and the Label Designer Tab. The Status Tab shows what print job is running, what is queued to run, and what has been completed.
AP-1301 i/t Operator’s Guide Document Revision: 100102 The Label Designer Tab To start designing your CD, click on the Label Designer tab. Here is where we have the ability to customize your CD’s appearance with text and graphic images. The Label Designer tab supports a variety of graphic image formats, as well as any installed Windows True Type font. The Label Designer tab is dominated by two concentric circles, which graphically represent the appearance of the CD you are designing.
AP-1301 i/t Operator’s Guide Document Revision: 100102 The Label Designer Menu Bar As we look at the AP-1301’s Label Designer, we see the top horizontal toolbar, containing New, Open, Save, Delete, and Help (Please take note that HELP was not implemented for this revision). The menu button functions are as follows: Clicking on the new button will clear the screen, and allow you to start on a new label design. Allows you to open an existing label file (*.LBL).
AP-1301 i/t Operator’s Guide Document Revision: 100102 Used to add text to the label being designed. Select this tool, and click on the location where the text should appear. Use the “Point” tool to reposition it, or double click on the text created to modify it. To change fonts or colors, you must first use the “Select Font” tool, and then the “Type Text” tool. Allows you to import a graphic image file. It is best to use images optimized for the current printer.
AP-1301 i/t Operator’s Guide Document Revision: 100102 images by clicking on one of the corner handles of the graphic, and dragging it to increase or decrease its size. • To change the attributes of a text element, simply double-click on it. To change the text fill in the box, or to change the font, click on the Select Font button displayed.
AP-1301 i/t Operator’s Guide Document Revision: 100102 The Job Tab Once you have designed your CD, the Job Tab is your next stop. It is through this tab of the AP-1301 application that all print jobs are submitted. A print job can be thought of simply as a work order. This work order defines how many discs are to be produced, and which artwork is to be used. New jobs are created here. In addition, you may recall and use previously saved jobs.
AP-1301 i/t Operator’s Guide Document Revision: 100102 The Job Tab menu button functions are as follows: Clicking on the new button will clear the screen and allow you to create a new job. Allows you to open an existing job file (*.job). Allows you to save the job currently displayed for future use. Displays the version information of the AP-1301 application currently running. Not currently implemented Creating a print Job In order to start printing, you must first create a print job.
AP-1301 i/t Operator’s Guide Document Revision: 100102 you to print relative to the artwork on a pre-silk screened disc. In other words, you can have your CD-Rs silk screened with generic artwork, and then customize them by printing in an area left for the title. The SmartAlign feature will rotate the disc before printing, so that the overprint is in the area left for the title or unique information. LABEL FILE The “Label File” field displays the desired label file to be used for printing. Only “.
AP-1301 i/t Operator’s Guide Document Revision: 100102 • By default, the LABELS folder will open. Click on and highlight the desired file you are selecting. • Click on the “open” button, and the highlighted label file will be selected. QUANTITY • Enter the desired number of discs to print, of the selected label file. COMMENTS • This is an optional field. Any comments, such as job description, may be entered here.
AP-1301 i/t Operator’s Guide Document Revision: 100102 The above three buttons will also be found on the Job Tab. “Open” and “Save” have the same functionality as the buttons on the horizontal tool bar, appearing at the top left of the Job Tab. The buttons function as follows: Open Job • Performs the same task as Open does in the top horizontal toolbar. • Allows you to open an existing job file. Save As • Saves the JOB file as it appears on your screen.
AP-1301 i/t Operator’s Guide Document Revision: 100102 Status Screen The Status Tab allows you to monitor the progress of jobs. As you view the Status tab, you will notice 3 panes. Each of these panes shows the different “states” of a job. The top pane shows you which jobs are pending, the second pane shows which job is running, and the third and bottom most pane shows which jobs have been completed or have failed.
AP-1301 i/t Operator’s Guide Document Revision: 100102 Total • This field shows the total number of CDs that are requested, per job. Requested • This field displays the time the job was submitted to the CD-3703 Eclipse Job Queue Screen Here you see how a job appears when it is in the Job Queue pane: Note: In this example, you see a job waiting to be processed.
AP-1301 i/t Operator’s Guide Document Revision: 100102 Running Jobs Within the Running Jobs pane, there are 6 fields: JobID • This is the JOBID of the active job. Total • Represents the desired number of discs to print. Good • Represents the number of discs successfully completed. Bad • Represents the number of discs that have failed to print correctly. If this number is high, you may need to readjust the alignment of the printer on the deck of the AP-1301.