Baxter (Model 9100) Installation Manual Baxter Hardware Must Be Installed Prior To Software Installation. Once Installed, Riptastic and Backup Platinum Must Be Launched From Scribe Premium Utilities Tab To Work. Only MF Digital Version of Premium Software Packages Will Operate In Baxter- Do NOT USE Versions From Manufactures Site… w w w . m f d i g i ta l .
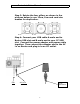
Baxter Installation Manual Document Revision 3/27/07 Quick Setup Step 1. Install the four pillars on the Input Bin Note: The bottoms of the Pillars have 2 different size posts, large and small. Place the pillars with similar posts diagonally across from each other into the corresponding holes. Step 2. Attach the Input Bin to Baxter Step 3. Attach USB Cable to Baxter and your PC. Step 4. Connect the power adapter to Baxter and Plug in to outlet. Turn Baxter on. Step 5. Turn PC on. Step 6.
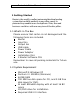
Baxter Installation Manual Document Revision 3/27/07 1 Getting Started Baxter is the world’s smallest automated desktop loading system that could fit perfectly in any office space. Its patented tray enables users to duplicate 12cm, 8cm and business-card discs with one easy turn of the disc pillars. 1.1 What’s In The Box Please ensure that carton is not damaged and the following items are included.
Baxter Installation Manual Document Revision 3/27/07 2 Hardware Installation 2.1 Front View 1. 2. 3. 4. 5. 6. Robotic Arm Status indicator Green: Ready Yellow: Burning Red: Error Output Bin CD/DVD Burner Input Bin Rejects – Baxter discards rejects over the top of (3) Output Bin 2.2 Rear View 1. 2. 3. 4.
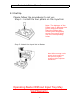
Baxter Installation Manual Document Revision 3/27/07 2.3 Set Up Please follow the procedures to set up: Step 1: Install the four pillars on the Input bin Note: The bottoms of the Pillars have 2 different size posts, large and small. Place the pillars with similar posts diagonally across from each other into the corresponding holes.
Baxter Installation Manual Document Revision 3/27/07 Step 3: Rotate the four pillars as shown in the pictures below to use 12cm, 8cm and card size medias for duplication. 8 cm 12 cm Card Size Step 4: Connect your USB cable A-male end to Baxter USB slot and B-male end to your PC USB slot. Connect the power adapter and power cable together. Then connect the adapter end to the AC In on Baxter and plug in to an AC outlet.
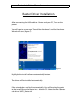
Baxter Installation Manual Document Revision 3/27/07 Baxter Driver Installation After connecting the USB cable to Baxter and your PC, Turn on the power. You will receive a message “Found New Hardware” and the Hardware Wizard will start. (figure 1) figure 1 Highlight the install software automatically button. The driver will be installed automatically. If the wizard does not find it automatically, You will be asked to point to the install file on the Baxter Inst allation CD.
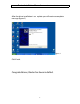
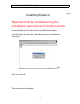
Baxter Installation Manual Document Revision 3/27/07 After the driver installation is co mplete you will receive a complete message (figure 2) figure 2 Click Finish. Congratulations, Baxter has been installed.
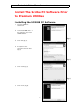
Baxter Installation Manual Document Revision 3/27/07 Install The Scribe PC Software Prior to Premium Utilities Installing the SCRIBE PC Software 1. Insert the SCRIBE PC software CD. 2. From the CD ROM drive o f the computer, click Install SCRIBE Software . (fig. 1) 3. Click Next (fig. 1). 4. Accept the license agreement and click Next (fig. 2). (fig. 2) 5. Click Install (fig. 3). (fig. 3) 6. Click Finish (fig. 4).
Baxter Installation Manual Document Revision 3/27/07 (fig. 4) Installing Riptastic Riptastic must be installed using the installation wizard prior to Scribe Launch. Insert the Riptastic CD. and run the setup file from windows. You will receive the message “ Would you like to install Riptastic now? (fig1) fig 1 Click Yes to Install. The Install wizard will appear.
Baxter Installation Manual Document Revision 3/27/07 Click Next. The License agreement screen will appear. Click I agree. Next you the Customer Information Screen will appear.
Baxter Installation Manual Document Revision 3/27/07 Type your name and company information and click next. Select the directory for the installation and click next. The confirm installation screen will appear. Click Next to continue.
Baxter Installation Manual Document Revision 3/27/07 After the program installs, you will receive an Installation Completed message. Click the close button. The Riptastic Installation is complete. Launch Riptastic via Scribe Launch Tab. At startup install the supplied License number and Riptastic is ready to use. Software Questions Related to Riptastic Software, Please Visit http://www.riptastic.com/help/index.
Baxter Installation Manual Document Revision 3/27/07 Installing The Backup Platinum Software Insert the Backup Platinum and run the setup file from windows. Backup Platinum must be installed using the installation wizard prior to Scribe Launch. The Welcome To Backup Platinum screen will appear. Click the Next button. You will receive the Read Me Screen.
Baxter Installation Manual Document Revision 3/27/07 After reading, click the Next button. The license Agreement screen will appear. Highlight the I accept this agreement and click Next. The Choose Destination Folder will appear.
Baxter Installation Manual Document Revision 3/27/07 Select the directory that you want to install Backup Platinum to and click next. The Start Installation Screen will appear. Click the Next button to continue. You will receive the Installation Complete message.
Baxter Installation Manual Document Revision 3/27/07 Backup Platinum Has Been Installed. Launch Backup Platinum via Scri be Launch Tab. At startup install the supplied License number and Backup Platinum is ready to use. Software Questions Related to Backup Platinum Software, Please Visit http://www.backupplatinum.com/help-online.
Baxter Installation Manual Document Revision 3/27/07 Important DVD Image Information If your DVD image file conforms to the UDF standard, but ends in the .ISO file extension, you will need to rename it .UDF before it can be used. * All .ISO images will not conform to .UDF standard so after converting .ISO to .UDF you must burn a single disc and check that disc thoroughly before duplicating. A simple browsing of the disc for proper folder structure is not sufficient.
How to reset Baxter’s Arm if it gets stuck. 1. Turn off the power Remove the power cord and USB Cord from behind Baxter. 2. Carefully, place Baxter on its side (label side). 3. On the bottom on the arm assembly there are two phillips screws on the silver bracket. Remove the two phillips screws. 4. The arm assembly has a hook and a slip notch that attaches to the drive base. You will need to push gently in an upwards motion to detach the arm assembly. 5.
6. Taking the arm assembly in your hand, look for the small silver motor that has a white plastic gear. Using your finger, rotate this gear so that the arm moves either in an upward or downward direction.