DIRECTOR EC Series Publishing System Operator’s Guide
DIRECTOR EC Series Operator’s Guide Document Revision: 080904 Table of Contents WELCOME TO THE DIRECTOR EC SYSTEM...................................................................................................5 COPYRIGHT NOTICE ...................................................................................................................................................5 CD-R/RW RECORDER WARRANTY POLICY .................................................................................................
DIRECTOR EC Series Operator’s Guide Document Revision: 080904 STARTING THE DIRECTOR EC APPLICATION .........................................................................................................21 DIRECTOR EC APPLICATION LAYOUT ..................................................................................................................21 DIRECTOR EC APPLICATION CONFIGURATION .....................................................................................................
DIRECTOR EC Series Operator’s Guide Document Revision: 080904 SELECTING CD CAPACITY ........................................................................................................................................53 REMOVING TRACKS..................................................................................................................................................54 EDITING A TRACK ...........................................................................................................
DIRECTOR EC Series Operator’s Guide Document Revision: 080904 CHANGING THE COMPUTER NAME ...........................................................................................................................81 CHANGE THE ANONYMOUS ACCOUNT ......................................................................................................................83 APPENDIX A: WORKING WITH CD-REWRITABLE (CD-RW) DISCS .......................................................85 CD-RW SUPPORTED FORMATS ..........
DIRECTOR EC Series Operator’s Guide Document Revision: 080904 Welcome to the Director EC System Copyright Notice Copyright ©2003, 2004 by MF DIGITAL. All rights reserved. This manual and the accompanying illustrations may not be copied, reproduced, electronically transmitted, or translated into another language, in whole, or in part, without the written consent of MF DIGITAL. MF DIGITAL, CD/DVD-5906ec, Director EC, Scribe EC, Scribe EC Standalone, are trademarks of MF DIGITAL.
DIRECTOR EC Series Operator’s Guide Document Revision: 080904 About MF Digital Thank you for purchasing MF Digital’s DIRECTOR EC publishing system. MF Digital manufactures a wide variety of software and audio duplication and production equipment, including manual and fully automatic CD and DVD duplicators and printers. We hope you will consider us for all of your production needs.
DIRECTOR EC Series Operator’s Guide Document Revision: 080904 Installing the DIRECTOR EC Carefully remove the DIRECTOR EC publishing system from the shipping container. Inspect the contents and verify them against the packing slip. Report any errors in shipping as soon as possible. What’s In The Box Your DIRECTOR EC is a complete publishing system containing all necessary components.
DIRECTOR EC Series Operator’s Guide Document Revision: 080904 The Best Place To Put The DIRECTOR EC The best operating location for the DIRECTOR EC publishing system is in a climate controlled area, free of dirt, dust, humidity, excessive heat, and electronic or electromagnetic interference. Room temperature should be between 65 and 75 degrees Fahrenheit, or between 18 and 23 degrees Celsius.
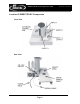
DIRECTOR EC Series Operator’s Guide Location Of DIRECTOR EC Components Front View Rear View Page 9 Document Revision: 080904
DIRECTOR EC Series Operator’s Guide Document Revision: 080904 Location Of CD-R/RW and DVD ±R/±RW Recorder Parts And Controls ProDRIVE 52x Legend 1. 2. 3. 4. 5. 6. Disc tray - Discs are loaded and removed from this tray. Pressing the eject button will open the tray when the power is switched on to the Director EC. Emergency eject pinhole - In the event that the disc tray will not open by pressing the eject button, insert the tip of a large paper clip into this hole and push.
DIRECTOR EC Series Operator’s Guide Document Revision: 080904 Removing Packing Restraints The DIRECTOR EC ships with a picker arm restraint to reduce the possibility of damage in transit. This restraint must be removed before operation or power-on. Remove the foam block above the transfer arm. Save the foam block, as you will need to return it to its place if you need to transport the unit in the future.
DIRECTOR EC Series Operator’s Guide Document Revision: 080904 Installing The Printer Before operating the DIRECTOR EC, the printer must be properly mounted and aligned. In addition, please familiarize yourself with the documentation included with the Spectrum2 thermal CD printer. Preparing the Prism Plus Printer (fig.
DIRECTOR EC Series Operator’s Guide Document Revision: 080904 1. With a Torx head screwdriver, remove the rubber feet from the bottom of the printer (fig. 1). 2. Using the flat head screws provided, attach the printer plate to the bottom of the printer as seen in (fig. 2). (fig. 1) (fig. 2) NOTE: Fig 3 – Fig 5 shows placement of Spectrum 2 printer. Placement for Prism Plus is similar. 3. Place the printer / plate onto the drive bay (fig. 3) 4.
DIRECTOR EC Series Operator’s Guide Document Revision: 080904 Installing The Monitor, Keyboard And Mouse Before operating the DIRECTOR EC, the monitor, keyboard and mouse must be attached. Connecting The Monitor • Place the monitor on either side of the DIRECTOR EC unit. • Make sure the monitor power switch is set to the off position. • Connect one end of the power cord to the VAC Out on the monitor and the other to the wall power outlet.
DIRECTOR EC Series Operator’s Guide Document Revision: 080904 Installing Firewire Cables The following illustrations show firewire installation on the Director EC. Please connect the firewire cables as illustrated below.
DIRECTOR EC Series Operator’s Guide Document Revision: 080904 Starting the DIRECTOR EC For The First Time Before CD creation or duplication can begin it is necessary to review a few details. Power Connection And Settings • Make sure the DIRECTOR EC power switch is set to the off position. Also, set the PC switch to off or “0”. • Verify that the voltage selector switch on the back of the unit is set correctly. The DIRECTOR EC supports both 115 VAC and 230 VAC at 50 ~ 60 Hz.
DIRECTOR EC Series Operator’s Guide Document Revision: 080904 Starting Up • • • • Flip the DIRECTOR EC power switch to the “on” position. Flip the host computer’s power switch to the “on” position. Switch on the power to the printer. Wait a minute or two while the system starts up. A series of diagnostic information will be displayed and once complete the unit will display the Begin Logon dialog box. • Enter “MF Digital” in lowercase letters for the password.
DIRECTOR EC Series Operator’s Guide Document Revision: 080904 Aligning The Drive Tower and Printer The printer must now be manually positioned relative to the DIRECTOR EC’s disc picking mechanism. Once the correct position has been determined the drive tower and printer retaining guides are screwed down tight to hold the drive tower and printer in place. • From the DIRECTOR EC’s desktop screen, double click the “EC Alignment Utility” icon.
DIRECTOR EC Series Operator’s Guide Document Revision: 080904 • Click the Perform Test button. The screen will now display: • • • • Manually open drive tray Place a blank disc on the input spindle. Click the Yes button. The disc will be loaded from the input spindle and over the open drive tray, so that you may properly align the drive tower • Click the Yes button. • The disc will be loaded onto the drive tray. Observe the disc’s position on the tray. The CD fits into the inset on the drive tray.
DIRECTOR EC Series Operator’s Guide Document Revision: 080904 • After aligning the drive tower, repeat the same procedure to align the printer.
DIRECTOR EC Series Operator’s Guide Document Revision: 080904 Application Startup The DIRECTOR EC is a state-of-the-art CD publishing system and duplicator. It is designed to create, duplicate and verify most standard compact disc formats. This startup section will guide you through starting and configuring the DIRECTOR EC application.
DIRECTOR EC Series Operator’s Guide Tabs: System Status Create Job Data Image Editor Audio Image Editor Label Editor Resources Info System Setup System Log Document Revision: 080904 Displays the status of jobs after they have been submitted for production. Brings together the data or audio contents and label components of a CD so it can be produced. Specifies the contents of a data CD to be recorded. Specifies the contents of an audio CD to be recorded. Creates labels to be printed on the surface of CDs.
DIRECTOR EC Series Operator’s Guide Document Revision: 080904 The System Setup tab is divided into a number of information fields that must be completed. Printer Driver (Required) The Printer Driver pull-down is used to indicate to the DIRECTOR EC the type of printer that is installed. • Click the Printer Driver pull down and select your printer Ex: “MF Digital Spectrum”.
DIRECTOR EC Series Operator’s Guide Document Revision: 080904 • Click the Operator’s E-mail Address field and enter an email address. Leave the field blank if the DIRECTOR EC is not attached to a network or if you do not want to receive unit attention messages. Recording Speed (Required) The Recording Speed pull-down allows you to set the recording speed as determined by the capabilities of the recorders installed in the DIRECTOR EC.
DIRECTOR EC Series Operator’s Guide Document Revision: 080904 also be in use for this particular job. Asynchronous mode is more demanding of system resources. The modes of operation are: Mode Description Disabled Jobs=Synchronous (FIFO), Drives=Synchronous When the setting is “disabled”, jobs are processed on a first in/first out (FIFO) basis such that they will be kept together when placed on the output spindle. For example, let us say two jobs of one piece each are submitted.
DIRECTOR EC Series Operator’s Guide Document Revision: 080904 • Click the ASYNCHRONOUS MODE pull down and select the desired “disabled” or “level O” setting (level 1 and level 2 not used). Default Job File Folder (Required) The DEFAULT JOB FILE FOLDER field is used to specify the default location where job files (*.JOB) will be saved. The factory setting (C:\CDDIRECTOR\Jobs\) should be sufficient for most uses.
DIRECTOR EC Series Operator’s Guide Document Revision: 080904 Creating New Privileges Profile Control access to the DIRECTOR EC by restricting use to only authorized users. The main intent of this is for jobs submitted remotely through the included Java Client, or through other client side applications. New users must first be entered into the DIRECTOR EC’s database and their privileges or permissions assigned.
DIRECTOR EC Series Operator’s Guide Editing Privileges Profile name Max quantity per day Max quantity per month Max quantity per quarter Max quantity per request Max requests per day Max requests per month Max requests per quarter Max priority • Document Revision: 080904 Required. Enter the profile name. Required. Enter the maximum number of discs this type of user is allowed to record/print per day. Required. Enter the maximum number of discs this type of user is allowed to record/print per month.
DIRECTOR EC Series Operator’s Guide Document Revision: 080904 Deleting Existing Privileges Profile To delete an existing privileges profile: • Click the privilege profile you wish to delete and click the Delete button below the PRIVILEGES window. • Click the Yes button to confirm. Note: You may NOT delete a Profile while users are assigned to it. You must first either delete or assign the users a new profile, then the profile may be deleted.
DIRECTOR EC Series Operator’s Guide Street Address 1 Street Address 2 City State/Province Zip/Postal Code Country Phone Fax Email Date Entered Document Revision: 080904 (31 characters maximum, A to Z, 0 to 9) Optional. Enter the user’s street address. (63 characters maximum, A to Z, 0 to 9) Optional. Enter the user’s street address. (63 characters maximum, A to Z, 0 to 9) Optional. Enter the user’s city. (31 characters maximum, A to Z, 0 to 9) Optional. Enter the user’s state or province.
DIRECTOR EC Series Operator’s Guide Document Revision: 080904 Editing Existing Users To edit an existing user: • Click the username you wish to edit and click the Edit button below the USERS window and the user information boxes will be displayed. • Make any changes as needed then click the Save To Database button. Deleting Existing Users To delete an existing user: • Click the username you wish to delete and click the Delete button below the USERS window. • Click the Yes button to confirm.
DIRECTOR EC Series Operator’s Guide Document Revision: 080904 System Drives The SYSTEM DRIVES window allows you to specify which hard disk drives the DIRECTOR EC uses exclusively. The factory settings should be sufficient for most uses. Director EC-4: Be sure that: D:, E:, F:, and G: are selected. DO NOT SELECT C:. Director Office Publisher (EC-2): Be sure that: D:, and E: are selected. DO NOT SELECT C:.
DIRECTOR EC Series Operator’s Guide Document Revision: 080904 Trusted Drives The TRUSTED DRIVES window allows you to specify which hard disk drives are capable of sustaining the data transfer rate necessary for recording CDs. The C: drive (which houses the DIRECTOR EC’s operating system and application) should never be used as a recording source. The factory settings should be sufficient for most uses. To change the TRUSTED DRIVES: • Select or de-select the check box next to the appropriate drive.
DIRECTOR EC Series Operator’s Guide Document Revision: 080904 Controlling the DIRECTOR EC From Custom Applications In addition to operating the DIRECTOR EC from its console, you have the option to remotely control the system from anywhere on the network using your own custom applications or scripts. This is accomplished using the DIRECTOR EC’s Application Program Interface (SmartAPI) after initial configuration using the System Setup tab.
DIRECTOR EC Series Operator’s Guide Document Revision: 080904 Creating Disc Labels The first step in creating a CD is to create a label that will be printed on the surface of the disc. The DIRECTOR EC’s built-in label design software provides a quick and easy way to create simple disc labels that contain text and graphics. More sophisticated labels can be created by using the provided software included with the your printer.
DIRECTOR EC Series Operator’s Guide Document Revision: 080904 Label Menu Buttons: New Creates a new disc label. Open Opens an existing disc label file (*.LBL). Save Saves the current disc label. Cut Cuts the selected item Select Used to select the font, style, size and color before creating test Font on the disc label. Used to select a piece of text, date field or graphic image so it Point can be moved, modified or deleted. Mode Text Mode Import Picture Used to create text on the disc label.
DIRECTOR EC Series Operator’s Guide Document Revision: 080904 Creating Text Using the Text Mode tool, you can create horizontal text anywhere on your disc label. In addition, once the text has been entered it can be repositioned and its font and other attributes changed. To create text: • Click the Text Mode button on the toolbar. • Click where you want the type to begin. • Enter the text you want.
DIRECTOR EC Series Operator’s Guide Document Revision: 080904 • To change the font, style, size or color, click the Select Font button. The screen will now display: • After making the changes click the OK button. • Click the OK button. Importing Graphics Using the Import Picture tool, you can place graphics created using other software anywhere on your disc label. To import a graphics file: • Click the Import Picture button on the toolbar.
DIRECTOR EC Series Operator’s Guide Document Revision: 080904 Resizing Graphics To proportionally resize a graphic image after it has been imported: • Click the Point button on the toolbar. • Click the graphic image you wish to resize. A bounding box will appear around the image with eight solid squares (handles). • Click and drag the appropriate handle until the image is the correct size and release the mouse button.
DIRECTOR EC Series Operator’s Guide Document Revision: 080904 Repositioning Text, Graphics and Dates To reposition a piece of text, a graphic image or a date field after it has been created or imported: • Click the Point button on the toolbar. • Click and hold on the selected text or graphic image you wish to move. • Drag the text or graphic image to the desired location and release the mouse button.
DIRECTOR EC Series Operator’s Guide Document Revision: 080904 Deleting Text, Graphics And Dates To delete a piece of text, a graphic image or a date field after it has been created or imported: • Click the Point Mode button on the tool bar. • Click the piece of text or graphic image you wish to delete. • Click the Delete button on the menu bar or press the DELETE key on the keyboard.
DIRECTOR EC Series Operator’s Guide Document Revision: 080904 Opening Existing Disc Labels Once a disc label has been saved it can be modified at a later date. To open an existing disc label file: • Click the Open button on the menu bar. • Select the appropriate file and click the Open button.
DIRECTOR EC Series Operator’s Guide Document Revision: 080904 Creating Disc Images After creating a label, the next step in constructing a CD is to specify its contents (disc image). The DIRECTOR EC creates industry standard data (Mode 1 ISO 9660 level 2 with Joliet extensions) and audio (Red Book) CDs from scratch as well as duplicates existing CDs authored in most formats.
DIRECTOR EC Series Operator’s Guide Document Revision: 080904 Data Image Editor Toolbar Horizontally at the top of the panes, which contains eight buttons: New Open, Save, Properties, Disc Capacity, CD, DVD, Wildcard. Data Image Editor Toolbar: New Folder Creates a new volume. Open Opens an existing folder on the disc image. Save Saves files or folders .
DIRECTOR EC Series Operator’s Guide Document Revision: 080904 Static And Dynamic Content The DIRECTOR EC allows CDs to be created from both static and dynamic content. A finished CD created from static content will contain the exact files and folders that are specified when the disc image is created. A finished CD created from dynamic content will contain the files and folders that exist in specified locations at the time the job is submitted for recording (rather than when the disc image is created).
DIRECTOR EC Series Operator’s Guide Document Revision: 080904 Adding Files And Folders • Click the desired file or folder in the top left or right pane (source) and hold down the mouse button. • Drag the file or folder over the CD icon in the lower right then release the mouse button • Files and folders can also be added to the disc image using the Open button. A box appears choose the image and click he Open button the image will be added.
DIRECTOR EC Series Operator’s Guide Document Revision: 080904 Saving The Current Disc Image File Once a data disc image has been created, it must be saved for the DIRECTOR EC to use it as a data source for recording. Disc images can either be saved as script files (with an “ISC” extension) or physical image files (with an “ISO” extension). A script file (ISC) contains pointers to the source data files and is used as a guide at the time of recording the CD.
DIRECTOR EC Series Operator’s Guide Document Revision: 080904 To save a data disc image script file: • Click the Save button on the toolbar. The screen will now display: The file will automatically be saved with the .isc extension.
DIRECTOR EC Series Operator’s Guide Document Revision: 080904 • Click the OK button. The screen will now display: • Select the volume and directory where you want to save the script file. • Enter the name for the script file and click the Save button. To save a disc physical image file: • Click the Save button on the toolbar. The screen will now display: • Select the volume and directory where you want to save the image file. • Enter the name for the image file. • Change you the Save as type: to ISO.
DIRECTOR EC Series Operator’s Guide Document Revision: 080904 Volume Properties Volume Label Publisher Data Preparer Copyright File Enter the name you want to call the CD. Enter the name of the publisher. Enter the name of the person who prepared the CD. Enter the file name that provides copyright information about the CD. Abstract File Enter the file name that describes the contents of the CD. Bibliographic File Enter the file name that provides bibliographic information about the CD.
DIRECTOR EC Series Operator’s Guide Document Revision: 080904 Loading An Existing Script File Once a data disc image script file has been saved it can be modified at a later date. To load an existing script file: • Click the Load Script button on the toolbar. The screen will now display: • Select the appropriate file and click the Open button.
DIRECTOR EC Series Operator’s Guide Document Revision: 080904 The Audio Image Editor tab is divided into three panes. The top left pane lists all the names and icons of the disk drives available to the DIRECTOR EC, as well as files and folders on the currently selected disk drive (source). The top right pane displays the contents of any item you click on in the top left pane along with its icon.
DIRECTOR EC Series Operator’s Guide Document Revision: 080904 Adding Tracks • As depicted below, drag one or more WAV / MP3 files onto the text. Multiple files may be selected by pressing and holding down the SHIFT or CTRL key while clicking on the tracks. SHIFT allows you to select a range of contiguous tracks, while CTRL allows you to randomly pick multiple tracks. As additional tracks are added, drag and drop them in at the desired insertion point.
DIRECTOR EC Series Operator’s Guide Document Revision: 080904 Removing Tracks • Right click on the audio track you wish to delete. • Choose Delete Track from the drop down menu. Editing A Track • Right click the track to be edited. The screen will now display: The right hand buttons have the following options: • Play Selection • Set IN Point • Set OUT Point • Remove Subindex These options allow custom changes to the tracks. Choosing OK sets the changes and Cancel cancels the changes.
DIRECTOR EC Series Operator’s Guide Document Revision: 080904 Changing ISRC Codes And Copy Prohibit Flags Note: DIRECTOR EC systems equipped with Pioneer DVD-R drives do not support MF Digital SmartDRIVE features. The INTERNATIONAL STANDARD RECORDING CODE (ISRC) is an optional 12-character descriptor that identifies a specific track on an audio CD.
DIRECTOR EC Series Operator’s Guide Document Revision: 080904 • To enable Copy Prohibit select the Copy Prohibit box so that it is checked, or uncheck the box to disable Copy Prohibit. Inserting, Editing And Removing Silence When assembling an audio CD disc image the DIRECTOR EC application does not insert silences (gaps) between tracks. To insert silence between tracks: • Right click the track that is to be edited. Choose “Edit” on the drop down menu • A pop up screen appears.
DIRECTOR EC Series Operator’s Guide Document Revision: 080904 • Click the up and down indicators to increase or decrease the duration of the silence (minutes, seconds, frames). • Click the OK button. To remove silence between tracks: • Click the silence indicator you wish to remove in the lower left pane and hold down the mouse button. • Drag the silence indicator over the trashcan in the bottom right of the • WaveMan tab and release the mouse button. • Click the Yes button.
DIRECTOR EC Series Operator’s Guide Document Revision: 080904 • Click the audio track you wish to edit in the lower left pane, and its existing sub-indexes will be displayed in the bottom right pane. • Double click the sub-index you want in the bottom right pane. The screen will now display: • Click the Insert Sub-index button. The screen will now display: • Click the up and down indicators to specify the new location of the subindex (minutes, seconds, frames). • Click the OK button.
DIRECTOR EC Series Operator’s Guide Document Revision: 080904 Saving The Current Audio Disc Image Once an audio disc image has been created it must be saved so that it can be used by the DIRECTOR EC as an audio source for recording. Disc images are saved as script files (with an “ISC” extension). To save an audio disc image script file: • Click the Save button on the toolbar. The screen will now display: • Select the volume and directory where you want to save the script file.
DIRECTOR EC Series Operator’s Guide Document Revision: 080904 Creating Jobs After creating a data or audio disc image, the next step in constructing a CD is to create or define a job. A job brings together the various elements of the CD (label, disc image, etc.) so they can be recorded and printed. Creating New Jobs To create a new job: • Click the Create Job tab. The screen will now display: The Create Job tab is divided into a number of check boxes and information fields that must be completed.
DIRECTOR EC Series Operator’s Guide Help Document Revision: 080904 Displays on-screen help. General Options Note: DIRECTOR EC systems equipped with Pioneer DVD-R drives do not support MF Digital SmartDRIVE features. Vertically along the left side of the Job tab is a series of nine check boxes: Copy, Verify, Print, Print First, Simulate, Archive, Align, SmartGuard Media.
DIRECTOR EC Series Operator’s Guide Document Revision: 080904 SmartGuard Media *** 48x ProDRIVE only *** This option, when the only item checked, allows you to generate SmartGUARD Media for use with MF Digital stand-alone duplicators. SmartGuard Media allows you to lock-in your stand-alone duplicator to specific media giving the owner control over what media is used. DIRECTOR ECs equipped with Pioneer DVD-R drives or any drive other than the ProDRIVE 48x, DO NOT support MF Digital SmartDRIVE features.
DIRECTOR EC Series Operator’s Guide Document Revision: 080904 Image (needed if “Copy” option is checked) The IMAGE field is used to specify the data or audio disc image, (ISC or ISO file) that was previously created, to be used as the data or audio source for recording. The DIRECTOR EC also accepts standard Mode 1 data physical image files (such as ISO 9660, MacOS HFS, Unix UFS and Rock Ridge, etc.
DIRECTOR EC Series Operator’s Guide Document Revision: 080904 • Select the appropriate file and click the Open button. Leave the field blank if no label is to be printed.
DIRECTOR EC Series Operator’s Guide Document Revision: 080904 SmartGuard Media ID Note: DIRECTOR EC systems equipped with drives other than the 48 ProDRIVE such as Pioneer DVD-R drives or the 52x ProDRIVE do not support this feature. This option allows you to create SmartGUARD Media for use with MF Digital stand-alone duplicators (CD-5000 or Scribe EC Standalone). SmartGuard Media allows you to lock-in your stand-alone duplicator to specific media, giving the owner control over what media is used.
DIRECTOR EC Series Operator’s Guide Document Revision: 080904 Saving The Current Job Once a job has been created it can be saved and used by the DIRECTOR EC for future recording. Job files are saved as job files with a “JOB” extension. To save a job file: • Click the Save button on the menu bar. The screen will now display: • Select the volume and directory where you want to save the job file. • Enter the name for the job file and click the Save button.
DIRECTOR EC Series Operator’s Guide • Select the appropriate file and click the Open button.
DIRECTOR EC Series Operator’s Guide Document Revision: 080904 Submitting Jobs After defining or creating a job, the final step in constructing a CD is to submit the job for production. During the production process the DIRECTOR EC uses the job as a guide or map for bringing together the various elements of the CD (label, disc image, etc.) to print and record as needed. The DIRECTOR EC processes up to eight different jobs simultaneously and offers unlimited job queuing.
DIRECTOR EC Series Operator’s Guide Document Revision: 080904 immediate status of the job (copying images, loading discs, copying discs, unloading discs, etc.), and the estimated time of completion (E.T.C). The lower pane is the COMPLETED JOBS window that lists all the jobs completed by the DIRECTOR EC.
DIRECTOR EC Series Operator’s Guide Document Revision: 080904 Removing A Job To remove a pending job from the queue so that it will not be produced: • Click the job you wish to remove in the JOB QUEUE window. • Click the Remove Job button. Clearing The Completed Jobs List To clear the list of completed jobs: • Click the Clear List button. Starting A New Job To start a new job: • Click the New button.
DIRECTOR EC Series Operator’s Guide Document Revision: 080904 Viewing Logs The DIRECTOR EC maintains a comprehensive database of all jobs completed by the unit. The collected information is useful for a variety of reasons such as, tracking disc usage, helping to diagnose problems, or even for billing clients. The Log tab provides an easy way to review the history of all jobs completed by the DIRECTOR EC. To display the DIRECTOR EC’s history log: • Click the System Log tab.
DIRECTOR EC Series Operator’s Guide Document Revision: 080904 Deleting Individual Job Records To delete a job record from the history log: • Click the job name you wish to delete and click the Delete Record button at the bottom of the JOBLOG window. Deleting All Job Records To delete all job records from the history log: • Click the Purge button at the bottom of the JOBLOG window.
DIRECTOR EC Series Operator’s Guide Document Revision: 080904 Duplicating Existing CDs In addition to creating industry standard data and audio CDs source files, the DIRECTOR EC also duplicates existing CDs authored in most formats. Creating An Image File The first step in duplicating an existing CD is to create an image file of it on the hard disk drive to be used as the master source for recording. Image files are saved with an “IMG” extension.
DIRECTOR EC Series Operator’s Guide Document Revision: 080904 • Select the volume and directory where you want to save the image file. Please note that depending upon the amount of data to be recorded the image file can occupy as much as 700 MB of hard disk space. • Enter the name for the image file and click the Save button. • Place your original CD to be duplicated (master disc) on top of the stack of blank discs on the input spindle. • Click the Submit Job button.
DIRECTOR EC Series Operator’s Guide Document Revision: 080904 Recording An Image File Once created, the image file of the master disc is used as the source for recording. To use the image file of the master disc as the recording source: • Click the Create Job tab. The screen will now display: • Adjust the general options and complete the information on the Create Job tab as required. When completing the IMAGE field specify the image file created from the master disc to be duplicated.
DIRECTOR EC Series Operator’s Guide Document Revision: 080904 Viewing Resources The Resource tab is a simple diagnostic tool that displays the hardware elements connected to the DIRECTOR EC. These include the disc autoloader, CD-R/RW recorders and the printer. To display the hardware elements connected to the DIRECTOR EC: • Click the Resources Info tab.
DIRECTOR EC Series Operator’s Guide Document Revision: 080904 Upgrading DIRECTOR EC Software Overview of the process Do not remove the previous version of Director EC software from the add/remove program applet. Note: • Download the zipped files • Unzip the downloaded files and save it as c:\cdDIRECTOR\cdDIRECTOR XXX • Reboot the PC • Run Setup.exe found in as c:\cdDIRECTOR EC\cdDIRECTOR XXX– choose all the default options Download Zipped files • Click on the link provided in the email.
DIRECTOR EC Series Operator’s Guide Document Revision: 080904 Extract the Zipped files • Unzip the downloaded files and save it as c:\cdDIRECTOR\cdDIRECTOR XXX • Browse to the location where the zipped file was saved. • Double Click on the cddirXXX.zip folder to open WinZip window. Click on [I agree] to open WinZip-cddirXXX window. • Click on Extract icon. Extract Window will appear. In the Folders/drives box select c:\cdDirector EC folder. You will see c:\cdDIRECTOR in the Extract to pull down box.
DIRECTOR EC Series Operator’s Guide Document Revision: 080904 Changing Computer Name 1. 2. 3. 4. Disconnect computer in the Internet Service Manager (ISM) Change the Computer name Change Anonymous user account and password Reboot the computer Disconnecting computer in the Internet Service Manager (ISM) • From desktop Click start, settings, control panel at this point the screen will appear as below. • Double click the administrative tools – the following window will appear.
DIRECTOR EC Series Operator’s Guide Document Revision: 080904 • Right Click on the computer icon with the name results in the following window • Right Click on the computer name to reveal the following window Although “Connect” is highlighted, select disconnect. When computer name is changed, a reboot is required and upon reboot ISM will automatically connect. Now you are able to change the Computer name as follows.
DIRECTOR EC Series Operator’s Guide Document Revision: 080904 Changing the Computer Name • From desktop, right click on the computer icon and click on Properties to open System Properties window.
DIRECTOR EC Series Operator’s Guide Document Revision: 080904 • Key in the new computer name in the computer name box, and click [OK]. Need to reboot the system for the new name to be effective.
DIRECTOR EC Series Operator’s Guide Document Revision: 080904 Change the Anonymous Account • Open ISM window as instructed previously • Right clicking on the default website will open the following window • Right Click on the properties, select Directory Securities tab to reveal the following Page 83
DIRECTOR EC Series Operator’s Guide Document Revision: 080904 • Click the [Edit] button to edit anonymous access in the authentication control window • Click browse to select the user, select the user in window that you would like to change The “Look In” window should default to the new computer name, select the user and click [OK], Manually key in the user password. Leave the check box “Let IIS control the password” blank. Click [OK] to effect the change.
DIRECTOR EC Series Operator’s Guide Document Revision: 080904 Appendix A: Working With CD-ReWritable (CD-RW) Discs In addition to working with CD-Recordable (CD-R) discs, the DIRECTOR EC can also rewrite CD-ReWritable (CD-RW) discs. CD-R discs are writeonce and can be read on any CD audio player, CD-ROM and MultiRead DVD-ROM drive. CD-RW discs can be rewritten to as many as 1,000 times and are read using MultiRead CD-ROM (usually 24x and faster) and DVDROM drives.
DIRECTOR EC Series Operator’s Guide Document Revision: 080904 Appendix B: Supported Formats For Duplicating Originally designed for audio use the Compact Disc (CD) evolved quickly and now employs a wide variety of formats for audio, data and multimedia applications. The following is a list of the most popular formats currently supported for duplicating by the DIRECTOR EC. Periodic software updates will be made available to deal with new formats as they appear.