Ripstation v4.4.13.0 Operating Manual Ripstation A Division of Formats Unlimited, Inc 155 Sherwood Avenue Farmingdale, NY 11735 T: +1 631 249 9393 F: +1 631 249 9273 Authors: Robert Warnock & Patrick McGrath support@mfdigital.com www.mfdigital.com/techsupport.
© Copyright 2013 Copyright All rights within this document and related software belong to Formats Unlimited. Ripstation is a registered trademark of Formats Unlimited. BY USING THIS SOFTWARE YOU ARE AGREEING TO THESE TERMS AND CONDITIONS. This software (the SOFTWARE) is prepared as a solution to dealers, systems integrators. This SOFTWARE is provided as is and with warranty only as detailed in the applicable License agreement.
Software EULA Software EULA End User Software License Agreement for Ripstation Software NOTICE TO ALL USERS: PLEASE CAREFULLY READ THE FOLLOWING LEGAL AGREEMENT ("AGREEMENT") FOR THE LICENSE OF Ripstation ("SOFTWARE") BY Formats Unlimited, Inc. ("FUI"). BY CLICKING THE ACCEPT BUTTON OR INSTALLING THE SOFTWARE, YOU (EITHER AN INDIVIDUAL OR A SINGLE ENTITY) CONSENT TO BE BOUND BY AND BECOME A PARTY TO THIS AGREEMENT.
Software EULA 100-5-01-000 b. Remedies. FUI and its suppliers' entire liability and your exclusive remedy for any breach of the foregoing warranty shall be, at FUI’s option, either (i)return of the purchase price paid for the license, if any, or (ii) replacement of the defective media in which the Software is contained. You must return the defective media to FUI at your expense with a copy of your receipt. This limited warranty is void if the defect has resulted from accident, abuse, or misapplication.
Contents 100-5-01-000 Overview Ripstation v4.4 is a suite of software to allow for batch transfer and encoding of CD material to digital music files utilising MF Digital’s 7600 series robotic autoloaders. The application operates on the Windows XP Platform. The product is designed for use by individuals, system integrators and service providers and offers flexibility, ease of use and high throughput at the core of its operation. Ripstation 4.
Contents 100-5-01-000 Contents 1.0 HARDWARE INSTALLATION 8 1.1 ROBOTIC HARDWARE 1.2 STEP-BY-STEP GUIDE OF ROBOTIC HARDWARE – 7602/4 1.2.1 STEP ONE – REMOVE THE PACKING CONSTRAINTS 1.2.2 STEP TWO– PLUG IN THE PERIPHERALS 8 8 8 8 2.0 RIPSTATION QUICK START GUIDE 9 3.0 MAIN USER GUIDE 11 3.1 KEY FEATURES 3.2 SUPPORTED CODECS AND BIT RATES 3.3 RIPSTATION V4.4 MAIN SCREEN 3.3.1 BUTTON AND SCREEN OPERATIONS 3.3.1.1 Group 1: Button Controls 3.3.1.2 Group 2: CD-ROM Drive Display Bar 3.3.1.
Contents 4.0 HELP AND SUPPORT Ripstation v4.
Ripstation v4.4 Quick Start Guide 100-5-01-000 1.0 Hardware Installation This section details a set of instructions for correct assembly of the robotic hardware (if purchased). It begins by listing the items contained within the packaging. 1.1 Robotic Hardware The autoloader box should contain: 1. 2. 3. 4. The robotic hardware system Power cable These Quick Set-up Instructions Warranty & support documents 1.2 Step-by-step guide of Robotic hardware – 7602/4 1.2.
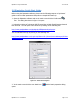
Ripstation v4.4 Quick Start Guide 100-5-01-000 2.0 Ripstation Quick Start Guide Before using the Ripstation software, please use the following steps as a ‘quick start’ guide to set the initial parameters and perform a simple MP3 batch rip. 1. Open the Ripstation software and on the main screen click the Preferences icon. The dialog box shown in figure 3.0 opens. 2. Select the ordering of lookups as GD3 First and the multiple FreeDB options Second then Click OK.
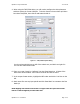
Ripstation v4.4 Quick Start Guide 100-5-01-000 4. When using the 7602/7604 device, you will need to configure the drive placement and then choose the correct COM port. To do this from the Source device pull down box select 7602/7604, then click the edit button beside it: Figure 2.1 – 7602/7604 Properties Dialog You then select which drives are left of the robotic arm, and which are right of it. You can also enable shake mode 6. Enter your name, 'testrip' or 'myfirstrip' into the Client Name box.
Ripstation v4.4 Main User Guide 100-5-01-000 3.0 Main User Guide 3.1 Key Features Batch encoding Batch reporting on successful & failed CDs Live batch process logging window Metadata lookup logging & reporting MFD series robotic autoloader and USB2.0 drive support Batch setup wizard Simultaneous multiple codec encoding Client detail entry SQL connectivity Support for GD3, FreeDB and CD Player.
Ripstation v4.4 Main User Guide 100-5-01-000 3.2 Supported Codecs and bit rates Installed as standard are the following codecs Codec Supported options FLAC MP3 Lossless VBR/CBR 64/128/192/256/320 kbps VBR/CBR 64/96/128/160/192/256/320 kbps Lossless Embedded ID3 wav Request WAV Sonos RIFF WAV VBR/CBR 96/128/160/192/224/320 kbps 45/64/80/96/112/128/160/192/224/256/320/499 kbps Lossless Lossless Lossless WMA WAV AAC OGG AIFF APE WAVPACK Ripstation v4.
Ripstation v4.4 Main User Guide 100-5-01-000 3.3 Ripstation v4.4 Main Screen The Ripstation main user interface is shown in figure 3.1 below. Operations are carried out using the button controls at the top of the screen and information is displayed throughout the rest of the screen. Figure 3.1 shows the interface split into groups from 1-7, Section 3.3.1 of the manual details each of these groups in turn. Figure 3.1 – Ripstation Main User Interface Ripstation v4.
Ripstation v4.4 Main User Guide 100-5-01-000 3.3.1 Button and Screen Operations 3.3.1.1 Group 1: Button Controls Figure 3.2 below shows a closer version of the button controls in the main user interface. They are labelled 1 –11 and are explained below. 1 2 3 4 5 6 7 8 9 10 Figure 3.2 – Ripstation Button Controls Button 1: New Batch / Cancel Batch This button opens the Start a New Batch dialog.
Ripstation v4.4 Main User Guide 100-5-01-000 3.3.1.2 Group 2: CD-ROM Drive Display Bar The CD-Rom drive display bar shows the status of each CD-Rom device in the system.
Ripstation v4.4 Main User Guide 100-5-01-000 A percentage complete figure is displayed and updated in real time as each track is synchronously read from the disc and encoded. 3.3.1.5 Group 5: Batch Status Window The batch status window as shown in figure 3.4 is designed to give a dynamic preview of the current batch job. Figure 3.
Ripstation v4.4 Main User Guide 100-5-01-000 3.3.1.6 Group 6: Internet and metadata provider Connection Status Window The key for the connection status of the internet and the metadata providers is shown below. Connectivity not tested Connectivity tested and status OK Connectivity tested and no response received Internet connectivity is tested every 12 seconds. Metadata provider connectivity is tested when each database lookup request is sent to the provider.
Ripstation v4.4 Main User Guide 100-5-01-000 Send Support Request - Opens the Ripstation Support homepage in your browser 3.4 Preference Settings Clicking on the preferences button opens the dialog box as shown in figure 3.6. Figure 3.6 – Preferences Dialog Box (Metadata Tab) 3.4.1 Metadata Tab The metadata tab selected in figure 4.6 allows for the following settings to be selected: Local cdplayer.ini - For metadata retrieval from a local cache, check the 'Local cdplayer.
Ripstation v4.4 Main User Guide 100-5-01-000 You can add GD3 look ups by clicking on the following link: http://www.getdigitaldata.com/Login.aspx?ReturnUrl=/Secure/AccountManager/ GD3AccountManager.aspx FreeDB – This is the web's main free metadata database. You can key in the web address of freedb.freedb.org or one of the local regional mirrors (shown in figure 3.7). FreeDB does not provide cover art. FreeDB regional mirrors.. at.freedb.org (Vienna, Austria) au.freedb.org (Sydney, Australia) ca.
Ripstation v4.4 Main User Guide 100-5-01-000 Rip and Reject - This option is the same as Automatically Rip except the unknown discs will be placed on the reject stack. Query User - User will immediately be prompted to enter album information manually during the batch process, as shown in figure 3.8.
Ripstation v4.4 Main User Guide 100-5-01-000 3.4.2 Data Tab In the preferences dialog box, select the data tab as shown in figure 3.9. Figure 3.9 – Preferences Dialog Box – Data Tab The company URL may be keyed in here such that it becomes embedded in the ‘encoded by’ field in the ID3 tag. Alternatively the box may be left blank. 3.4.3 SQL Tab In the preferences dialog box, select the SQL tab as shown in figure 3.10. Figure 3.10 – Preferences Dialog Box – SQL Tab Ripstation v4.
Ripstation v4.4 Main User Guide 100-5-01-000 SQL enabled allows Ripstation v4.4 to write ALL information from metadata and client detail to a local SQL server. Simply check the box and key in the server details to enable this. Please consult MF Digital detailed documentation for set up details. 3.4.4 Grooming Tab In the preferences dialog box, select the Grooming tab as shown in figure 3.11. Figure 3.
Ripstation v4.4 Main User Guide 100-5-01-000 to the list of album titles to perform this function on – e.g. best of, very best of etc. Replace keywords – Primarily for consistency of box sets, we can instruct the application to, for example search for ‘disc1’ and make it ‘CD 1’. Click edit to add to the list of keywords to perform this function on. Delete all after – This function removes all words after specific keywords in the track title e.g. “Under Pressure Feat.
Ripstation v4.4 Main User Guide 100-5-01-000 Log batch summary - When checked, this creates a text log file in the client folder detailing failed/rejected CDs and successfully ripped CD's in order they were ripped. Log genre in folder.dat – this will place a folder.dat file in the album folder which contains the genre of the disc. As an example the contents of the file would look like “genre=latin”.
Ripstation v4.4 Main User Guide 100-5-01-000 Calculate Replay Gain – This will switch on the option to calculate the replay gain value and embed it in the file. Rip all tracks to one file – This will rip all tracks on the disc to a single file and will also write out a cue file for the ripped track. NOTE: These options may be selected or unselected. 3.5 Starting a New Batch 3.5.1 Batch Setup In the main Ripstation screen, click the ‘New Batch’ button Batch dialog box shown in figure 3.
Ripstation v4.4 Main User Guide 100-5-01-000 drive tray. Figure 3.15 – Source Device Edit Dialog Box Number of CDs - key in the number of CDs in the batch, or 0 to rip indefinitely. Target device – Use Generic for any portable devices, or select from the manufacturer list to enable file format and grooming. Added direct support for Vantage Media servers with cddbinfo.txt file output.
Ripstation v4.4 Main User Guide 100-5-01-000 Make a duplicate copy of output files here – This will place a copy of the ripped files to the specified location Launch this application after every successful batch – This allows the user to select an application that will be launched by Ripstation after every successful batch that is completed. [Start Batch] closes this screen and starts the batch process.
Ripstation v4.
Ripstation v4.4 Main User Guide 100-5-01-000 Figure 3.17- MP3 CODEC Settings Include Metadata In Output files – If this is checked Ripstation will write out and embed metadata in the file. If this is unchecked no metadata will be written into the output. Path - This represents the path the codec's output will use as a root folder. This may be overridden however in the batch properties screen (figure 3.14) by checking the ‘Use this output path’ option.
Ripstation v4.4 Main User Guide 100-5-01-000 3.5.3 Operations during Batch Rip 3.5.3.1 Operations with Robotic Autoloader At the start of a batch process, all selected drives will eject. Place CDs in the drives and click ‘close all drives’. The batch process will now progress. As each CD is completed, it will be ejected. Replace with another when ready. At the end of the batch the screen in figure 3.18 will be presented. Figure 3.
Ripstation v4.4 Main User Guide 100-5-01-000 At the end of the batch, the dialog box shown in figure 3.18 will appear, either click the ‘No, I’m Done!’ button to complete the process or add more CDs to the spindle, key in the number and press the ‘Yes, Add More!’ button, at which point ripping will recommence. 3.5.3.3 Reported errors If the robotic autoloader experiences a problem collecting a CD during a batch rip, one of two error dialog boxes will appear. These dialog boxes are shown in figure 3.
Ripstation v4.4 Main User Guide 100-5-01-000 3.6 Actions for Completed Batch 3.6.1 Podload button (load an iPod) When you click the Podload button it opens iTunes and adds the rip files to the library. Then the user can add the music files to the iPod using the iTunes interface. 3.6.2 Loading an external Hard Drive Clicking the ‘Send to HD’ button loads the client folder to a hard drive. The standard Windows explorer dialog appears. Figure 3.
Ripstation v4.4 Main User Guide 100-5-01-000 3.7 Error detection & correction Ripstation’s error handling consists of: Auto C2 Check Burst mode check Jitter check 3.8 Output Reports In addition to the live logging window, Ripstation generates a key report automatically at the end of a batch as follows: A flat text file detailing the following, saved into the client folder. (Clientname_log).txt Ripstation v4.
Help and Support 100-5-01-000 4.0 Help and Support Support terms are detailed in client specific contracts, but at minimum shall include 24 hour support via our online helpdesk. In addition we offer an extended warranty package which includes remote access to your site from our headquarters and extended hardware warranty coverage. Support response is guaranteed within 24 hours.