Spectrum2 Designer User’s Guide
Spectrum2 Designer User’s Guide Document Revision: 092903 Table of Contents GETTING STARTED.................................................................................................................................... 3 INTRODUCTION.......................................................................................................................................... 3 INSTALLING THE APPLICATIONS ......................................................................................................
Spectrum2 Designer User’s Guide Document Revision: 092903 WORKING WITH IMPORTED GRAPHICS ............................................................................................. 25 IMPORT THE GRAPHIC............................................................................................................................... 26 IMAGES AND TEXT.................................................................................................................................... 26 EDITING LABEL GRAPHICS .
Spectrum2 Designer User’s Guide Document Revision: 092903 Introduction (Getting Started) The Spectrum2™ Designer labeling software is the link between label designs created by users and their CDs in the Spectrum2 printer. Designer enables users to arrange graphics, text, and serial numbers into customized CD surfaces. The image on the screen is transferred to the Spectrum2 printer, which prints the image directly onto CD-R or DVD-R disks.
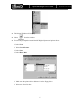
Spectrum2 Designer User’s Guide Document Revision: 092903 If you have MS-Windows 98 b Exit all Windows Programs. b Load the first Spectrum2 Designer installation disk. b Select Start from the taskbar and scroll to Settings. b Choose Control Panel from the Settings menu. b Double-click on Add/Remove Programs. b Choose Install. b Follow the instructions that appear on your screen. b You will be prompted to restart Windows before using the program.
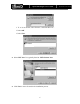
Spectrum2 Designer User’s Guide Document Revision: 092903 The Printer Window will display. Choose from the window. You will be prompted to install the MF Digital Spectrum2 printer driver. bSelect Next b Select Local Printer bSelect Next bSelect Have Disk b Make sure the printer driver diskette is in the floppy drive. b Select A:\ from List box.
Spectrum2 Designer User’s Guide b If A:\ is not shown, select ‘Browse’, and select Drive A:\ bSelect OK. bSelect Next. Spectrum2 Select LPT Port. It is typically listed as: LPT1:Printer Port. Click Next to move forward in the installation process.
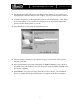
Spectrum2 Designer User’s Guide Document Revision: 092903 MF Digital Spectrum2 will appear in the Printer name window. If you wish to give the Spectrum2 a different name on your computer, type the preferred name in the box. You have the option to set the Spectrum2 printer as your default printer. Click Yes to set it as the default, or leave the box checked No if you do not want the Spectrum2 printer to be the default printer on your PC. Click Next to move forward in the installation process.
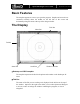
Spectrum2 Designer User’s Guide Document Revision: 092903 Basic Features The template appears as soon as you open the program. Graphic and text tools are contained vertically down the toolbar on the left side of the screen and horizontally along the menu at the top of the design window. The Display Title Bar Menu Bar Toolbar Status Bar Scroll Bar Windows Boarder Desktop and CD-R template The template represents the disk in the printer and remains on the desktop at all times.
Spectrum2 Designer User’s Guide Document Revision: 092903 Windows Border You can shrink or enlarge the view box by clicking on the outer border of the window. Reducing the size of the window allows you to work on several labels simultaneously and operate other Windows applications at the same time. Menu Bar The complete menu bar appears across the top of the screen when you open a file. When you click a menu option, commands appear on a vertical scroll.
Spectrum2 Designer User’s Guide Document Revision: 092903 Adjusting the Display Adjusting Image Size If you wish to make the template larger or smaller, you can adjust the display size by selecting the scale icon from the tool bar. The display can be enhanced up to 500% of the actual label size and reduced to 10%. Only the display on the screen is affected. The print size of the label will remain the same.
Spectrum2 Designer User’s Guide Document Revision: 092903 Printing Printing from a Standard Printer Before you are ready to print your label onto disks in the Spectrum2 printer, you may want to print a copy of the image on paper. This can be done on a standard printer. To print a copy of your label on a standard printer, simply follow the commands you would to print any other windows document on your standard printer. Printing from the Spectrum2 b Select Print from the File menu.
Spectrum2 Designer User’s Guide Document Revision: 092903 Adjusting the Printout Label printouts are made lighter or darker by changing the setting within the Spectrum2 properties dialogue box. You can lighten the printout by selecting a lower number than the one currently displayed, and you can darken the printout by selecting a number higher than the one displayed. Click Start on the taskbar. Select Settings.
Spectrum2 Designer User’s Guide Document Revision: 092903 Creating and Operating a Label File File Functions Opening New Files bSelect New from the file menu or from the toolbar. bYou can begin working with text, graphics, and serial numbers instantly. Opening Existing Files b Choose Open from the File menu, or click b Select the drive and directory the label was saved in. b Highlight the file name. b Click OK. Saving Label Files bChose Save from the file menu or click .
Spectrum2 Designer User’s Guide Document Revision: 092903 Designing a Label When you open a label, the template appears in the center of the display window. Only objects entered on the template will appear on printed versions of the label, but text and graphics can be entered anywhere in the display window. This gives you extra workspace. Defining Label Size b Select the appropriate type of media from the Settings / CD Template menu. b Enter a new radius if your CDs are not standard size.
Spectrum2 Designer User’s Guide Document Revision: 092903 Text Standard Text Circular Text Entering Standard Text Standard text is best for creating straight lines of text, and must be used for serial numbers. The standard text option allows the user to write left to right, top to bottom, or bottom to top. Additionally, standard text can be pivoted vertically at a 90° angle or flipped 180° and read from the “outside” of the disk. Font style, size, and color are adjustable, as is line spacing.
Spectrum2 Designer User’s Guide Document Revision: 092903 Font style is changed by checking the boxes to the left of the styles. All styles can be used alone or in combination. The transparent option removes the white box that surrounds text objects. This box is invisible when text is printed on a clear or white label, but is visible on most color backgrounds. When the transparent option is selected, text appears to be written directly onto the background color or graphic.
Spectrum2 Designer User’s Guide Document Revision: 092903 Color is selected by clicking the color box. An array of basic and custom color options appear, and you may also define a color by selecting Custom Color at the bottom of the Color dialogue box. Press Okay at the bottom of the Text dialogue box when you have completed your text entry. If you do not press Okay before closing the dialogue box, your entry will be lost. Commands for editing text after it has been entered are on page 19.
Spectrum2 Designer User’s Guide Document Revision: 092903 Enter text in the box entitled Text at the top of the dialogue box. The text will appear on the screen as it is entered. Font type is chosen by clicking the arrow to the right of the Font box and selecting and clicking a choice. The font selection is composed of all fonts installed on your system. Font size can be modified using the arrow at the right side of the Font Size box.
Spectrum2 Designer User’s Guide Document Revision: 092903 Editing Standard and Circular Text Tools for editing text on your label design are the same for standard and circular text except for the Move command. Editing tools are found in the toolbar and menu bar, and you can return to the Text dialogue boxes at any time by double clicking on the block of text, or by using the right click on your mouse.
Spectrum2 Designer User’s Guide Document Revision: 092903 Moving Circular Text Right click the mouse on the piece of text you wish to edit. Chose Edit from the shortcut menu. The Circular Text dialogue Box appears. Change the Radius to move text closer or farther from the center of the label. Change the Reference Angle to move the text to another angle on the label. Center commands are also useful for movement operations. Returning to the Text dialogue boxes Double click on the block of text.
Spectrum2 Designer User’s Guide Document Revision: 092903 Serial Numbers Serial numbers incorporating letters and or numbers are easy to create using Spectrum2 Designer. You can create series up to 10 digits, and incorporate prefixes and suffixes into your serial numbers. Select Serial Number from the Data menu. The Serial Number dialogue box appears. Enter a Prefix. The prefix is a set of unchanging characters that will precede your serial number.
Spectrum2 Designer User’s Guide Select Document Revision: 092903 from the toolbar or Text from the Tools menu. Click the cursor in the location you want the serial number to appear on the label. The Standard Text dialogue box appears. Select Serial Number from the Source box. Make any format changes as you would with standard text. Click OK.
Spectrum2 Designer User’s Guide Document Revision: 092903 Graphics You can create your own graphics or import images on your label with the design tools located in the right column of the toolbar and in the Tools menu. Ellipses, circles, ovals, rectangles, squares and lines can be created instantly with the options. The shapes can then be customized easily using the mouse pointer to define the dimensions of the shape.
Spectrum2 Designer User’s Guide Document Revision: 092903 Release the cursor when you are satisfied with the shape. Reshaping and Re-sizing Basic Shapes To turn a square into a rounded rectangle or circle b Put the mouse pointer on the corner of a square, or rounded rectangle until the pointer changes into a two-sided arrow. b Hold down the Shift key and the left mouse button simultaneously. b Re-figure the square into a rounded rectangle or circle by maneuvering the mouse.
Spectrum2 Designer User’s Guide Document Revision: 092903 Working With Freehand The freehand options allows you to use the mouse pointer as a pen or paint brush to design images and alter basic shapes or imported images. Freehand images can be made in color or black and white. Choose or Freehand from the tools menu. Click the mouse pointer at the location on the template you want to start drawing. This can be on a blank spot or one where an image already exists.
Spectrum2 Designer User’s Guide Document Revision: 092903 Import the Graphic Select the or Picture from the Tools menu. The Open Picture File dialogue box appears. Select the drive and directory in which your picture file is located. Only graphics files will appear in the window. Select the correct file. The file graphic will appear in the Window on the right side of the dialogue box if the Preview option in the bottom corner of the dialogue box is checked. Press Open.
Spectrum2 Designer User’s Guide Document Revision: 092903 The object is mobile as long as you hold down the left mouse button. Or, Right-click on the border of the object. Select Move from the shortcut menu. You can now move the object freely with the mouse. Press the left mouse button when you are done moving the object. Simultaneously: Press the Shift button and keep it depressed. Select each item you wish to move by clicking on it once with the mouse.
Spectrum2 Designer User’s Guide Document Revision: 092903 Overlaying Objects If objects are entered where others already exist, the new object will be placed on top, or in front, of the other objects. You can change object positioning by right-clicking on one of the objects and using the following commands: Send to Back moves the selected object to the very back of the stack of objects. Send to Front moves the selected object to the very front of the stack.
Spectrum2 Designer User’s Guide Document Revision: 092903 Changing Object Properties Select the border of the object by right-clicking the mouse. The shortcut menu appears. Choose Edit. The Figure Properties dialogue box appears. Pen thickness can be changed from .1 pixel to a choice between 0 and 10 pixels. One of the eight patterns will be added to the interior of the shape or design by selecting one of the choices.
Spectrum2 Designer User’s Guide Document Revision: 092903 Deleting Objects If you are not sure whether or not you want to delete the object, it is better to use Cut and Paste which allows you to return the object to your screen if you are unsatisfied with the removal. bSelect the object with the left-click. bChoose Cut from the Edit menu. bIf you wish the graphic to return to the screen, simply chose Paste from the Edit menu before cutting another object.
Spectrum2 Designer User’s Guide Document Revision: 092903 Index Importing graphics...................................... 27 Layering...................................................... 29 Label................................................................ 16 Close ........................................................... 15 Exit.............................................................. 15 Open existing .............................................. 15 Open new ...................................
Spectrum2 Designer User’s Guide Document Revision: 092903 MF Digital - End User License Agreement MF Digital Spectrum2 Designer for Windows 95 and Windows 98 Copyright © 1998 MF Digital and its Affiliated Companies. All Rights Reserved NOTICE TO ALL USERS: CAREFULLY READ THE FOLLOWING LEGAL AGREEMENT, WHICH SETS FORTH LICENSE TERMS FOR THE SOFTWARE IDENTIFIED IN THE HEADING ABOVE.
Spectrum2 Designer User’s Guide Document Revision: 092903 that connect to and use the Software directly or simultaneously (e.g., “multiplexing” or “pooling” software or hardware) does not reduce the number of licenses required. Specifically, you must have that number of licenses that would equal the number of distinct inputs to the multiplexing or pooling software or hardware “front end”).
Spectrum2 Designer User’s Guide Document Revision: 092903 granted to you under this Agreement. You may not reverse engineer, decompile, or disassemble the Software, except to the extent that the foregoing restriction is expressly prohibited by applicable law. You may not modify, or create derivative works based upon, the Software in whole or in part. You may not copy the Software or Documentation except as expressly permitted in Section 1 above.
Spectrum2 Designer User’s Guide Document Revision: 092903 7. Limitation of Liability. UNDER NO CIRCUMSTANCES AND UNDER NO LEGAL THEORY, WHETHER IN TORT, CONTRACT, OR OTHERWISE, SHALL MF DIGITAL OR ITS SUPPLIERS BE LIABLE TO YOU OR TO ANY OTHER PERSON FOR ANY INDIRECT, SPECIAL, INCIDENTAL, OR CONSEQUENTIAL DAMAGES OF ANY CHARACTER INCLUDING, WITHOUT LIMITATION, DAMAGES FOR LOSS OF GOODWILL, WORK STOPPAGE, COMPUTER FAILURE OR MALFUNCTION, OR FOR ANY AND ALL OTHER DAMAGES OR LOSSES.
Spectrum2 Designer User’s Guide Document Revision: 092903 APPLICABLE LAWS, OR (B) IN VIOLATION OF ANY APPLICABLE PROHIBITION AGAINST THE EXPORT OR RE-EXPORT OF ANY PART OF THE SOFTWARE. SOME COUNTRIES HAVE RESTRICTIONS ON THE USE OF ENCRYPTION WITHIN THEIR BORDERS, OR THE IMPORT OR EXPORT OF ENCRYPTION EVEN IF FOR ONLY TEMPORARY PERSONAL OR BUSINESS USE. YOU ACKNOWLEDGE THAT THE IMPLEMENTATION AND ENFORCEMENT OF THESE LAWS IS NOT ALWAYS CONSISTENT AS TO SPECIFIC COUNTRIES.