Warranty ————————————————————— MODERN HOME PRODUCTS —————————————————————– LIMITED WARRANTY Modern Home Products Corp. Offers to the original purchaser a Limited Warranty on all aluminum grill components except the 7 year “SearMagic” cooking system. These components will be free from defects in material and workmanship (excluding paint) when subject to normal domestic use and service.
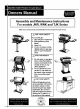
General Instructions GENERAL INSTRUCTIONS STORAGE This installation guide provides you with easy to follow illustrations and instructions to assemble your MHP Gas Barbecue Grill. Turn gas OFF at the LP cylinder (or at the shut OFF valve in the case of Natural Gas) when the MHP Gas Barbecue Grill is not in use. Before you start assembling and using your MHP Gas Barbecue Grill we recommend that you read through all precautions, safe guards and instructions to avoid any personal injury or property damage.
Mountings Step 2: Built-In Mounting Assembly IMPORTANT: Since the mounting is attached directly to the grill, you must first partially assemble your grill by attaching the control panel to the grill head (refer to the appropriate grill section for assembly instructions). Then the built-in mounting heat shield must be attached to the bottom of the grill head using four ¼-20 x ¾" bolts, see fig. 14 “Complete View” illustration.
JNR & WNK Assembly Instructions CARTON CONTENTS Please check to be sure that all parts are included before proceeding with assembly. Contact your local dealer if any parts are missing. Note: The grill is partially assembled. The Burner, Spider Guards, Venturis, Ignitor Collector Box are installed. Also, for LP units the Gaslow Regulator and Hose are installed.
TJK Assembly Instructions CARTON CONTENTS Please check to be sure that all parts are included before proceeding with assembly. Contact your local dealer if any parts are missing. Note: The grill is partially assembled. The Burner, Spider Guards, Venturis, Ignitor Collector Box and the Stainless Steel Handle are installed. Also, for LP units the Gaslow Regulator and Hose are installed.
TJK Assembly Instructions Grill Head Assembly Instructions • • • • The grill head bottom must be attached to the mount before starting. It is easiest to work with the grill in the upright position. Leak test all gas connections before using. Caution: Combustible material should never be within 24 inches of the top, bottom, back or sides of your MHP Gas Barbecue Grill. Complete View of TJK Grill Step 4: Attaching the Grill Lid (See JNR/WNK instructions on page 18, Fig 30.
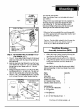
Gas & LP Tank Connections GAS & LP CYLINDER Check Local Codes Consult your local LP dealer or Natural Gas Company for recommended installation procedures and regulations. In the absence of local codes, installation must conform to the National Fuel Gas Code, ANSI Z223.1 or CAN/CGA-B149.1 Natural Gas Installation Code or CAN/CGA-B149.2, Propane Installation Code. Natural Gas Models The grill is designed to operate on Natural Gas at a pressure of 7” water column (W.C.) [1.75 kPa].
Gas& LP Tank Connections CONNECTING THE LP CYLINDER (Fig. 40) 1. Slip the LP cylinder into the grill LP Tank Mounting. Position the LP cylinder so that the tank valve receives the regulator without kinking or creating sharp bends in the hose. Secure the tank to the grill base. For cart base models fasten the mounting thumbscrew to secure the tank in place. The Optimum Console base models has the LP Tank Locking Bar to hold the LP Cylinder in place (refer to mounting section for detail). 2.
Leak Testing & Lighting Grill Leak Testing Lighting Your Grill LEAK TEST ALL GAS CONNECTIONS BEFORE USING YOUR GRILL. ALWAYS OPEN GRILL BEFORE LIGHTING THE BURNER. DO NOT SMOKE WHILE LEAK TESTING. DO NOT LEAN OVER AN OPEN GRILL. KEEP YOUR HEAD AND BODY AT LEAST ONE FOOT AWAY WHEN LIGHTING THE GRILL. DO NOT LEAK TEST WITH A MATCH OR OPEN FLAME. DO NOT USE A GRILL THAT IS LEAKING GAS. YOU SHOULD TEST FOR GAS LEAKS EVERY TIME YOU DISCONNECT AND RECONNECT A GAS FITTING.
Maintenance Warning: Check the hose before each use of the grill for nicks, cracking, abrasions or cuts. If the hose is found to be damaged in any way, do not use the grill. Replace using only MHP authorized replacement hose. Annual Maintenance After a period of nonuse or to keep your grill in top operating condition, you should perform the following maintenance procedures to keep the grill ready for instant use and for your safety. • Do not obstruct the flow of combustion and ventilation air.
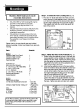
Troubleshooting Problem Yellow or orange flame and the smell of gas. Cause 1. 2. 3. Burner does not light or flame is low in HIGH position. 1. 2. 3. Blockage in the venturi tube or orifice. Orifice not seated properly in the venturi Tube. Bent or kinked hose. Check 1. 2. 3. Could be a kink in the gas supply 1. line. 2. LP tank could be low or empty. 3. LP regulator excess flow feature has been activated. Clean venturi (See section “Annual Maintenance”.
Parts Information Parts are divided below into lists associated with the three different grill configurations . When ordering a part please provide the grill Identification, part number, quantity and product description. To order contact your local MHP dealer or MHP’s customer service: phone: 1-888-647-4745, fax: 1-800-637-2918, or E-mail: mhp@voyager. net for the dealer nearest you.