
Operating instructions


22
RFSDV24/34 Freestanding Direct Vent Gas Stove
10003550
Instructions for RCSITEA
RFSDV34TSR Series
CAUTION: The RCSITE is only certified for use on
vented heater rated equipment.
This remote control system provides a safe, reliable and
user-friendly remote control for millivolt valve gas appli-
ances, blower speed and flame height adjustment. The
system can be manually or thermostatically turned on
and off with the transmitter.
Carefully inspect the contents for shipping damage. If
any parts are missing or damaged, immediately contact
your dealer. Do not attempt to install any part of the kit
unless all parts are in good condition. Refer to instruc-
tions provided with the kit for complete installation
instructions.
WARNING: Make sure 120V AC fan and SIT valve are
correct. If not wired correctly, damage to receiver could
result. Make sure the wires do not contact the applianc-
es any place other than at the terminals. Exposure to
temperatures higher than 250°F (105°C) may cause the
receiver to malfunction and cause possible fire hazard.
Remote Transmitter
Install Batteries
The remote transmitter uses three
(3) “AAA” batteries.
1. Press down the battery door tab
and pull out to remove the bat-
tery door. (Fig. 32)
2. Install the batteries as indicated
on transmitter.
3. Close the battery door by snap-
ping in place.
4. When three (3) batteries are
installed, the transmitter will
initialize for 10 seconds and then
is ready for use.
5. The batteries should be replaced at least once every
12 months or when the low battery indicator is dis-
played.
Setting Privacy (DIP) Switch on Receiver and Trans-
mitter
The remote receiver and transmitter privacy (DIP)
switches are preset at the factory. In the event of activa-
tion or interference from other nearby transmissions,
reset the code using the following procedure:
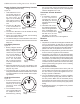
1. There are four (4) switches on the transmitter and
seven (7) switches on the receiver. Figure 33.
Switches #1, #2, #3 and #4 on both transmitter and
receiver are privacy switches and #5, #6, #7 on
the receiver are blower switches and should not be
moved. These are preset for the installed blower.
ST1088
RCSITE battery tab
Battery
Door
Tab
Fig. 32 Bat-
tery door tab.
2. Slide the privacy code switches (1,2,3 & 4) on the
transmitter and receiver to your choice of ON or OFF
position. All switches are preset to “ON” for both the
transmitter and receiver.
3. The privacy code switches (1,2,3 &4) on the trans-
mitter and on the receiver must match in order for
the system to work.
4. To check, press either the ON or OFF button on the
transmitter and the receiver indicator light will blink.
If not, repeat Step 2.
5. The system is now ready to operate.
NOTE: Refer to optional 6 Hour Shutdown.
WARNING: Do not use two (2) or more remote control
systems in the same area with the same dip
switch settings, they will communicate with
each other. This may cause the appliances to
malfunction.
Reset Button
The reset button can be used to reset the transmitter
if transmitter is not working properly. The reset button
is located behind the battery door cover in the lower
left corner of battery compartment. Using a paper clip,
press the reset button and the transmitter will reset and
initialize for 10 seconds before it can be used.
Operation
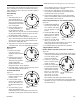
Transmitter
General
The RCSITE Remote Control has
two (2) operating modes: Manual
and Thermostatic. The control
system can be set to temperature
ranges between 45°F and 90°F.
The blower speed and flame
height can be adjusted in either
the manual or thermostatic mode.
FAN
AUTO
AMBIENT
ST1090
RCSITE remote
ON
FLAME
OFF
Fig. 34 RCSITE
remote transmitter.
ST1089
RCSITE dip switches
ON
DIP
ON
DIP
ON
DIP
ON
DIP
1 2 3 4 5 6 7
ON
DIP
1
2 3 4 5 6 7
1 2 3
4
5
6 7
Privacey Switch
Blower Switch
NOTE: The switches on the transmitter and receiver
must match.
Transmitter
Receiver
Privace Dip Switches
(Need to Match)
ST1089
Blower Switch
- Do Not Move
Fig. 33 Privacy switches.