Electric Fireplace/Insert Model: WEF26 INSTALLER / CONSUMER SAFETY INFORMATION Read these instructions completely before beginning installation. Failure to follow them could cause a heater malfunction resulting in serious injury and/ or property damage. WARNING: All electric heaters have hot and arcing or sparking parts inside. Do not use it in areas where gasoline, paint or flammable liquids are or are stored. This fireplace meets the construction and safety standards of H.U.D.
Table of Contents Safety Information.................................................................................................................. 3 Installation Instructions Fireplace Dimensions.......................................................................................................... 4 Electrical Specifications....................................................................................................... 4 Fireplace Parts Identification.........................................
Safety Information When using electric heaters, basic precautions should always be followed to reduce the risk of fire, electric shock and injury to person, including the following: 1. Read all instructions before using this appliance. 2. Keep combustible materials, such as furniture, pillows, bedding, papers, clothes and curtains away from front of heater. 3. This heater is hot when in use. To avoid burns, do not allow bare skin to touch hot surfaces.
Installation Instructions • WEF26 Fireplace Dimensions NOTE: This heater must be electrically wired and grounded in accordance with local codes or, in the absence of local codes, with National Electric Code ANSI/NFPA 70-latest edition or the Canadian Electric Code, CSA C22.1 as appropriate.
CAUTION: The unit's power supply cord • Unpacking and Testing must be connected to Carefully remove unit from box. Prior to permanently installing unit, test to make sure a properly grounded and prounit operates properly. to do this, plug unit's power cord into a conveniently located tected 120 Volt outlet. Always 120 Volt grounded outlet. use ground fault protection where required by the electrical code. WARNING: Do not operate the unit if it is damaged or has malfunctioned.
• Install Fireplace Select a suitable location that is not susceptible to moisture and is a safe distance from drapes, furniture and high traffic areas. NOTE: Follow all national and local electrical codes. This insert can be installed into either an existing fireplace or as a new construction/renovation. • Installing in a Mantel 1. Assemble mantel according to mantel instructions. 2. Locate mantel near a wall (or corner depending on mantel type) close to a power source.
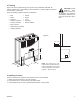
• Framing Figure 4 shows a typical framing of the heater using combustible materials. All required clearances to combustibles must be adhered to. Header height is measured from the base of the heater.
• Finishing Combustible Finishing Material - Materials made of or surfaced with wood, compressed paper, plant fibers, plastics or any material capable of igniting and burning, whether flame proofed or not, plastered or unplastered (this includes drywall). Noncombustible Finishing Material - Materials which will not ignite and burn. Such materials are those consisting entirely of steel, iron, brick, tile, concrete, slate, glass or plasters or combinations thereof or have a fire rating of zero.
Operation The controls are located behind the hinged control panel door. If using heater, control panel door will be hot during and immediately after operation. Open door by pressing on right side. A spring magnet will push door forward. Pull door down to open. 1. Plug in electric fireplace. 2. Turn on lighted power switch. Figure 5 3. Adjust Flame/Ember/Backlight/Heater to desired settings using the control pad on fireplace (Figure 5) or remote control. Figure 6.
Cleaning & Maintenance To service electric fireplace, it may be necessary to remove it from the mantel or enclosure in which it is installed. Allow unit to cool completely before cleaning or servicing. • Cleaning Firebox 1. Open control panel door by pressing on right side. a spring magnet will push door forward. Pull door down to open. 2. Remove two (2) screws holding front trim in place. Pull gently to remove trim. Figure 8. There are magnets on the lower portion of trim. Figure 8 3.
• Replacing Heater/Blower 1. Follow Steps 1 through 4 of 'Cleaning Firebox'. 2. Remove screws from around top panel of firebox. Figure 11 3. There are several wires attached to the top panel. Carefully lift top panel. 4. Disconnect heater/blower wires from main circuit board. 5. Remove screws holding heater/blower to top panel. Figure 11 6. Remove brackets from heater/blower. Figure 12. Save brackets and screws. 7. To remove heater from blower, remove four (4) screws (2 per side). 8.
• Replacing Transformer 1. Follow Steps 1 through 3 in 'Replacing Heater/Blower'. 2. Disconnect transformer wires from control board. 3. Remove screws and nuts from firebox surround to remove transformer. Figure 15 4. Remove and discard transformer. 5. Place new transformer against inside of firebox surround and replace screws and nuts removed in Step 3. 6. Reconnect transformer wires to control board. Refer to Wiring Diagram, Figure 14. 7. Replace glass with brackets, and top panel. 8. Replace trim.
• Replacing Flame Generation LED 1. 2. 3. 4. 5. 6. 7. 8. 9. 10. 11. 12. 13. 14. Follow Steps 1 through 4 in 'Cleaning Firebox'. Remove screws securing log to either side of base. Remove log. Figure 10 Remove screws from sides and back of bottom panel of firebox. Gently lay unit on its back. White Wire There are several wires attached to bottom panel. Carefully remove panel. Disconnect wires from motor and LED drum assembly. Remove screws from bottom panel to remove assembly.
Troubleshooting Problem 1. Fireplace turns off and will not turn on. Possible Cause 1. Fireplace has overheated and safety devise has caused thermal switch to disconnect or home circuit breaker has opened. Solution 1. Reset switch by turning main power switch off and waiting 5 minutes then turning it back on or reset circuit breaker. 2. Flame is not moving. 1. Loose wiring. 1. Inspect wiring for loose connections. 2. Call a qualified service technician to replace flame motor. 2. Flame motor defective.
Replacement Parts 11 18 2 20 17 5 9 15 6 12 7 8 1 13 14 4 16 10 3 19 MHSC reserves the right to make changes in design, materials, specifications, prices and discontinue colors and products at any time, without notice. WEF26 Electric Fireplace685001 Ref. 1. 2. 3. 4. 5. 6. 7. 8. WEF26 parts Description Qty.
WEF26 Electric Fireplace Ref. Description 9. Settings Control Board 10. LED Drum Assembly 11. LED Ember Strip 12. Remote Control 13. Remote Control Sensor 14. Power Cord 15. ON/OFF Switch 16. Front Glass 17. Control Panel Door (black) 18. Top (black) 19. Front Trim 20. Magnetic Catch Parts Available - not shown Wire - LED Drum Motor Wire - LED Drum Lighting Wire - Ember Bed Wire - Back Light Thermocouple 16 Qty.
68D5001 17
68D5001
WARRANTY BASIC WARRANTY MHSC warrants the components and materials in your electric fireplace to be free from manufacturing and material defects for a period of one year from date of installation. After installation, if any of the components manufactured by MHSC in the electric fireplace are found to be defective in materials or workmanship, MHSC will, at its option, replace or repair the defective components at no charge to the original owner.
MHSC 149 Cleveland Drive • Paris, Kentucky 40361 www.mhsc.