
User's Manual


10
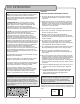
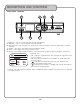
FRONT PANEL - RECEIVER
1. IR Sensor – This is used to pair and sync the microphone.
2. IR Button – This is used to initialize the pairing mode.
3. Selector Knob – This navigates the menu and is used to confirm a selection. Click knob to confirm
selection.
4. Volume – This alters the volume of the microphone audio.
5. Power – This toggles the receiver power on/off.
6. Display – This shows current frequency, mic battery level, graphic frequency analyzer, and menus.
a. Display Icons
• RF – Indicates signal intensity. The stronger the signal, the more
the bar is filled.
• AF – Indicates the audio level. The louder the audio, the more
the bar is filled.
• – Indicates microphone battery level. The indicator will
display remaining battery power.
• – Indicates the receiver is sending new settings through the
IR sensor to the microphone.
7. Unlock – This will unlock the selector knob and allow the menu settings to be altered. Press and hold
to toggle the lock.
DESCRIPTIONS AND FUNCTIONS
RF
AF
GR/CH
SCAN
927.70 MHz
15 06
GR CH
5 76
1 2
3 4