
User's Manual


11
Descriptions and Functions
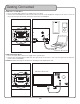
FRONT PANEL
1. Power/Pair ID – This button toggles power OFF/ON.
•Press and hold for 3 seconds to toggle the Microphone Pairing Mode. See Pairing The Microphones for
more info.
2. Next – This button skips the next track*.
3. Previous – This button skips to the previous track*.
4. Play/Pause – This button plays and pauses the current track.*
Note: *Only applies to Bluetooth. See Getting Connected for more details.
5. Input Select – This button toggles through the available inputs:
•Bluetooth
•Optical
•Line
6. Music Volume +/- – These buttons vary the music input volume from 0-15.
7. BT Pairing – This button activates the Bluetooth pairing mode. Refer to Getting Connected for more
details.
8. Microphone Status LEDs – These lights indicate the microphone connection status:
•Solid LED – This means the microphones are connected.
•No LED – This means the microphones are not connected.
•Flashing LED – This means the Microphone Pairing Mode is activated. See Getting Connected for more
details.
9. Bluetooth Status LED – This light indicates the Bluetooth connection status:
•Solid LED – This means the Bluetooth is connected.
•No LED – This means there is no Bluetooth signal connected.
BACK PANEL
1. AC In – This is where the AC power adapter is plugged in.
2. 1/8” Line Input – This is where the Stereo 1/8”-1/8” cable is plugged in.
3. Optical Input – This is where the digital Optical cable is plugged in.
4. Bass Port – Do not cover. This enhances the bass response of the speaker cabinet.