
Hydromatic II Chiller Operation Manual
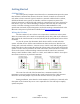
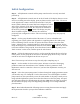
Table Of Contents
- Introduction
- Getting Started
- System Overview
- Operational Overview
- Initial Configuration
- System Menu Items
- Operation
- Fault Handling
- Wiring Diagrams
- Specifications
- Glossary
- Appendix 1: System menu overview
- Appendix 2: Organizing IDs in the CAN system
- Appendix 3: Ordering a system

Page 6
Rev 1.07 ©2015 Micro Air Corp 10/26/2015
Initial Configuration
Step 1: All Hydromatic controls and the pump control must be correctly wired and
powered up.
Step 2: All Hydromatic controls must be in the off mode. If the display shows a screen
saver text scrolling across the display, press any button exit the screen saver. The screen
on the right shows a master control in the off mode. If only the
menu symbol is shown, the control has been configured as a slave
and is in the off mode. If the display shows temperatures in the
upper right and left of the screen, the control is on and must be
turned off by pressing the button. The display may also
flash “No Master Signal”. This indicates the control has
previously been configured as a slave. The error message will go away once properly
configured.
Step 3: Set the group ID and unit ID of the master. If you are unfamiliar with
organizing your system, please read Appendix 2: Organizing IDs in the CAN system,
before continuing. Choose one slave to operate the master function. Press the menu
button. Advance to the “Staging Parameters” menu and press the select button. Set the
Group ID using the up or down buttons. Press the select button and set the unit ID
to the same number as the group ID. Press the advance button repeatedly until you see
“Back to menu” on the screen, and then press the select button.
Step 4: Follow the instructions in step 3 to set the group ID and unit ID for each slave
in the system. Set the group ID on each slave to the same group ID set in step 3. Set the
unit ID on each slave one higher than the last one you set.
Note: The next steps can be done on any slave only after completing step 4.
Step 5: Set the number of slaves in the system. Advance to and select the staging
parameters menu item then advance to the “Number of Slaves” parameter. Each
Hydromatic control is counted as a slave so if you have four Hydromatic controls, you
will enter a 4.
Step 6: Select the system pump control. Advance through the staging parameters menu
you entered in step 5 to “Pump ID”. Use the down arrow to scroll through the available
pump controls on the system until you see the serial number of the pump control you are
using with this Hydromatic system. Press the select button to select the pump. An equal
sign will appear before the ID indicating the selection. Note: Once the pump is selected,
the red LED on the pump relay will stop flashing indicating it is receiving commands
from the master.
Step 7: Read and understand the following section on using the menu items and apply
those parameters related to your specific installation conditions.