HCL Series Users Manual Microboards Technology LLC Version 1.
• Introduction
MICROBOARDS TECHNOLOGY, LLC HCL Series TABLE OF CONTENTS INTRODUCTION.................................................................................................................. 5 THE ROBOTIC PLATFORM ................................................................................................... 7 THE LCD CONTROL PANEL ................................................................................................ 7 MENU OVERVIEW ..................................................................
• Introduction
MICROBOARDS TECHNOLOGY, LLC HCL Series Introduction The Microboards HCL Series autoloader is a reliable, high performance, high speed, standalone, robotic DVD and/or CD autoloader. With its professional industrial design and simple user interface, it makes your duplicating experience easier than ever.
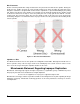
Disc Placement Another common problem when using an autoloader is the placement of media onto the spindles. Placing the media onto the spindles properly can avoid possible picking errors when operating the autoloader. Even though the autoloader is designed with certain tolerance adjustments to prevent mishandling by the picking arm, failures may still arise if the spindles are not loaded correctly.
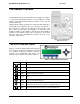
MICROBOARDS TECHNOLOGY, LLC HCL Series The Robotic Platform The Microboards HCL Series autoloader has five spindles (see Figure 1-2) that hold approximately 250 discs each; variations in media thickness between brands will change the number of discs you can load at any one time. Initially, Spindle 1 will be left empty. The robotic arm picks blank discs from Spindle 2 first, and places the successful copies onto Spindle 1.
Menu Overview This section provides an overview of the menu options. These menu options are explained in detail on the referenced pages. Copy Test page 14 Use the Copy menu or Copy quick key to make CD/DVD copies. Before you start a copy, make sure you have selected the correct Master Mode. If you plan to use Single Master Mode, please make sure you have successfully loaded your master disc to a partition on the Hard Drive.
MICROBOARDS TECHNOLOGY, LLC ¾ HCL Series Quick Erase: This option erases the index (TOC) of the Rewritable disc, not the data section. It is much faster than Full Erase. However, the data section is still recoverable. If you prefer the old content not to be recovered for security purpose, please perform Full Erase. Hard Drive Setup page 21 Use the Hard Drive Setup menu to perform hard drive-related operations. These options include loading, renaming, or deleting your images.
2. System Info Use this menu option to see data about the autoloader and its resources (firmware version, RAM and CPU). 3. Device Info Use this menu option to see data about the drives that are installed in the autoloader. 4. Load Default Use this menu option to reset all of the options back to the manufacturer's default values. You can use this function if your autoloader is acting abnormally. 5. Update Firmware Use this utility to update the software in your autoloader.
MICROBOARDS TECHNOLOGY, LLC HCL Series Introduction to Manage Accounts This feature allows the administrator to: ¾ ¾ ¾ ¾ Create user accounts and passwords to prevent unauthorized use of the autoloader. Edit existing user account information, including name and password. Delete existing user account(s). Enable or disable “Manage Accounts”. Manage Accounts is disabled by default. Prior to activating the “Manage Accounts” feature, the autoloader recognizes all users as the Administrator.
Under Multi Master Mode, you would need to follow the steps below: 1. Make sure all of the spindles are empty. 2. Place 30 blank discs for job C on to the first input spindle. 3. Place the master disc for job C on top of those blank discs for job C. 4. Place 40 blank discs for job B on top of the master disc for job C. 5. Place the master disc for job B on top of those blank discs for job B. 6. Place 20 blank discs for job A on top of the master disc for job B. 7.
MICROBOARDS TECHNOLOGY, LLC HCL Series To input the desired quantity, do the following: ¾ Make sure the cursor is located at the first position (First blinking position): Specify Counter: [0 ] OK? ¾ ¾ ¾ ¾ ¾ ¾ ¾ ¾ Press the Down button repeatedly until “0” is displayed. Press OK button once to move the cursor to the next position. Press the Down button repeatedly until “0” is displayed. Press OK button once to move the cursor to the next position. Press the Down button repeatedly until “2” is displayed.
Operation This chapter shows each of the menu options and how they are used. 1. Copy COPY Quick Button The Copy menu option or the front panel Copy quick key have two different modes of operation: ¾ Single Master Mode: This mode requires that a single master disc is loaded onto the hard drive prior to initiating the duplication process. This mode is ideal if your job involves one or very few master disc(s). ¾ Multi Master Mode (Batch Mode): This mode does not require you to manually load your master.
MICROBOARDS TECHNOLOGY, LLC HCL Series The loader will continue to remove discs from the input spindle and place those into drives until either all of the drives are full, or the count that you loaded into the counter is reached. Processing... Please Wait It takes a few seconds for the autoloader to recognize all the discs. After two or three seconds of processing time, one of the following Copy Progress screens will appear. Copying...
1.2 Making Copies in Multi Master Mode This mode does not require you to manually load your master. Simply place the master disc(s) on top of the stack of blank discs needed for that particular job of the master disc. This mode is ideal if you have numerous master discs and fewer copies for each master disc. The Multi Master mode uses the Reserve partition to temporarily store the content of the current master disc.
MICROBOARDS TECHNOLOGY, LLC HCL Series The loader will continue to remove discs from the Input Spindle and place those into drives until either all of the drives are full or all Input Spindles are empty. Processing... Please Wait It takes a few seconds for the autoloader to recognize all of the discs in the trays. Loading... RESERVED 36% 121MB Loaded Once all of the discs are detected, the autoloader will detect the master disc and read the contents of the master disc into the reserve partition.
3. Compare Use the Compare function to perform a bit-by-bit comparison between the content of your master disc(s) in the Hard Drive and the contents of all discs it copied. This ensures that all of your copies are identical to original master disc(s). Note: The bit-by-bit comparison will only apply on all DVDs and Data CDs. The readability check will be applied for other formats like Audio CDs, CD+G, and Video CD discs due to their lack of error correction mechanisms. If you are at the 1.
MICROBOARDS TECHNOLOGY, LLC HCL Series 4. Test+Copy With the Test + Copy menu option, the autoloader simulates the copying process, and then makes copies if everything works correctly. If a failure is encountered on a disc during the simulation, it will not be copied during the copying process while the discs that passed the simulation will move on to the copying process.
HDD to CD Speed Adjusted to: 8x Once your selection has been changed successfully, you will see the display to the left for 2 seconds: You will automatically be returned to the Main Menu. 7. Select Source The Select Source menu is used to set the Master Reading Source. In the autoloader, the Master Reading Source is always the Hard Drive. 8. Master Mode The Master Mode menu is used to select between Single Master mode or Multi Master mode.
MICROBOARDS TECHNOLOGY, LLC Quick Erasing... 0/25 HCL Series The “0” indicates that zero discs have been erased so far. The “25” indicates the number programmed into the counter. Once all the discs have been erased, you will see one of these PASS/FAIL screens: Counter Specified No Counter Specified PASS 25 FAIL 0 Job Completed! Press OK to Finish or: Input Bin Empty (20) Reset Hoppers? ¾ “Input Bin Empty (20)” indicates that the system has run out of discs to erase.
10.2 Load Partition The Load Partition menu is used to load a master disc’s content into the desired partition on the Hard Drive. Hard Drive Setup 2. Load Partition Press the OK button to enter the Load Partition menu. If you would like to load the master disc into a new partition, press the OK button when the New Partition option is shown. Or, you can use the Up or Down button to select one of the existing partitions to be overwritten & press the OK button to select it.
MICROBOARDS TECHNOLOGY, LLC Partition DVD1 Deleted HCL Series The autoloader displays the Deleted message for two seconds and then returns you to the Delete Partition menu. 10.5 Partition Info The Partition Info option provides information about an existing partition. Use the navigate to the 5. Partition Info menu. Hard Drive Setup 5.
10.7 Format Hard Drive This function formats the Hard Drive. It deletes all disc images and re-initiates the Hard Drive. To format the Hard Drive, use the Up or Down button to navigate to the 7. Format Hard Drive menu: Hard Drive Setup 7. Format Hard Drive Format Hard Drive Press OK to Continue Press the OK button to enter the Format Hard Drive menu. Press the OK button to format the Hard Drive. After the Hard Drive has been formatted, the system will return you to the Format Hard Drive menu. 11.
MICROBOARDS TECHNOLOGY, LLC HCL Series 11.3 CD Writing Mode This setting allows you to select which mode to use to duplicate a CD; “Disc at Once” or “Track at Once.” Unless you understand completely what these modes are, we strongly suggest you to set it to “Disc at Once.” Use the Up or Down button to select the CD Writing Mode menu and press the OK button to enter that menu. Setup 3.
11.7 Screen Saver This menu allows you to choose whether you want to enable the Screen Saver feature. By enabling this feature, a screen saver will be displayed when your autoloader has been idle for a long period of time. Setup 7. Screen Saver Screen Saver: On Screen Saver: Off Use the Up or Down buttons to select the Screen Saver menu and press the OK button to enter that menu. Use the Up or off, and press the Down button to select whether the Screen Saver is on or OK button to select that option.
MICROBOARDS TECHNOLOGY, LLC HCL Series Loader Processing... Please Wait The loader will then start the Autocopy process. Loader Processing Drive 1<-Input Bin The loader will load the Master into the next available drive. Loading... 60% The loader will load the contents of the master disc into the RESERVED partition.
Use the press the Setup 10. Disable Drives Drive 1 Port 1 [*]Enable [ ]Disable Up or Down button to select the Disable Drives menu and OK button to enter that menu. Use the Up or Down button to select the desired drive/trays you would like to enable/disable. Then press or button to move the asterisk in front of “Enable” or “Disable” Drive 1 Port 1 [ ]Enable [*]Disable Save Changes? Down button until you see the “Save Changes” screen Use the Up or and press the OK button to save the changes you made.
MICROBOARDS TECHNOLOGY, LLC HCL Series A blank 24x CD-RW media was placed in the second tray. ¾ The “2.” Indicates that the information is for the media inserted in tray 2. ¾ The “CD-RW” indicates that the media inserted is a CD-RW. ¾ The “702M” indicates that 702Mbytes of space is available on the disc. ¾ “Blank” indicates that the disc is blank. ¾ “INFODISC 97m25s31f”” is the media ID code. Down button to see the next disc. 2.
12.4 Load Default This function will reset all of the options back to the manufacturer's default settings. You should only perform this function if your autoloader is acting abnormally. System Utilities 4. Load Default Load Default Press OK to Continue Use the Up or Down button to select the Load Default menu and press the OK button to enter that menu. Press the OK button to load the default parameters or the to return to the System Utilities menu. ESC button 12.
MICROBOARDS TECHNOLOGY, LLC Drive Alignment Alignment Finished? HCL Series The autoloader will pick a disc from the first input spindle, move it to ¼ inch above the drive tray, and hold it there. You will see the Drive Alignment screen: Check the alignment of the drive trays and press the OK button when you are finished. Note: If the drive trays are not properly aligned and there is a need to re-align them, please contact Tech Support Service for information regarding setting alignments.
13.4 Z form Maneuver Some drives have bezels that extend out from the front of the drive face. This can cause the disc to catch on the edge of the bezel of a higher drive as it is being lowered into one of the below drives. Enabling the Z form Maneuver will allow the robotic arm to lower the disc off center from the front of the drives to clear any protruding obstacles like the bezels, and then center the disc directly above the extended writer tray just before the disc is loaded.
MICROBOARDS TECHNOLOGY, LLC HCL Series 14.2 Create User This menu allows you to create additional user accounts. Each user has their own settings and hard drive partitions. During this process, you will be prompted to enter a new username and user password for a new account. Note: The User name consists of a maximum of eight alphanumeric letters or numbers. Note: The User password consists of four numbers. Manage Accounts 2.
14.5 Password on Bootup This menu allows you to enable or disable the Password on Bootup feature. During this process, you will be asked to select “Yes” or “No” (enable or disable). Manage Accounts 5. Password on Bootup Press the OK button to enter into this menu. Use the Up or Down button to select either Yes or No. Press the button to enter the selection. OK 15. Shutdown This function will make sure it is safe to turn off your autoloader.
MICROBOARDS TECHNOLOGY, LLC HCL Series Troubleshooting No display on LCD or the unit does not operate when the power is on. ¾ Check the connections for the power cable and ensure that the power outlet is working correctly. ¾ Make sure that the rear-panel power voltage setting matches the voltage of your power outlet.
Error Codes Code 10 Short Description Arm did not return to top position 11 Arm did not detect specified location in the allotted time 12 Unable to move to the next input/output bin 13 Unable to move into the drop disc position 14 Unable to perform the horizontal Z Maneuver from bin # 1 to the starting point Unable to perform the horizontal Z Maneuver from the starting point to the original position 15 16 20 Unable to perform vertical Z Maneuver while placing disc in drive tray Unable to perfor
MICROBOARDS TECHNOLOGY, LLC 30 40 Unable to locate drive tray for output of the disc Clear previous error 60 Unable to locate drive tray for input of the disc 70 Disc dropped during input procedure Failure to pick up a disc from input bin Disc remaining on vacuum block not loaded on to the drive tray Disc dropped during output procedure Output bin full 71 80 90 A0 B0 Cannot detect disc in drive tray C0 ~ C5 Disc misloaded output bin # FF High static shock error 37 in HCL Series The vacuum
Menu Tree 1. 2. 3. 4. 5. 6. 7. 8. 9. 10. 11. 12. 13. 14. 15. 16. 38 Copy Test Compare Test+Copy Copy+Compare Select Burn Speed Select Source Master Mode Erase RW Hard Drive Setup 10.1 Select Partition 10.2 Load Partition 10.3 Rename Partition 10.4 Delete Partition 10.5 Partition Info 10.6 Partition Size 10.
MICROBOARDS TECHNOLOGY, LLC HCL Series Specifications DVD Recorder Drive: Power Source: Power supply: Environment: DVD-+R/RW/DL CD-R/RW Recorder 90V/240V 50-60Hz switchable power supply 400W Temperature: 40°C (104°F) / 5°C (41°F) Humidity: 20% - 80% Actual Size (8-drive) W 20"xD 26"xH 29" (51x66x73.5cm) 100 lbs (45.5 kg) Packaged Size (8-drive) W 25"xD 29"xH 34" (63.5x73.5x86.5cm) 115 lbs (52.