
User Guide

2016 Microchip Technology Inc. DS50002525A-page 17
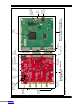
2.2.3 Evaluation Kit Set-Up
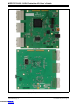
1. Connect the evaluation board and the data capture card as shown in
Figure 2-1.
2. Power up both boards using the supplied 5V Power Supplies.
3. Ensure that a clock input is connected or that a crystal oscillator is installed
correctly. Follow instructions in section
Section 2.2.4.1 “Optimizing the Clock
Connection”.
1: Note: If this is done correctly, the CAL DONE LED will be ON. Otherwise,
the user should check the clock input or crystal oscillator for issues.
4. Connect the data capture card to a computer using the provided USB cable.
5. Press the Reset button on both boards.
6. Run the Pipeline ADC Utility Software.
For help with troubleshooting the boards and operating the GUI, please refer to the
software’s supporting documentation.
WARNING
Avoid applying an input signal while the board is powered off. This may damage the input
baluns! If a high second harmonic is seen, it is likely that these baluns need to be replaced.
Downloaded from Arrow.com.Downloaded from Arrow.com.Downloaded from Arrow.com.Downloaded from Arrow.com.Downloaded from Arrow.com.Downloaded from Arrow.com.Downloaded from Arrow.com.Downloaded from Arrow.com.Downloaded from Arrow.com.Downloaded from Arrow.com.Downloaded from Arrow.com.Downloaded from Arrow.com.Downloaded from Arrow.com.Downloaded from Arrow.com.Downloaded from Arrow.com.Downloaded from Arrow.com.Downloaded from Arrow.com.