Gas Wall Oven Single and Double Welcome .................................. 2 Important Safety Instructions ... 3-4 Before Setting Oven Controls ...................... 5-6 Setting Oven Controls ........... 6 Cooking Informations ......... 7-8 Care & Cleaning ................. 9-14 Adjusting Your Oven Temperature ................ 14 Before You Call Solutions to Common Problems ........................................... 14-15 Warranty ................ Back Cover 318200958 (0703) Rev.
Welcome & Congratulations Questions? 1-800-944-9044 (United States) 1-866-294-9911 (Canada) Please attach sales receipt here for future reference. Congratulations on your purchase of a new appliance! At Electrolux Home Products, we are very proud of our product and are completely committed to providing you with the best service possible. Your satisfaction is our number one priority. We know you’ll enjoy your new appliance and Thank You for choosing our product.
Important Safety Instructions Read all instructions before using this appliance. Save these instructions for future reference. This manual contains important safety symbols and instructions. Please pay attention to these symbols and follow all instructions given. This symbol will help alert you to situations that may cause serious bodily harm, death or property damage. This symbol will help alert you to situations that may cause bodily injury or property damage.
Important Safety Instructions • Do Not Use Water or Flour on Grease Fires—Smother the fire with a pan lid, or use baking soda, a dry chemical or foam-type extinguisher. • Do not use a broiler pan without its insert. The broiler pan and grid allow dripping fat to drain and be kept away from the high heat of the broiler. • When heating fat or grease, watch it closely. Fat or grease may catch fire if allowed to become too hot. • Do not cover your broiler grid or oven bottom with aluminum foil.
Before Setting Oven Controls Grounding Instructions (electric ignition models only) IMPORTANT: READ AND SAVE THESE INSTRUCTIONS. This appliance is equipped with a 3-prong grounding plug for your protection against shock hazard and should be plugged directly into a properly grounded receptacle. DO NOT cut or remove the grounding prong from this plug. For personal safety, this oven must be properly grounded. For maximum safety, the power cord must be plugged into a 120V—60 Hz.
Before Setting Oven Controls Oven Vent Location The oven is vented through the upper control panel trim and grille or through the bottom grille of the upper control panel. When the oven is on, warm air is released through the vents. This venting is necessary for proper burner operation in the oven and good baking results. DO NOT block the vents. Doing so may cause baking failures, fire or damage to the wall oven.
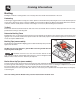
Cooking Informations Oven Baking For best cooking results, heat the oven before baking cookies, breads, cakes, pies or pastries, etc... There is no need to preheat the oven for roasting meat or baking casseroles. The cooking times and temperatures needed to bake a product may vary slightly from your previously owned appliance. Baking Problems and Solutions Chart Baking Problems Causes Corrections Cookies and biscuits burn on the bottom.
Cooking Informations Broiling Broiling is a method of cooking tender cuts of meat by direct heat under the broil element of the oven. Preheating Preheating is suggested when searing rare steaks. (Remove all utensils before preheating the oven. Foods will stick if placed on hot metal.) To preheat, set the control(s) to BROIL as instructed in the Electronic Oven Control Guide. Wait for the element to become red-hot, usually about 2 minutes. Preheating is not necessary when broiling meats well-done.
Care & Cleaning (Cleaning Chart) Surfaces How to Clean Aluminum (Trim Pieces) & Vinyl Use hot, soapy water and a cloth. Dry with a clean cloth. Do not scour or use all-purpose cleaners, ammonia, powdered cleaners or commercial oven cleaner. They can scratch and discolor aluminum. Painted and Plastic Parts, Body Parts, and Decorative Trim For general cleaning, use hot, soapy water and a cloth. For more difficult soils and builtup grease, apply a liquid detergent directly onto the soil.
Care & Cleaning Cleaning the Manual Clean Oven (Regular oven models only) Porcelain has a smooth finish and is a type of glass fused to metal. Oven cleaners can be used on all interior oven surfaces. REMOVE SPILLOVERS AND HEAVY SOILING AS SOON AS POSSIBLE. REGULAR CLEANINGS WILL REDUCE THE NUMBER OF MAJOR CLEANINGS LATER. Adhere to the following cleaning precautions: • Allow the oven to cool before cleaning. • Wear rubber gloves when cleaning the appliance manually.
Care & Cleaning Self-Cleaning (some models) A Self-Cleaning oven cleans itself with high temperatures (well above cooking temperatures) which eliminate soils completely or reduces them to a fine powdered ash you can wipe away with a damp cloth. Adhere to the following cleaning precautions: • Allow the oven to cool before cleaning. • Wear rubber gloves when cleaning any exterior parts of the oven manually.
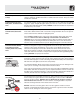
Care & Cleaning Hinge lever hook Hinge support Removing and Replacing the Oven Door The door is heavy. For safe, temporary storage, lay the door flat with the inside of the door facing down. Single Oven Models Lock engaged for door removal Figure 1 - Single Oven Models HINGE SLOT - Door removed from the oven Figure 2 - Single Oven Models To Remove Oven Door (Single Oven models): 1. Open the door to the fully opened position. 2.
Care & Cleaning Removing and Replacing the Oven Bottom Single Oven Models To Remove the Oven Bottom: 1. Lift up the lift tab at the back of the oven bottom 2. Slide oven bottom out, and lift it up and out. To Replace the Oven Bottom: 1. Slide horizontal tabs on back of oven bottom into the holes at the back of oven cavity. 2. Lower the front of the oven bottom so locking flange fits into locking channel. 3. Replace lift tab to hold oven bottom in place.
Care & Cleaning Changing Oven Light Use the rocker switch located on the control panel to turn the oven light ON or OFF. On some models, the oven light automatically will turn automatically ON when the oven door is opened. Be sure the oven is unplugged and all parts are COOL before replacing the oven light. Wear a leather-faced glove for protection against possible broken glass. To Change the Oven Light 1. Turn electrical power off at the main source or unplug the oven. 2.
Before you call Solutions to Common Problems Entire Appliance does not operate. Controls are not set properly. See instructions in the Oven Control Guide to set the controls. House fuse has blown or circuit breaker has tripped immediately following installation. House fuse may not be fully engaged. Check fuse or engage circuit breaker securely. House fuse has blown or circuit breaker has tripped after the oven has been installed and previously operating. Call an authorized servicer.
Major Appliance Warranty Information Your appliance is covered by a one year limited warranty. For one year from your original date of purchase, Electrolux will pay all costs for repairing or replacing any parts of this appliance that prove to be defective in materials or workmanship when such appliance is installed, used and maintained in accordance with the provided instructions. Exclusions This warranty does not cover the following: 1.