
Use and Care


5
// www.micromatic.com
3 // INSTALLATION
3.1 UNCRATING
Cut and remove the outer packaging. Cut the (4) four clamps that hold the refrigerator
to the skid lift the unit off the skid. If machine was laid down during this operation leave
the cabinet up right for 24 hours before plugging into power source. To install draft
arm, rst place rubber washer over draft arm mounting holes in cabinet top and put
beer line connector down through hole. Next secure draft arm with four bolts provided.
To retain complete mobility of the cooler, the accessory CO
2
tank (up to ve pounds in
size) must be placed inside the cabinet.
3.2 SEALING
WHEN SANITATION CODES REQUIRE SEALING TO FLOOR, THIS METHOD MAY
BE USED
1. Tip cabinet and apply a bead of silicone seal on bottom edge of the base.
2. Return cabinet to upright position and using proper equipment, lift cabinet into location.
Heavy appliances should not be used on the same circuit with the cooler.
CAUTION: If an extension cord is necessary, use only a three wire grounding type of
wire, size 16 AWG or heavier; do not exceed 20 feet in length. The use of ungrounded
cords or overloaded circuit voids compressor warranty.
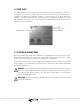
3.3 CLEANING OF CABINET
The exterior of the cabinet is either black vinyl or stainless steel and should be cleaned
only with lukewarm water, taking care not to scratch the surface. Mild detergents are
also recommended. The interior can be cleaned in a similar manner. THE CONDENSER
MUST BE CLEANED AT REGULAR INTERVALS. FAILURE TO DO SO CAN CAUSE
COMPRESSOR MALFUNCTION AND WILL VOID WARRANTY.
Clean approximately every six months, depending upon usage, dust, etc. Pull cabinet
away from wall and thoroughly vacuum the condenser and surrounding surfaces.