
CONFIGURATION TOOLKIT User guide


53HC2600 INSTRUCTION MANUAL
10 Installation
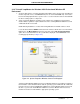
•The Select Program Folder window appears. Select the program Folder you want the pro-
gram icons added to. The Micro-DCI Comm Services folder is selected by default as the
folder for the program icons. You can accept the default, select an existing program folder,
or type a new program folder.
• Click the Next button.
•A Setup window with a progress bar appears and the Micro-DCI files begin to install.
•The Enter Information window appears and prompts you to enter a maximum of eight-
characters as a name for your entire Micro-DCI local system.
• Either accept the default name or enter a name and click the Next button.
The progress bar then finishes updating and the Setup process continues.
6. Installing Data Access Objects (DAO)
• The LoopMaster uses Data Access Objects (DAO’s) to store local databases. If Microsoft
DAO 3.5 has not been previously installed, LoopMaster launches the DataAccess Objects
(DAO) SDK Setup window. This program is only installed the first time then LoopMaster is
installed on your PC.
• Click the Next button and DAO Setup will copy about 25% of the files, then close and
return to the Main LoopMaster Setup program. It is correct that only about 25% of the files
are copied. These are the only files required.
• If DAO 3.5 is already present on the system, Item 5 will be bypassed and the setup pro-
gram will perform Item 6.
7. Installing Micro-DCI Services and Program Folder
• The Micro-DCI Services will be automatically installed. A window will pop up to install
these services.
• When the services are installed, the window will close and return you to the Main Loop-
Master Setup.
• The Micro-DCI Communications Services Setup program then creates the Micro-DCI
Communications Services program folder and automatically adds the appropriate icons
for the Micro-DCI Communications Services product.
8. Installing Micro-DCI Communications Services License Key
Setup will launch the Micro-DCI License Administration program to enter your license keys.
License keys must be added one at a time.
•Select Add new license... from the License menu.
• In the License Administration dialog, type in your license information for one license key.
Be certain to enter all information exactly as it appears. Click Save and this information
will be verified and written to the license file. If the information entered is not correct, a
pop-up message box will appear and the information will have to be corrected.
✎ NOTE If this PC is a node on a Micro-PWC network, the selected name
will be used to identify the Micro-DCI communication interface on
this PC; therefore this name must be unique from all other node
names on the Micro-PWC global network.