Micronet Faster and Easier Networks User Manual Wireless Print Server Model No.: SP766W http://www.micronet.
Federal Communication Commission Interference Statement This equipment has been tested and found to comply with the limits for a Class B digital device, pursuant to Part 15 of FCC Rules. These limits are designed to provide reasonable protection against harmful interference in a residential installation. This equipment generates, uses, and can radiate radio frequency energy and, if not installed and used in accordance with the instructions, may cause harmful interference to radio communications.
Federal Communication Commission (FCC) Radiation Exposure Statement This equipment complies with FCC radiation exposure set forth for an uncontrolled environment. In order to avoid the possibility of exceeding the FCC radio frequency exposure limits, human proximity to the antenna shall not be less than 20cm (8 inches) during normal operation. The antenna(s) used for this transmitter must not be co-located or operating in conjunction with any other antenna or transmitter.
COPYRIGHT Copyright ©2006/2007 by this company. All rights reserved. No part of this publication may be reproduced, transmitted, transcribed, stored in a retrieval system, or translated into any language or computer language, in any form or by any means, electronic, mechanical, magnetic, optical, chemical, manual or otherwise, without the prior written permission of this company.
CONTENTS 1. INTRODUCTION..........................................................................................1 1.1 PRODUCT INTRODUCTION ...........................................................................1 1.2 PRODUCT PACKAGE ..................................................................................1 1.3 NETWORK PRINTING ARCHITECTURE ........................................................2 1.3.1 Print Server Network Functions........................................................
5.2.1 Installation Using PCONSOLE.......................................................40 6. UNIX SYSTEM NETWORK .....................................................................43 6.1 INTRODUCTION........................................................................................43 6.2 ENABLE PRINT SERVER’S TCP/IP SUPPORT ............................................43 6.3 SETUP PRINT SERVER’S IP ADDRESS .......................................................44 6.3.1 DHCP..................
8.3 DEVICE STATUS ......................................................................................75 8.3.1 System..............................................................................................75 8.3.2 Printer .............................................................................................75 8.3.3 TCP/IP.............................................................................................76 8.3.4 SMB ...........................................................
9.4 MODIFY SETTING VALUES – “SET” COMMAND ........................................103 9.5 OTHER COMMANDS .................................................................................108 9.5.1 ipconfig..........................................................................................108 9.5.2 reboot ............................................................................................108 9.5.3 exit .........................................................................................
1. Introduction 1.1 Product Introduction Thank you for purchasing and using our print server. This print server allows your printer to become a shared device on the network. It offers printing flexibility and manageability on your Local Area Network at an extremely low cost and with an absolute minimum setup and maintenance required. This print server provides IEEE 802.11g/b wireless LAN (up to 54Mbps data transfer rate), an Ethernet network port (10/100Mbps Ethernet), two USB 2.
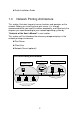
z Quick Installation Guide 1.3 Network Printing Architecture This section illustrates how print server functions and operates on the network. Before you install and use print server, it is strongly recommended that you read this section completely, and select only the chapters you need according to your network operating system by “Contents of the User’s Manual” in next section. This section will first introduce the role every component plays in the network-printing environment.
1.3.1 Print Server Network Functions Print Server Unix Print Server NetWare ServerWindows NT Server Windows NT Windows 2000 Windows 98 Workstation Because print server supports IPX/SPX, NetBEUI, TCP/IP and AppleTalk network protocols, any networked computer can directly print to the print server from any of its installed protocol.
1.3.2 Network Printing Functions for Clients Client User Unix Print Server NetWare ServerWindows NT Server Windows NT Windows 2000 Windows 98 Workstation Common operating systems for clients are classified as following: Windows 95/98SE/Me/NT/2000/XP/2003 Our print server system provides PTPP (Peer-to-Peer Printing) driver and utilities for Windows 95/98SE/Me/NT/2000/XP/2003 users. PTPP (Peerto-Peer Printing) supports TCP/IP protocol.
In the client installation procedure, after PTPP (Peer-to-Peer Printing Driver) is installed into Windows, the system will automatically (manual configuration is also allowed) search all the print servers on the network, and then add their printing ports into Windows’ printing port (see below).
1.3.3 Network Printing Functions for Network Server Network Server Unix Print Server NetWare ServerWindows NT Server Windows NT Windows 2000 Windows 98 Workstation Common network servers are classified as following: Windows NT/2000/2003 Our print server system provides PTPP (Peer-to-Peer Printing) driver and utilities for Windows NT/2000/2003. After PTPP is installed, the server can directly print through print server.
1.4 Network Printing Environment Common network environment are classified as following: Windows Peer-to-Peer Network The client’s PTPP driver will use TCP/IP protocol to print through print server. Windows NT/2000/2003 Network Network printing function will become available after PTPP driver is installed into Windows NT/2000/2003. Adding this printing function into Windows NT/2000/2003 Server allows print queue, user authority management, and many other advanced features to be used.
NetWare Network (see below) 8
1.5 Contents of the User’s Manual Chapter 2 explains print server’s hardware installation and configuration. It is strongly recommended for you to read. The following chapters introduce: Chapter 3. Windows Peer-to-Peer Network Chapter 4. Windows NT/2000/2003 Server-Based Networks Chapter 5. NetWare Network Chapter 6. UNIX System Network You may select the appropriate chapters and sections to read depending on your network printing’s requirement.
1.6 Firmware & Printing Function The print server provides a complete network printing solution.
2. Hardware Installation 1. Unpack the print server package and verify that all the items listed in the section 1.2 are provided. 2. Connect the print server to the printer you want to share on the network. 3. Connect the print server to your network by attached the network cable to the UTP port of the print server. 4. Connect the power adapter to the print server. The print server will perform the Power-On-Self-Test (POST) after it is powered on. During the POST, the three Printer Port LEDs will be on.
3. Windows Peer-to-Peer Network 3.1 System Architecture Print server supports Windows Peer-to-Peer network printing mode, which is suitable for most medium and small network environments. Through quick and simple installation procedure, users can immediately enjoy the convenience of network printing. Installation procedure is separated into following two parts: 1. Administrator Installation and Setup (refer to section 2 for more detailed information).
3.2 Administrator Installation and Setup The Administrator Installation can be performed on Windows 95/98SE/Me/NT/2000/XP/2003 with the same user interface. Before the installation, please verify that your network protocol is installed on your PC (TCP/IP, IPX and/or NetBEUI). It will be helpful in your installation process. 1. Insert the CD shipped along with the print server into your CD-ROM drive. The Autorun.exe program should be executed automatically. If not, run Autorun.
3. The “Utilities Setup” window will be displayed. Click “Next”. 4. Click “Next” to install the utilities in the default folder or click “Browse” to specify the destination folder where you would like to install the utilities.
5. Select the components you want to install. It is highly recommended to install all provided components. Click “Next” to continue. 6. Specify the program folder where the program icons will be added to, click “Next”.
7. The system will start to install the utilities automatically. 8. You have completed the installation phase and prepare to configure the Print Server. The “Choose Print Server” will list all Print Servers within the network. Select the Print Server you would like to configure and click “Next”.
NOTE 1: If this is the first time you configure the Print Server, the “Print Server Name” is the last 6-digit of MAC ID with prefix “PS”. Please check the MAC ID on the print server. NOTE 2: The list can only display the devices from the same manufacturer. 9. Specify a recognizable name for the Print Server and click “Next”.
10. Specify the IP Address for the Print Server manually or click “Next” to keep default IP Address, i.e. 192.168.2.2. 11. The configuration summary is displayed in the window. Now, you have completed the “Print Server Setup”. Click “Finish” and your system will add network port of the Print Server to your PC automatically.
12. The Administrator Installation procedure is totally completed. Click “Finish”. The Administrator Installation Program has executed the installation procedure that performs the following tasks: z Install all utilities and drivers to the administrator’s PC. z Configure the print server (including the print server name and network protocol) z Add the network port of the print server to the administrator’s PC.
3.3 Administrator Utilities After Administrator Installation is completed, there will be four utilities in print server’s Program folder. z Network Ports Quick Setup – Add the network ports of print servers within the network to your PC. z PS Admin – Allows you to configure the print server’s IP Address, network protocols and other advanced functions. Please refer to Chapter 7 for the detail instruction of the configuration. z Remote Ports – Add the network port of remote printer server to your PC.
3.4 Client Installation and Setup The Client Installation can be performed on Windows 95/98SE/Me/NT/2000/XP/2003 with the same user interface. Before the installation procedure, please confirm that your PC has connected to the network and installed at least one network protocol. 1. Insert the CD shipped along with the print server into your CD-ROM drive. The Autorun.exe program should be executed automatically. If not, run Autorun.exe manually from CD-ROM drive’s root directory. 2.
3. The “Utilities Setup” window will be displayed. Click “Next”. 4. Click “Next” to install the utilities in the default folder or click “Browse” to specify the destination folder where you would like to install the utilities.
5. Specify the program folder where the program icons will be added to, click “Next”. 6. The system will start to install the utilities automatically. 7. Now, the installation procedure is completed, you are ready to set up the client’s computer. All network ports of the Print Servers detected on the network will be added to your PC automatically, click “Continue”.
8. Note that if there are no print servers detected in the network currently, please click “Continue” to finish the installation. Please refer to Section 3.5.1 to add network ports of print servers manually. 9. The Client Installation procedure is completed. Click “Finish”.
After the installation, you have completed the following tasks: z Install all utilities and drivers to the client’s PC. z Add all the print server’s network ports of the network to the client’s PC. You can then perform the Windows’ standard “Add Printer” procedure to add network printers to your PC. Please refer to Section 3.6.
3.5 Client Utilities After Client Installation is completed, there will be three tools in print server’s Program folder. z Network Ports Quick Setup z Remote Ports z Uninstall Network Driver The Uninstall Network Driver will assist you in removing all installed client software. The other two tools are described as follows.
3.5.1 Network Ports Quick Setup Network Ports Quick Setup Utility offers a very simple method to add or remove print server’s printer port from the client’s computer. During the client’s installation procedure, the system will automatically search for all print servers on the network, and add them into the printer ports of the client’s computer (see below). If you have just installed another new print server in the network, you must run this program first.
Please be aware that Network Ports Quick Setup Utility can only detect and configure all print servers on the same network, it cannot search and configure print servers on other subnets across network segments. You must use Remote Ports Utility described in the next section to manage remote (across network segments) print servers. Select the network ports in the “Available Ports” list and click “>” to add ports. If you want to add all available ports, please click “>>”.
3.5.2 Remote Ports (Utility) Remote Ports Utility offers a convenient way for you to manage and add printer port of the remote print server. From the assistant of this utility, you can print to other print servers outside the subnet across network segment. However, please note that this function only supports TCP/IP network protocol. Please follow the procedures described below: 1. Run Remote Ports Utility. Clicks “Add” to add a remote print port. 2.
3. The new remote print port is displayed as follows. In order to use the remote printing function, you will have to proceed with normal Add Printer procedure and select your printer port as the newly added remote printer port.
3.6 Windows Add Printer Procedure After adding a “Network Port” of the print server to your PC by Administrator or Client Installation Program, you can follow the procedure described below to add printer to the Windows. Note that following “Add Printer” steps are running in Windows XP, the steps in other Operating Systems are similar. 1. Click “Start”, choose “Settings” and select “Printers and Faxes”. 2. Click “Add a Printer”. 3. The “Add Printer Wizard” is displayed. Click “Next”. 4.
5. Choose the suitable “Print Server Network Port” which was created by the Administrator Installation or Client Installation process and click “Next”.
6. Select a suitable printer manufacturer and the printer model and click “Next”. If your printer is not in the list, click “Have Disk…” to install the driver of the printer. After installation, the printer model will be added to the list. 7. Name your printer and setup the default printer, click “Next”.
8. Choose to print the test page or not. It is recommended to print a test page. Click “Next”. 9. You have added the printer to the PC successfully. The information of the printer is displayed in the windows. Click “Finish”.
4. 4.1 Windows NT/2000/2003 Network System Architecture In Windows network environment, other than the Peer-to-Peer network printing architecture described in the previous chapter, we also offer the Server-Based Printing architecture for Windows NT/2000/2003 server. Only one Windows NT/2000/2003 is required to have Windows PTPP (Peer-to-Peer Printing) driver installed and share the printing service on the network.
4.2 Windows NT/2000/2003 Server Installation and Setup Please follow the procedures described below for installation and construct a peer-to-peer connection (PTPP) between Windows NT/2000/2003 Server and Print Server. Step1. If this is your first time installing print server, please install the administrator software on Windows NT/2000/2003 server first. Refer to section 3.2 for installation instructions.
4.3 User Installation and Setup After server side’s installation is completed, client side will be able to find the server’s shared printer in Network Neighborhood. You only need to perform Window’s standard Add New Printer procedure, select “Network Printer” shown in the screen below, and complete the configurations afterwards to access the shared printer.
5. NetWare Network 5.1 System Architecture We implemented NetWare printer sharing functionality into the print server itself, thus allowing one or more printers attached by a print server to be connected to the network. We have developed the print server to support NetWare print server. Embedded print server, which emulates the “queue management functionality” of NetWare print server, PSERVER program running on the NetWare server.
Relieve the need of a workstation running the remote printer utility. Improve productivity by locating the printer near the workgroup. Each print server should log into a NetWare server before servicing the print jobs. Each print server will occupy a user account with which it can log into the NetWare server.
5.2 NetWare 3.x/4.x/5.x Installation & Setup Once your print server is connected to your Ethernet network, you can set it up for use with your networking software. 5.2.1 5.2.1.1 Installation Using PCONSOLE Configuring as Print Server Mode 1. Run the NetWare PCONSOLE program. 2. Change the current file server, if necessary, using the Change Current File Server menu selection. 3. Choose the Print Queue Information menu selection. 4. Press the Insert key to add a new print queue. 5.
8. Press the Insert key to add a new NetWare print server object. The print server name can be identical to the PSxxxxxx name printed on the label of the print server. 9. Press Enter to select the newly created print server. 10. Select Print Server Configuration. 11. Select Printer Configuration. 12. Select Printer 0 (or Printer 1, Printer 2), and press Enter, then select LPT1 (or LPT2, LPT3) in the Type field. If your print server is with only one port, you do not need to configure this Type field.
13. Press Escape, and answer Yes to the Save Changes question. 14. Select Queues Serviced by Printer, then select Printer 0 (or Printer 1, Printer 2) and press Enter. 15. Press Insert and add your newly created print queue to the list of queues serviced by the printer. Enter a priority number for the queue service, or press Enter to accept the default. 16. Repeatedly press Escape to exit the PCONSOLE program. 17. Reset the print server to have the changes take effect.
6. UNIX System Network 6.1 Introduction The print server is available for TCP/IP printing by Unix LPD (Line Printer Daemon) protocol. The LPD protocol originated with Unix release is based on the BSD version of Unix and supported under most versions of Unix. This chapter explains how to configure the print server for TCP/IP operation, and how to modify configuration files on your Unix system to allow printing to the print server.
6.3 Setup Print Server’s IP Address The print server must have a unique IP address in order to be recognized by the network. You can set up the IP address on the various Unix systems using any one of the following methods: 1. DHCP (Dynamic Host Configuration Protocol) 2. BOOTP (Bootstrap Protocol) The print server will use the last three methods to obtain its IP address automatically if its IP address is configured as Auto (0.0.0.0). 6.3.
2. Add an entry to the host’s /etc/bootptab file, similar to the following: hostname:\ :ht=1:\ :ha=print_server_ethernet_address:\ :ip=print_server_ip_address: Lines should be indented with tabs. Where hostname is the device name of a print server, the ht=1 tag specifies the hardware type is Ethernet, the ha= tag specifies the Ethernet address of a print server, which is the Node ID located on the print server. The ha tag must be preceded by the ht tag.
6.5 Configure Remote LPD Printing on the Host The procedure you use to configure your Unix host(s) to allow printing to your network remote print server varies between different varieties of Unix. The procedure below can be used for Unix variants that are related to BSD Unix, such as SunOS or Linux. For other versions of Unix, consult your system documentation, keeping in mind that: 1. The print server should be treated as a BSD networked print server host. 2.
:lp=:\ :rm=203.66.191.186:\ :rp=lpt1:\ :lf=/var/spool/lpd/pserverd.log:\ :sd=/var/spool/lpd/pserverd:\ :mx#0: Lines should be indented with tabs. More than one printer name can be used, with variants separated by vertical bars (name1|name2). The rm= entry should correspond to the IP address you have assigned to the print server. You can also use a host name if you have assigned one in the /etc/hosts file. The sd= entry should correspond to the spool directory you created in the previous step.
7. 7.1 Configuration Utility Introduction This chapter introduces print server’s system configuration utility in Windows environment. This utility is automatically installed during Windows Administrator Utility installation procedure - refer to section 3.2 and 3.3. This utility provides the most complete management and configuration functions on the print server side.
7.2 Search for All Available Print Servers Every time when you run print server’s configuration utility, click the on the tool bar. The configuration utility will delay for “Search” icon several seconds because the utility is using system’s available network protocols to search for all print servers on the network. All available print servers will be listed under “Print Server Group” on the left side of the window. You must select the print server you would like to configure from the list.
7.3 Status of Print Server Click “Status” icon on the tool bar, the status of the current selected print server will be showed on the right side of the window. The information of the print server displayed are MAC ID, Model Type, Firmware Version, status of each printer port, NetWare file server name, NetWare file server polling interval, NetWare printer queue names, IP address, subnet mask, default gateway, AppleTalk printer type, AppleTalk zone and print server printing ability…etc.
7.4 Setup the Print Server Click “Setup” icon on the tool bar, the setup items of the current selected print server will be showed on the right side of the window. Double click one of the icons to set up the selected print server. A screen will pop up to verify “User Name” and “Password” of the print server. The default values are as follows.
7.5 General Configuration Double Click “General” icon and the General configuration window will pop-up. You can see basic print server information in this page. You also can configure the “Print Server Name”, “SMB Group Name”, “User Name” and “Password” here. Server Name, the name of the print server. You can use this name to identify the print server when you are searching for the print server by the administration and client utilities.
7.6 TCP/IP Configuration Double Click “TCP/IP” icon and the TCP/IP configuration window will popup.
You can configure the print server to automatically get IP from DHCP server or manually specify static IP. The print server also has a built-in DHCP server. You can enable this DHCP server and let it manages IP for you. Click the “IP” button to enter the IP setting page. If you need the print server to automatically get an IP from DHCP server, select “Auto IP”. You also can select “Static IP” to manually assign “IP Address”, “Subnet Mask” and “Gateway” for the print server.
7.7 Netware Print Server Configuration Double Click “NetWare” icon and the NetWare configuration window will pop-up. This print server supports NetWare Bindery Printing method. The print server periodically polls the NetWare server printer queues for printing jobs. You have to assign the NetWare server name, print server polling interval and the name of queue on the NetWare server for each printer port.
7.8 AppleTalk Configuration Double Click “AppleTalk” icon and the AppleTalk configuration window will pop-up. AppleTalk is a data communication protocol often used by Macintoshes. The print server can use these parameters to join the AppleTalk network and share the printer to other AppleTalk workstations. You have to setup the “Zone Name” and “Printer Type” for each printer port of this print server. Zone Name: Print server has to join zones of AppleTalk before it can be shared to other workstations.
7.9 Bonjour Configuration Bonjour enables automatically discovery of computers, devices and services on IP network. The service name will be seen by users on IP network, you have to designate the unique and friendly name to describe the device.
7.10 SNMP Configuration Double Click “SNMP” icon and the SNMP configuration window will pop up. Contact: You can enter the print server administrator’s contact information here. This information will be displayed in the SNMP management tool. Location: You can enter the installed location of the print server here. This information will be displayed in the SNMP management tool.
7.11 SMB Configuration SMB Group Name: the name of SMB group that this print server belongs to. All PC should join the same group before they can use this print server by SMB protocol. Pass Job when Error Occurred: When the printer is interrupted because of paper out or off line while printing, user can set the interval time to bypass the current printing job. Or the printing document will not be printed completely or with unformatted messages. The range is from 1 to 120 seconds.
7.12 System Configuration Double Click “System” icon and the System configuration window will pop-up. In the System configuration page, you can select to enable/disable each printing or management protocol, assign name for each printer port of this print server, and upgrade the new firmware for this print server. Port Name is the name of the printer port. Each printer port has to be assigned a name. The client utility uses this name to access the printer port.
Upgrade Firmware: You can use this “Upgrade Firmware” tool to update the newest firmware of the print server. Click “ ” button and select the correct firmware in your PC. After selecting the firmware file, click the “Upgrade” button to finish the firmware update process. If you want to reset the Print Server to default factory settings, please click “Load Default”.
7.13 Wireless Configuration If you want to use the print server through wireless LAN, please set up the print server through Ethernet first and make sure your wireless LAN setting is correct. After setting the wireless LAN, unplug the Ethernet cable and restart the print server, then you can start to use the print server through wireless LAN.
Infrastructure Mode: In the Infrastructure mode, you have to let the print server associate with an access point. You let the print server scan for an available access point automatically or manually assign the SSID of the access point you want to use. If you select to let the print server scan for an available access point, the following window will pop up. The list is the scanned available access points. Select an access point in the list and click “Next”.
Ad Hoc Mode: In the Ad-Hoc mode, you can let the print server automatically associate with other wireless station or manually assign the SSID of your wireless network. You can let the print server automatically select the channel that is the same with the peer or manually assign a channel. If you select to let the print server scan for an active wireless station, the following window will pop up.
The list is the scanned active wireless stations. Select a wireless station in the list and click “Next”. If you cannot find the wireless station that you want the print server to communicate with, click “Scan” to let the print server scan again. Both “Infrastructure” and “Ad-Hoc” mode have to go through the following procedure: This print server supports WEP and WPA-PSK security mode. If you want to use WEP encryption to protect your wireless network, you have to select “WEP (ASCII)” or “WEP (HEX)”.
WEP Security Mode: You can select “64 bit” or “128 bit” length and “Hexadecimal” or “ASCII” format for the encryption key. Longer key length can provide stronger security but worth communication performance.
Enter four key values by following the rules below and select one key as the default key. z PassPhrase – A passphrase simplifies the WEP encryption process by automatically generating the WEP encryption keys for the print server. This setting is only valid when the security mode is in “WEP (HEX)”. z Key 1 to Key 4 – If the key length is 64-bit, enter 10-digit Hex values or 5-digit ASCII values as the encryption keys. For example: “0123456aef“ or “Guest“.
WPA-shared key Security Mode: When “WPA-shared key”, also named “WPA-PSK” requires users to select the advanced encryption methods, i.e. TKIP or AES and enter a set of shared key. z TKIP – TKIP (Temporal Key Integrity Protocol) changes the temporal key every 10,000 packets. This insures much greater security than the standard WEP security.
You can select to let the print server automatically obtain IP settings with DHCP client or manually assign the IP settings. If you manually assign the IP settings, you have to enter IP address, subnet mask and default gateway address. When you finish configuring the IP settings, click “Next” to confirm the IP Address configuration. Click “Save” to save the wireless configuration.
7.14 Wizard Click “Wizard” icon on the tool bar, the setup wizard item of the current selected print server will be showed on the right side of the window. Double click the “Print Server Setup Wizard” the setup wizard will guide you through all the setup process.
1. Set up the name of this print server and the port name for the print server. 2. Select to enable required printing protocol. Please refer to section 7.12 for detail information.
3. Setup the IP of this print server and the DHCP server. Please refer to section 7.6 for detail information. 4. Setup the NetWare printing. Please refer to section 7.7 for detail information.
5. Click “Save” to finish setting. 7.15 Report Click “Report” icon on the tool bar, the Report window will pop up. The report lists basic information of all available print servers on the network. The information includes Device Name, MAC ID, Model Type and Firmware Version of print server.
8. 8.1 Web Management Introduction Print server can be configured and managed on the Web. Through Local Area Network, or even Internet, administrator can easily configure and manage print server’s various main functions in browsers. Simply enter print server’s IP address into your browser’s address field to manage a print server by print server’s built-in Web Server. The default IP Address, User Name and Password settings of the Print server are as follows. IP Address: 192.168.2.
8.3 8.3.1 Device Status System System Information includes “Device Name”, “Print Server Name”, “Model Type”, “System Up Time”, “Firmware Version”, “MAC Address” and the protocols enabled status, etc. 8.3.2 Printer This page lists information of printers connected to all printer ports.
8.3.3 TCP/IP This page lists all TCP/IP settings of the print server including “IP Address”, “Subnet Mask” and “Gateway”. It also lists DHCP server setting. 8.3.4 SMB This page lists the SMB group and the pass job interval time settings of the print server.
8.3.5 SNMP This page lists the SNMP settings of the print server. It includes the settings of “SNMP System Contact” and “SNMP System Location”. 8.3.6 NetWare This page lists NetWare settings, including “Polling Time”, “Use Bindery Mode”, “Name of the File Server” and “Port Attached Queue”.
8.3.7 AppleTalk This page lists AppleTalk settings, including “AppleTalk Zone Name” and “Printer Type” of printers connected to all print ports. 8.3.8 Bonjour This page lists Bonjour settings, including “Port Service Name” of each port.
8.4 8.4.1 Setup Wizard System You can change the print server name and port name of the print server from here. Print Server Name, the name of the print server. You can use this name to identify the print server when you are searching for the print server by the administration and client utilities. Port Name is the name of the printer port. Each printer port has to be assigned a name. Then you can use this name to access the printer port.
8.4.1.1 Admin Password It allows you to change the password of the print server. USER Name: the administrator name of the print server. If you change the user name, you have to login to the print server from administrator utility or web management with the new name. The default user name is ”admin”. Password, enter the password you want to change to the print server. The password can be up to 8-digit alphanumeric format. The default password is “1234”.
8.4.1.2 Advanced Settings You can enable/disable the printing protocols and management tools from the screen. To enable the function, please select “Enabled”; to disable the function, please select “Disabled”.
8.4.2 Wireless If you want to use the print server through wireless LAN, please set up the print server through Ethernet first and make sure your wireless LAN setting is correct. After setting the wireless LAN, unplug the Ethernet cable and restart the print server, then you can start to use the print server through wireless LAN.
2. If “Auto” is selected, the print server can automatically decide to enable or disable the wireless function. The print server only can work in ether Ethernet or wireless LAN mode. It cannot work in both Ethernet and wireless LAN mode at the same time. When the print server starts up, it will auto-detect if the LAN port is connected to an active network by an Ethernet cable.
8.4.2.1 Site Survey You can use this “Site Survey” function to search for available access points in you location. In the list is the information of all available access points or wireless stations, includes SSID, BSSID, Channel, Type, Encryption and Signal Strength. You can select one wireless device in the list for this print server to associate with or you have to go back to “Wireless” page to manually setup the wireless parameters.
8.4.2.2 Encryption This print server supports WEP and WPA-PSK security mode. If you want to use WEP encryption to protect your wireless network, you have to select “WEP”. If you want to use WPA-PSK, you have to select “WPAshared key”. The wireless security setting should be the same with other wireless devices in the same network. WEP Security Mode: z Key Length – You can choose “64-bit” to use WEP with 64-bit key length encryption or choose “128-bit” to use WEP with 128-bit key length encryption.
z Key 1 – Key 4 – The WEP keys are used to encrypt data transmitted within the wireless network. Fill the text box by following the rules below. 64-bit WEP: input 10-digit Hex values (in the "A-F", "a-f" and "0-9" range) or 5-digit ASCII character as the encryption keys. For example: “0123456aef“ or “Guest“. 128-bit WEP: input 26-digit Hex values (in the "A-F", "a-f" and "0-9" range) or 10-digit ASCII characters as the encryption keys. For example: “01234567890123456789abcdef“or “administrator“.
z AES – AES has been developed to ensure the highest degree of security and authenticity for digital information and it is the most advanced solution defined by IEEE 802.11i for the security in the wireless network. z Pre-shared Key Format – Select “Pass phrase” or “Hex” key format. If “Pass phrase” is selected, please enter 8 to 63 digits of ASCII format to be the key for the authentication within the network. If “Hex” is selected, please enter 64 digits of Hex code which should be “0-9” and “A-F”.
8.4.3 TCP/IP You can configure the print server to automatically get IP from DHCP server or manually specify static IP. The print server also has a built-in DHCP server. You can enable this DHCP server and let it manages IP for you. If you need the print server to automatically get an IP from DHCP server, select “Enable Obtain TCP/IP Settings Automatically (Use DHCP/ BOOTP)”.
8.4.4 SMB You can enable/disable the SMB protocol from here. If SMB is enabled, enter the “SMB Group Name” to specify the SMB group that this print server belongs to. All PC should join the same group before they can use this print server by SMB protocol. Pass Job When Error Occurred is for you to set the interval time for bypassing the current printing job in order to avoid the printing job is not printed completely while the printer is interrupted unexpectedly because of paper out or off line.
8.4.5 SNMP The print server supports SNMP configuration. If it is enabled, please set up the following parameters. SNMP System Contact: You can enter the print server administrator’s contact information here. This information will be displayed in the SNMP management tool. SNMP System Location: You can enter the installed location of the print server here. This information will be displayed in the SNMP management tool.
8.4.6 NetWare This print server supports NetWare Bindery Printing method. The print server periodically polls the NetWare server printer queues for printing jobs. You have to assign the NetWare server name, print server polling interval and the name of queue on the NetWare server for each printer port. Polling Time is the polling interval of the print server for waiting printing jobs on the NetWare server. Name of the File Server is the name of the NetWare file server that provides printer queues.
8.4.7 AppleTalk AppleTalk is a data communication protocol often used by Macintoshes. The print server can use these parameters to join the AppleTalk network and share the printer to other AppleTalk workstations. You have to select to enable or disable AppleTalk, and setup the “Zone Name” and “Printer Type” for each printer port of this print server. AppleTalk Enable: Enable or disable “AppleTalk”.
8.4.8 Bonjour Bonjour enables automatically discovery of computers, devices and services on IP network. The service name will be seen by users on IP network, you have to designate the unique and friendly name to describe the device. 8.4.9 Save Settings You can click the “Save Settings” to save the settings and restart the system.
8.5 8.5.1 System Tools Load Default You can use this page to restore the factory default settings. All of your previous setup will be cleared.
8.5.2 Upgrade Firmware from Browser You can upgrade new firmware for this print server in this page. Click “Browse” to select the new firmware in your storage and then click “OK”, the firmware will be updated in several minutes. Be aware that if you have started upgrading firmware, you have to follow all the upgrading steps or the print server can’t turn back to normal configuration.
8.5.3 Backup Setting To backup the print server setting to a “config.bin” file, select “Backup settings from Print Server”. To apply the setting from the backup file, select “Restore settings from file” and specify a file to restore. 8.5.4 Restore System From here, you can select the file to restore this print server.
9. Telnet Management 9.1 Introduction Print server can be configured and managed by Telnet. Through Local Area Network, or even Internet, administrator can easily configure and manage print server’s various main functions by a telnet client. 9.2 Login Execute the Telnet client tool and connect to the print server IP. telnet 192.168.2.2 Then you will be prompted to enter the username and password.
9.3 Get Setting Values – “get” Command “get” command is used to get the setting values of this print server. The format of “get” command is as following: get argument Then the argument value will be displayed after the command. For example, if I want to get IP address of the print server, I type “get ip” command and the IP value “IP_ADDR=’192.168.2.2’” is displayed: admin# get ip IP_ADDR=’192.168.2.2’ If you enter “get” only, the system will list all available arguments of “get” command.
Argument wlmode Description Example Wireless LAN mode admin# get wlmode is Infrastructure or Ad AP_MODE=1 Hoc 0: Infrastructure 1: Ad Hoc ESSID ESSID of the wireless LAN admin# get ESSID SSID=’default’ channel Channel number admin# get channel used by wireless LAN CHANNEL=11 wep The mode of WEP admin# get wep 0: disable WEP=0 1: 64 bit WEP enabled 2: 128 bit WEP enabled defkey Default WEP key number admin# get defkey WEP_DEFAULT_KEY=0 0: key 1 1: key 2 2: key 3 3: key 4 key641 64 bit WEP k
Argument key644 Description 64 bit WEP key 4 Example admin# get key641 WEP64_KEY4=0123456789 key1281 128 bit WEP key 1 admin# get key1281 WEP128_KEY1=0123456789 abcdef0123456789a key1282 128 bit WEP key 2 admin# get key1282 WEP128_KEY2=0123456789 abcdef0123456789a key1283 128 bit WEP key 3 admin# get key1283 WEP128_KEY3=0123456789 abcdef0123456789a key1284 128 bit WEP key 4 admin# get key1284 WEP128_KEY4=0123456789 abcdef0123456789a ip IP of the print server admin# get ip AP_ADDR=’192.168.2.
Argument aq1 applezone Description Example Name of the printer queue on the NetWare server admin# get aq1 The name of AppleTalk zone that this print server joins to admin# get applezone PORT1_QNAME=’PQ1’ PORT1_APPLEAONE=’*’ printertype1 The type of the printer attached admin# get printertype1 to this print server PORT1_PRINTTYPE=’La serWriter’ SMBDG The name of the SMB group admin# get SMBDG name that this print server joins SMBD_NAME=’default’ to SNMPC The administrator contact information of
Argument Description Example appletalk AppleTalk printing is enabled or admin# get appletalk disabled APPLE_ENABLE=0 0: disable 1: enable SMBD SMB printing is enabled or disabled 0: disable admin# get SMBD SMBD_ENABLE=1 1: enable SNMP SNMP management protocol is admin# get SNMP enabled or disabled SNMP_ENABLE=1 0: disable 1: enable IPX NetWare Bindery printing is enabled or disabled 0: disable LPD IPP RAW LPD_ENABLE=1 admin# get IPP IPP_ENABLE=1 1: enable RAW printing is enabled or disabled 0:
9.4 Modify Setting Values – “set” Command “set” command is used to modify the setting values of this print server. The format of “set” command is as following: set argument_name value Then the value will be written into the system configuration. For example, if you want to set IP address of the print server to 192.168.2.2, type “set ip ‘192.168.2.2’” command and the IP of the print server will be changed: admin# set ip ’192.168.2.
Argument Description wep The mode of WEP. Example set wep disable The value should be “disable”, “wep64” or “wep128” defkey Default WEP key number. set defkey 0 The value should be 0~3. key641 0: key 1 1: key 2 2: key 3 3: key 4 64 bit WEP key 1. set key641 0123456789 The value should be 10 digit Hex value key642 64 bit WEP key 2. set key641 0123456789 The value should be 10 digit Hex value key643 64 bit WEP key 3.
Argument Description key1284 128 bit WEP key 4. Example set key1284 0123456789ab The value should be 26 digit cdef0123456789a Hex value ip gateway IP of the print server set ip ‘192.168.2.2’ Default gateway of the print set gateway ‘192.168.2.254’ server submask Subnet mask of the print set submask ‘255.255.255.
Argument Description Example DHCPS Enable or disable the DHCP Set DHCPS disable server. The value should be “disabled” or “enabled”. DHCP Enable or disable to get dynamic IP by DHCP. Set DHCP disable The value should be “disabled” or “enabled”. appletalk Enable or disable AppleTalk printing Set appletalk disable The value should be “disabled” or “enabled”. SMBD Enable or disable SMB printing Set SMBD enable The value should be “disabled” or “enabled”.
Argument Description Example IPP Enable or disable IPP printing set IPP enable The value should be “disabled” or “enabled”. RAW Enable or disable RAW printing The value should be “disabled” or “enabled”.
9.5 Other Commands 9.5.1 ipconfig “ipconfig” command is used to quickly get the IP settings (IP, subnet mask, default gateway) of the print server: admin# ipconfig IP_ADDR=192.168.2.2 SUBNET_MASK=255.255.255.0 DEFAULT_GATEWAY=192.168.2.254 9.5.2 reboot “reboot” command is used to restart the print server: admin# reboot 9.5.3 exit “exit” command is used to leave the print server telnet management: admin# exit 9.5.
10. IPP Printing 10.1 Introduction IPP (Internet Printing Protocol) Printing provides a convenient way of remote printing service by TCP/IP. The print server can support IPP printing by default. It is needless to do any setting. Any PC that can support IPP printing, for example Windows 2000/XP, can directly uses the print server by IP. By using the IPP printing, you can share the printer to all the PC’s that can access the print server by IP. You can even share your printer to Internet users. 10.
3. The “Add Printer Wizard” is displayed. Click “Next”. 4. Select “A network printer, or a printer attached to another computer”. Click “Next”.
5. Select “Connect to a printer on the Internet or on a home or office network” and enter the URL of print server. The URL format is “http://IP:631/Port Name”. The IP should be the print server’s IP. The number 631 is IPP standard port number. Port Name is the port name of print server that your printer is connected to. The default port name is “lpt1”. One example of the URL is http://192.168.3.66:631/lpt1. After entering the URL of print server, click “Next”. 6.
7. Choose to set the print whether as a default printer or not. Click “Next”.
8. You have added the network printer to the PC successfully. The information of the printer is displayed in the windows. Click “Finish”.
11. LPR Setting in MAC OS LPR Printing (Line Printer Remote technology) allows Macintosh computers to connect to printers via TCP/IP. LPR Printing can be set up on any Macintosh with version 9.x above. To enable LPR Printing in Macintosh, please follow the procedures below. 1. In the Desktop, click “System Preferences”. 2. Click “Print & Fax”.
3. From the “Print & Fax” screen, click “Set Up Printers…”. 4. Click “Add” to add the new Print Server through TCP/IP.
5. Enter the “Printer Type”, “Printer Address” and “Queue Name” and select the “Printer Model” to setup the Print Server. Click “Add” to continue. Printer Type: LPD/LPR Printer Address: Input the IP Address of the Print Server Queue Name: The queue name of the Print Server is “lpt1” Printer Model: Select the Printer Model that is attached to the Print Server.
6. The Print Server is installed completely. You can see it in the “Printer List”. 7. You can print a file to check whether the Print Server is installed successfully.
12. UPnP Setup When the UPnP function is enabled, the print server can be detected by UPnP compliant system such as Windows XP. The print server will be displayed in the Neighborhood of Windows XP, so you can directly double click the print server or right click the print server and select “Invoke” to directly get into the web page of the print server for configuration.
Enable UPnP in Windows XP SP2 If you can’t find the print server in the Neighborhood of Windows XP SP2 or you have seen the following message when you double click the print server. You have to check if UPnP function is blocked by the firewall. Please follow the steps below to enable it. 1. Click “Yes” on the above message or click “Start”, choose “Settings” and select “Network Connections” to enable UPnP manually. 2. Right click the “Local Area Connection” and select “Properties”.
3. In the “Local Area Connection Properties”, select “Advanced” option menu and click “Settings”.
4. The “Windows Firewall” screen will be popped up, select “Exceptions” option menu.
5. Enable “UPnP Framework” from the “Programs and Services list” and click “OK”.
13. Windows XP SP2 Setup In Windows XP SP2, XP SP2’s firewall would block the unknown communication. This print server has allowed the communications data passed through the XP SP2’s firewall. In case that you do not find any print server listed on the “Available Ports” in “Network Ports Quick Setup”, please follow the steps below. 1. Click “Start”, choose “Settings” and select “Network Connections”. 2. Right click “Local Area Connection” and select “Properties”.
3. Select “Advanced” tab and click “Settings…”.
4. Select “Exceptions” tab and click “Add Program…”.
5. Click “Browse” to add a new program.
6. Open the “NPUtil” file from “C:\Program Files\PrintServer Utilities” (where C:\ is the system drive).
7. A new program “Network Ports Quick Setup” is displayed in the list, click “OK”.
8. Click “OK”. You have completed the setting. The Windows XP SP2 will allow the incoming network connections activated by the program.