User’s Manual VoIP FXO Gateway Model No.: SP5052A/S, SP5054A/S http://www.micronet.
Table of Contents 1. 2. WEB CONFIGURATION ............................................................................................. 3 STEP 1. USE WEB BROSWER TO CONNECT GATEWAY ..................................................... 3 STEP 2. INPUT THE LOGIN NAME AND PASSWORD ............................................................. 3 STEP 3. START TO CONFIGURE ....................................................................................... 4 1.1 NETWORK INTERFACE .....................
2.13 [LINE] .................................................................................................................. 34 2.14 [ROUTE] .............................................................................................................. 35 2.15 [PREFIX] .............................................................................................................. 37 2.16 [PAUSE]............................................................................................................
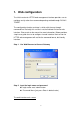
1. Web configuration The initial version for HTTPD web management interface provides user to configure easily rather than command operating method through RS-232 / TELNET. The configuration function and step is similar with the way through command line. Basically this version is not the finalized version for web interface. Please refer to the manual for more information. Below provide a simple user guide for user to configure via web interface.
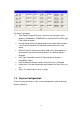
Step 3. Start to Configure Most of all commands displayed in console / telnet are transfer to web interface. The most important commands are Network Interface, SIP Config and Reboot System. The method is as the same as command mode. 1.1 Network Interface Users have to configure the Network configurations in this page. This gateway will be work while it is connecting with the internet network. Please get more info from the following descriptions. (See figure 3.
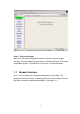
Parameter Description: z IP Address: Define the ip address for your networking if it is the fixed ip. Please get this info from your ISP. z Subnet Mask: Define the mask address for your networking. Please get this info from your ISP. z Default Routing Gateway: Define the default gateway for your networking. Please get this info from your ISP. z IP Mode: To configure the fixed or dynamic ip address for this unit. Please configure to PPPoE if the ADSL is using the PPPoE type.
z z z z connection. PPPoE IP Address: In the PPPoE mode, this table will show the ip address that this unit gets from the ISP. PPPoE Destination: In the PPPoE mode, this table will show the default gateway address that this unit gets from the ISP. PPPoE DNS primary: In the PPPoE mode, this table will show the DNS ip address that this unit gets from the ISP. After Remote Host Disconnection: This unit will reboot and re-connect to the ISP 1.
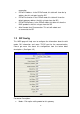
Peer-2-Peer: It only supports the peer-to-peer mode and users have to define the phone book for this mode. z Proxy: Users have to register on the Proxy if users picked up this option. z Gateway: Only user line1 has to register on the Proxy, then the line1, line2, line3 and line4 join in the same hunting group automatically. Primary Proxy IP Address: Enter the proxy ip if users pick up the proxy mode.
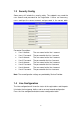
1.3 Security Config Some proxy will include the security policy. The endpoint may need the user account and password for the registration. If these are necessary, users could put the correct account and password in the correct table. Parameter Description: z Line 1 Account: z Line 1 Password: z Line 2 Account: z Line 2 Password: z Line 3 Account: z Line 3 Password: z Line 4 Account: z Line 4 Password: The user name for the line 1 account. The password for the line 1 account.
Parameter Description: z Type: Show the type of this port. There are only one types of this gateway. (SP5052A/S / SP5054A/S will show the FXS and FXO type. It can not be changed.) z Hunting Group: Define the group number of this port. When the port is busy, the call could be transferred to another port in the same group. z z z z z Hotline: Enable or Disable the hotline mode. The hotline mode will be enabled if you enter the hotline number. The default setting is disabled. Fwd.
Parameter Description: z Keypad Type: Select different DTMF Keypad Type z In-Band: The DTMF signal sending by RTP. z RFC2833: RTP Payload for DTMF Digits z INFO: The DTMF signal sending by SIP INFO. z Inter Digit Time: Set the DTMF inter-digit time (second). Parameter defines the maximum amount of time between digits. If a digit is not followed by another within this time limit, then digit collection is terminated. z z z z Ring Time: It for the ring detection from the PSTN.
Parameter Description: z z z z z z Codec Priority: This could help users configure the codec priority for using. Frame Size: To configure the packet size for the codec that users want. G.723 Silence Suppression: To enable the VAD and CNG function for the G.723 codec. Volume: Adjust the volume in “Voice” (sending out); “Input” (receiving); “ DTMF” (DTMF sending out). Please Noted the value is limited. Echo Cancel: To enable or disable the echo cancellation function.
define the pattern of the disconnect tone if the disconnect tone from PSTN side is not the standard tone. Parameter Description: z Disconnect Tone 1 – 4: To configure the frequency, level gain and on/off time for the busy tone from PSTN or PABX side. The busy tone supports 4 tables. z Remote Ring Back Tone: To configure the frequency, level gain and on/off time for the ring tone from PSTN side. The gateway won’t connect the calls if the ring tone value is incorrect. 1.
Parameter Description: z Index: The list number of the Phone Book. z Name: The name for this contact number. z E164: The dialing number for the calling side. z IP Address: The destination IP address for this phone number. z Port: The call signal port of the destination. z Drop: Support the drop function. Enable is for enable this drop function; Disable is for disable this drop function. The Drop Prefix will drop the E164 number, which you had configured in the E164 table.
1.9 Prefix Configuration The Prefix function is using the drop and inserts function. Parameter Description: z Index: The list number of the Phone Book z Prefix: The prefix number of the whole numbers that could be into this gateway z Drop: The drop function. Enable this function by the Enable button; Disable this function by the Disable button z Insert: The insert function.
1. 2. Press the Prefix Configuration button to enter the configuration table. Enter the index number. Put the prefix numbers you will dial in the prefix table, enable (disable) the drop function and enter the numbers you want to insert. The usage is as same as the drop, insert function of the Phone Book. 3.
4. Please Commit it and Reboot the system if the configuration is finished. 1.10 Routing Table Parameter Description: z Index: Define the number of this data. z Prefix: Define the number you dial.
z z z z z digit of the numbers Destination: Define the destination of this rule. There are three directions of the destination. E164: Define a right E164 number of the destination you want. Min Digits: The minima digits you dial. Max Digits: The maxima digits you dial. Hunt Method – Enable the Hunt Group function and pick up the hunt type. z None – Disable this function z Group – The call will search other ports to be the destination with the same group if the origin destination is busy.
1.11 FXO Password You will get the IVR if you make calls from PSTN side. The IVR will ask you the password you set, and you could make other calls to IP side if the password you type is correct. Please press the FXO Password button to configure the password Note: This function is only for the calls from the PSTN side. It’s not ready for the IP side as so far. 1.12 IP Packet ToS The Type of Service needs worked with the network router supported.
these values to make the packets with the correct values for the TOS service from the gateway. According to the RFC 1349 document, the TOS value as following: 1000 – minimize delay 0100 – maximize throughput 0010 – maximize reliability 0001 – minimize monetary cost 0000 – normal service These values are the Binary format. Please change to the Decimal and put these values in to the correct table. 1.13 Password There are two accounts for login to access or change the configurations.
1.14 ROM Upgrade User could update the firmware just by the web configuration interface. There are two types for the upgrading procedure. One is using the TFTP server; another is using the FTP server.
1.16 Commit Data Press COMMIT when any configuration has been changed before reboot 1.17 Reboot System After commit configuration, user has to REBOOT device to be able run the configurations properly.
2. Command list Command Line user interface is provided via out-of-band console access and telnet. Console Access y Launch the HyperTerminal program, then the following windows pop-up on the screen. (START – Program files – Accessories – Communication – HyperTerminal) y Define a name such as ‘SP5052A’ for this new connection. y After pressing OK button, the next window popping up is necessary to connect choose COM Port.
Note: Make sure the gateway serial cable is connected to correct COM port as the terminal selected, try the different port if failed. y Configure the COM Port Properties as following: (1) Bits per second: 9600 (2) Flow control: None Press ‘OK’ button, and start configuring Gateway. y Power on the gateway, the message shows while booting. About 40 seconds for complete boot-up.
Telnet Please set your PC with IP address (10.1.1.x), mask (255.255.0.0), and default gateway (10.1.1.254). Click on START Æ RUN Æ telnet 10.1.1.3. Then, login with username (root) and password (no password).
2.1 [help] Type help or man or ? to list all the available command.
2.2 [quit] Type quit will quit the Micronet SP5052A/S / SP5054A/S Gateway configuration mode. And turn back to login prompt. --------------------------------------------------------------usr/config$ quit Disconnecting... login: --------------------------------------------------------------Note: It is recommended that type the “quit” command before you leave the console. If so, Micronet SP5052A/S / SP5054A/S Gateway will ask password again when next user connects to console port. 2.
-delete -open -close - sip: sip related information - vp : voice related information Remove specified debug flag. Start to show debug messages. Stop showing debug messages. 2.4 [reboot] After commit command, type reboot to reload Micronet SP5052A/S / SP5054A/S Gateway in new configuration. 2.5 [flash] This command will clean the configuration stored in the flash rom and reboot Micronet SP5052A/S / SP5054A/S Gateway in factory default setting.
--------------------------------------------------------------usr/config$ commit This may take a few seconds, please wait.... Commit to flash memory ok! usr/config$ --------------------------------------------------------------Note: Users should use commit to save modified value, or they will not be activated after system reboot. 2.7 [ifaddr] Configure and display Micronet SP5052A/S / SP5054A/S Gateway network information.
SNTP mode (0=no update, 1=specify server IP, 2=broadcast mode). Example: ifaddr -ip 210.59.163.202 -mask 255.255.255.0 -gate 210.59.163.254 ifaddr -mode 1 ifaddr -sntp 1 210.59.163.254 ifaddr -autodns 1 ifaddr -dns 1 168.95.1.1 ifaddr -ipsharing 1 210.59.163.254 --------------------------------------------------------------- 2.8 [time] When SNTP function of Micronet SP5052A/S / SP5054A/S Gateway is enabled and SNTP server can be found as well, type time command to show current network time.
--------------------------------------------------------------- No Responsed --------------------------------------------------------------usr/config$ ping 192.168.0.20 PING 192.168.0.20: 56 data bytes no answer from 192.168.0.20 --------------------------------------------------------------- 2.10 [sysconf] This command displays the system information and configuration.
-flashtime Flash time setting.(1-200, 1->10ms) Example: sysconf -ring 500 --------------------------------------------------------------Parameter Usages: -idtime set the duration (in second) of two pressed digits in dial mode as timed out. If after the duration user hasn’t pressed next number, it will dial out all number pressed. (1-10 seconds) -keypad keypad type when relay DTMF signal. 0 Æ In-Band 1 Æ RFC2833. -callerid -ring 1.
change the time waiting for dial tone. -rba set how many rings the gateway will answer the call (1 ~ 5 rings) -eod -connect End of dial.(Enable:1 / Disable:0) The unit will send the connect message to the IP side automatically. This function just supports the one-stage-dialing function. 2.11 [sip] This command is to configure SIP related parameters.
-line2 -line3 -line4 Line 2 is E.164 number of L2. Line 3 is E.164 number of L3. Line 4 is E.164 number of L4. -pbsearch -expire Search phone book 0: off/1: on. The relative time after which the message expires (0 ~ (2^31-1)) -port SIP local UDP port number (1~65534), Default: 5060 -rtp RTP port number (1~65534), Default: 16384 -lmedia Late Media 0:off/1:on. -cidchange CID Change in From Header 0:off/1:on. -busy busy response message, Default: 486 Example: sip -px 210.59.163.
2.13 [line] Configure the Hotline, Hunt and No Answer Forward --------------------------------------------------------------usr/config$ line Gateway line information and configuration Usage: line -config number [hunt number][hotline number] line -print Gateway line information. hunt Hunting group. hotline Hot line configuration. fwdtype forward type. To IP: 0:disable 1:un condition 2:busy forward forward.
Example : Call out from FXO Line Proxy Mode Usage: Set gateway under proxy mode. Create a Hotline table with “line ” command. --------------------------------------------------------------usr/config$ line - config 1 hotline 1001 --------------------------------------------------------------In this example means: if user picks up phone set of FXO Line1, gateway will automatically dial out “1001”. P2P Mode Usage: Set gateway under P2P mode. Create phone book table with “pbook ” command.
(NONE:0/GROUP:1/ALL:2). Example: route -add prefix 100 dst 1 e164 1001 min 1 max 3 hunt 1 route -ip dst 1 e164 1001 route -fxo dst 2 e164 x route -modify 1 prefix 100 dst 2 e164 1001 min 1 max 3 hunt 1 route -delete 1 --------------------------------------------------------------Parameter Usages: -print print out all routing table information -add add a routing rule in routing table. User can add less than 50 rules. (route –add prefix "prefix number "dst" destination port type "e164" e.
Note: 1. When destination is IP side, e.164 number doesn't need to determine. 2. If user doesn’t want to determine a specific port to route, e.164 number must set as "x". 2.
insert 2.16 Gateway will drop prefix number on incoming call. set which digit to insert on incoming call. [pause] Pause function allows users define a prefix for FXO, it usually apply to one-stage-dialing. For example, the FXO port is connect to a PBX, when an incoming call from IP side, users will hear a dial tone from PBX. If they want to dial to a PSTN, they must press a special code and wait 1~2 seconds for the PSTN dial tone.
2.17 [pbook] Phone Book function allows users to define their own numbers, which mapping to real IP address. It is effective only in peer-to-peer mode. When adding a record to Phone Book, users do not have to reboot the machine, and the record will be effective immediately.
-add add a new record to phone book. When adding a record, users have to specify name, ip, and e164 number to complete the command. -search search a record in phone book. The searching criteria can be name, ip, or e164. -delete delete a specific record. “pbook –delete 3” means delete index 3 record. -insert add a new record and force to assign a specific index number for it. -modify modify an existing record.
“82265699”. Pleased be noted that “0” is eliminated from Micronet FXO Gateway itself. Note: 1. Because of above characteristics, users have to take care of the number plan very well to avoid the numbering conflict. If users already defined “0” for specific trunk Gateway, other terminal started with “0” shall be avoided, or the number will be routed to the trunk Gateway defined “0”. 2.
[-nscng [G711U used1] [G711A used2] [G723 used3]] [-echo used] [-mindelay t1] [-maxdelay t2] [-optfactor f] voice -print voice -priority [G723] [G729] [G729A] [G729B] [G729AB] [G711U] [G711A] -print -send Display voice codec information and configuration. Specify sending packet size. G.723 (30/60/90 ms) G.729 (20/40/60 ms) G.729A (20/40/60 ms) G.729B (20/40/60 ms) G.729AB (20/40/60 ms) G.711U (20/40/60 ms) G.711A (20/40/60 ms) -priority Priority preference of installed codecs. G.723 G.729 G.729A G.729B G.
-priority -volume -nscng good condition, smaller sending packet size is recommended. In this parameter, 20/40/60ms is applicable to G.711u/a law, and G.729a codec, while 30/60ms is applicable to G.723.1 codec. codec priority while negotiating with other sip device. This parameter determines the listed sequence in TCS message. The codec listed in left side has the highest priority when both parties determining final codec. There are three adjustable value.
2.19 [tone] Disconnecting and Ring Back tone configuration --------------------------------------------------------------usr/config$ tone Disconnect tone and remote ring back tone configuration Usage: tone [num][freqHi ][freqLo ][freqHiLev][freqLoLev] [Tone1ON][Tone1OFF][Tone2ON ][Tone2OFF ]] tone -print Display tone configuration. [num] Tone index(1~4:Disconnect tone / 5~8:Remote ring back tone).
fxopwd -print FXO password information. passwd The password. Example: fxopwd -add passwd 1234 fxopwd -delete 1 fxopwd -modify 1 passwd 1234 --------------------------------------------------------------Caller will be asked PIN number to pass the call through the gateway from FXO port to IP side when fxopwd set 2.
Press (S) to stop record... .................................................................................................... .................................................................................................... .....................................................s.............................................. .................................................................................................... Press (P) to play the voice or (W) to write to flash or (Q) to quit...
Press (S) to stop record... .................................................................................................... .................................................................................................... ..........................................................................s......................... .................................................................................................... ..........................
.................................................................................................... .......... Analizing!! Please wait a moment... Frequency 1 : 620 Frequency 2 : 474 0.25sec on 0.25sec off usr/config$ -greeting -askpin -tone record the greeting file record the askpin file analyze the tone from PSTN or PABX The Procedures of recording the disconnect tone Micronet FXO/FXSO Gateway in the latest version use the "record -tone" command to analyze the disconnect tone.
6). According to the result, enter the Freq. into Tone table. command: usr/config$ tone 1 480 620 1 1 25 25 1023 1023 【Example-1】 (Make a call from PSTN to FXO port) usr/config$ record -tone Press (R) to start record... (Please make sure that you are already finish the steps 2 ~ 7) r (Press “Enter” button after you key in “R”) .................................................................................................... ..................................................................................
(Put this value in to the tone table) tone –print Disconnect tone 1 paramter Frequency high frequency low frequency high level frequency low level Tone1 on Tone1 off Tone2 on Tone2 off Disconnect tone 2 paramter Frequency high frequency low frequency high level frequency low level Tone1 on Tone1 off Tone2 on Tone2 off Disconnect tone 3 paramter Frequency high frequency low frequency high level frequency low level Tone1 on Tone1 off Tone2 on Tone2 off Disconnect tone 4 paramter Frequency high frequency low f
Tone2 off : 50 (Confirm the values is correct or not) (Key in the commit and reboot command if you finish the procedures as above) 【Example-2】 (Make a call into FXO port) usr/config$ record -tone Press (R) to start record... (Please make sure that you are already finish the steps 2 ~ 7) r (Press “Enter” button after you key in “R”) .................................................................................................... ............................................................................
frequency low level Tone1 on Tone1 off Tone2 on Tone2 off Disconnect tone 2 paramter Frequency high frequency low frequency high level frequency low level Tone1 on Tone1 off Tone2 on Tone2 off Disconnect tone 3 paramter Frequency high frequency low frequency high level frequency low level Tone1 on Tone1 off Tone2 on Tone2 off Disconnect tone 4 paramter Frequency high frequency low frequency high level frequency low level Tone1 on Tone1 off Tone2 on Tone2 off :8 : 25 : 25 : 1023 : 1023 : 450 :0 :8 :0 : 35 :
2.22 [tos] TOS service allows users to achieve QoS on IP network. --------------------------------------------------------------usr/config$ tos IP Packet ToS(type of Service)/Differentiated Service configuration Usage: tos [-rtptype dscp] tos [-sigtype dscp] tos -print [-rtpreliab mode] tos -print Example: tos -rtptype 7 -sigtype 0 --------------------------------------------------------------In QoS, a modification of the type of service byte.
usr/config$ pt RTP payload type configuration and information Usage: pt -print Display the RTP payload type information -rfc2833 Configurate the DTMF RFC2833 payload type -dtmf Configurate the DTMF payload type -fax Configurate the FAX payload type Example: pt -rft2833 96 -fax 101 --------------------------------------------------------------The RTP (Real-time Transport Protocol) Payload Type Idea for use the Payload Type: z Selective Retransmission : Priority bit indicates the importance of the payload O
-dspcore update DSP kernel code(optional) -dspapp update DSP application code(optional) -greeting update greeting voice file(optional) -askpin update ask pin code voice file(optional) -s IP address of TFTP/FTP server (mandatory) -f file name(mandatory) -method download via TFTP/FTP (TFTP: mode=0, FTP: mode=1) -ftp specify username and password for FTP Note: This command can run select one option in 'app', 'boot', , 'dsptest', 'dspcore', and 'dspapp'.
1. Loginname can be only 'root' or 'administrator' 2. passwd -clean will clear all passwd stored in flash, please use it with care. Example: passwd -set root Your_Passwd_Setting 2.26 [auth] --------------------------------------------------------------usr/config$ auth Root control what command administrator can use. Usage: auth -print Display auth switch configuration. Use item name to do config name (0=Disable, 1=Enabled). Example: auth -ifaddr 1 2.