
Hardware Guide


z
Rev. 3 Micronet SmartCAM™ - Hardware Guide 41 / 50
Pin
Signal
Type
Function
Specifications
13
RS232_RX1
I
Receive Data (COM1)
EIA-RS232 level
14
Automotive Input
I
Digital Input 1
Typical Min Max
Input Low: VIL 0V -30V 6V
Input High: VIH 12V-24V +8V +30V
0V-30V max, 12k OHM
15
GPIO
I/O
General-Purpose
Configurable General-Purpose Input/Output
16
SWC
I/O
Single Wire CAN
10. SmartCAM™ Installation
Mechanical Installation
Mounting Sunshield
The mountable sunshield of the Micronet SmartCAM™ should be attached to the vehicle’s windshield
using the adhesive provided in the DTK for installation.
The fast and easy-to-use permanent bonding adhesive method provides high strength and long-term
durability. It is virtually invisible and keeps surfaces smooth. It can replace mechanical fasteners
(rivets, welds, screws) or liquid adhesives, eliminate drilling, grinding, refinishing, screwing, welding
and associated clean-up. It also creates a permanent seal against water, moisture and more.
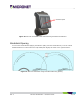
Mounting Location and Dimensions
The sunshield can rotate every 8 degrees for click-turn positioning with two adhesive pads. Place the
adhesive pads on the mounting sunshield as shown in the figure below:
NOTE:
In-vehicle installation instructions must be provided by a qualified installation technician.