
Hardware Guide


z
Rev. 3 Micronet SmartCAM™ - Hardware Guide 43 / 50
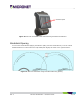
Figure 20: Micronet SmartCAM™ Double Windshield Mounting Spacing
Device Installation Steps
1. Determine the optimal positioning of the Micronet SmartCAM™ in the vehicle that provides easy
access and a clear view of both the road and the display.
2. Attach the two adhesive pads to the mounting sunshield of the Micronet SmartCAM™ (make sure
the sunshield is free of dust and debris.
3. Press and hold the mounting sunshield with adhesive pads on the pre-determined windshield
position for at least 30 seconds.
4. Follow the cable installation steps as described in Electrical Installation.
Electrical Installation
Vehicle Battery Connection
The Micronet SmartCAM™ input power connects directly to the vehicle’s battery. See the Electrical
Installation in Figure 21 below.
The supported nominal battery voltage supply is 12V or 24V DC, with an operating range between 8V to
30V DC.