
Installation guide


9
RAID 0
The RAID 0 (striping) storage policy presents the best data speed by
using both disks in parallel. Hard drive data segments are written
to different disks simultaneously which increases performance, but
at an increased fault sensitivity (two drive's worth of data may be
lost at a single disk fault.) The FAST storage policy creates a single
virtual volume that is striped across both hard drives, with a storage
capacity that is equal to the sum of both hard disk drives.
RAID 0 has no fault tolerance. A single disk failure will cause
loss of ALL data, and is very difficult to recover. RAID 0
should only be used when speed is required and the data can
be recovered from backup.
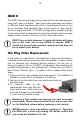
Hot Plug Drive Replacement
In the event of a disk failure, the DataDock II supports the ability to
hot-swap drives without powering down the system. A data module
can be removed and replaced without powering off the unit or
taking the system off line. In RAID1 configuration, the rebuilding will
proceed automatically in the background. A failed drive will have a
dark "Power/Rebuild" light. To replace a drive, please follow these
steps:
1. Gently press the drive release latch (see page 6, “The DataDock II
Interface components”) to release the drive tray.
2. Gently pull out the disk drive tray handle and slide out
the drive tray.
3. To replace: Slide in the
replacement drive tray with the
tray handle open. When the tray
is slid all the way into the DataDock
II, push the tray handle closed.
Replacing a disk module may interrupt the host connection
momentarily. Please make sure that there are no open files
on the DataDock volume before replacing a disk module.
NEVER remove a drive tray without replacing it. Operating
the RAID with a drive tray missing will disrupt airflow and
may cause the DataDock II to fail.