Micronet Faster and Easier Networks User Manual USB KVM Switch Model No.: SP212D/SP214D World Wide Web: www.micronet.com.tw ; www.micronet.
Certificates FCC This equipment has been tested and found to comply with Part 15 of the FCC Rules. Operation is subject to the following two conditions: (1) This device may not cause harmful interference (2) This device must accept any interference received including interference that may cause undesired operation.
Contents Certificates...................................................................... 1 Chapter 1 Introduction .................................................. 3 1.1 1.2 1.3 1.4 Overview .............................................................. 3 System Requirements .......................................... 3 Features ............................................................... 4 Package Contents ................................................ 5 Chapter 2 Installation ...................
Chapter 1 Introduction 1.1 Overview The SP212D/SP214D is a 2/4-port Slim Palmtop USB KVM Switch with optional audio and microphone switching function. It allows you to access, control, boot and reboot multiple USB-enabled computers. The independent audio/mic switching function allows an uninterrupted audio experience on a same connected computer even when you switch to another computer.
1.3 Features z 2/4-port Slim Palmtop KVM Switch with Audio&Mic and 2/4 x detachable USB KVM & 2/4 x Audio/Mic Cables z USB console support for USB keyboard and mouse z Audio and Microphone switching for uninterrupted multimedia experience across multi-platforms. z USB 1.
1.
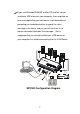
Chapter 2 Installation 2.1 Hardware Installation 1. Make sure that all computers are connected to the KVM Switch and their peripherals are in power-off state. 2. Connect the shared USB keyboard, mouse and monitor to the KVM switch. 3. Connect the shared speaker set and microphone to the KVM switch (SP214D only). 4. Connect each of your computers to the KVM switch, using appropriate KVM and/or Audio/Mic cables. 5. The KVM Switch should be automatically power-on with computers connected. 6.
If you use Windows 95/98/SE or Mac OS and has not yet installed a USB mouse on your computer, there might be an error message telling you that mouse is not detected and prompting you to decide whether to ignore the same message in the future, and yet you will find there is no mouse movement to disable this message….So it is suggested that you should installed your USB mouse on your computer first, before connecting it to this KVM Switch.
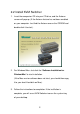
2.2 Install KVM Switcher 1. Insert the companion CD into your CD drive, and the Autorun screen will pop up. (If the Autorun feature has not been enabled on your computer. Just find the Autorun.exe on the CDROM and double-click it to start). 2. For Windows/Mac: Just click the “Software Installation for Window/Mac” to start installation. (If the Mac version software does not start, you should then copy it to your local Hard disk on Mac). 3. Follow the instructions to completion.
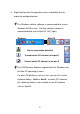
4. Right-click to evoke the operation menu, and double-click to evoke the configuration box. The Windows switcher software is recommended for use on Windows 98 SE or later. The Mac switcher software is recommended for use on Mac OS 10.4 [Tiger]. Windows Mac OS No live connection detected Current active PC channel is on port 1 Current active PC channel is on port 2 The KVM Switcher Software supports both the Windows and the Mac OS operating systems.
Chapter 3 Operation This KVM switch provides three ways to control your KVM Switch for PC and Audio/Mic channel selection: (1) the face-panel push buttons, (2) the hotkey sequences, or (3) the KVM Switcher Software. 3.1 Face-panel buttons The face-panel button allows you a direct control over KVM switching operation. Simply press the button to switch to the corresponding PC port (and audio/mic channel, if binding is enabled).
3.2 Keyboard hotkeys 3.2.1. User-definable hotkeys for PC selection: Hotkey sequence = Ctrl - Alt - [command key]* *** Please refer to next section for keys that are qualified to be used as a command key Note that these 3 keys should be pressed and held together. And it is upon the release of all three keys, the switching action will be executed. 3.2.2.
Each keystroke within a hotkey sequence should be pressed within 2 seconds. Otherwise, the hotkey sequence will not be validated. After port switching, you have to wait till the KVM Switcher icon shows forth the target port before you can perform next switching again. All the hotkeys are only functional after your PCs are booting into the OS. If you want to switch PC in the BIOS/preboot stage, press the face-panel button to switch. 3.2.3.
3.3 Switch to PC x by Operation Menu Right-click the KVM Switcher icon to evoke the operation menu, then select whichever PC that is available for switching. Once you select a PC channel, it will immediately switch to that PC. Note: the unconnected port(s) or the active port will be grayedout and hence non-selectable.
Mac OS: Operation Menu Configuration Dialog Box 3.3.1 Switch to PC x by Keyboard Hotkeys Hit the hotkey according to your current hotkey definition: Hotkey sequence = Ctrl - Alt - [command key]* *** The factory default hotkey setting is Ctrl + Alt + 1/2/3/4 for PC 1/2/3/4. You can also use ScrLk + ScrLk to switch PC.
Note that these 3 keys should be pressed and held together. And it is upon the release of all three keys, the switching action will be executed. 3.3.2. Start Auto-scan Right-click the KVM Switcher icon to evoke the operation menu, then select Start Auto-Scan to activate auto-scan. 3.3.3. Stop Auto-scan (While auto-scan) Right-click the KVM Switcher icon to evoke the operation menu, then select Stop Auto-Scan to de-activate auto-scan. Or you can press any button on the face-panel to stop the action. 3.3.
Hotkey Sequence = CTRL - ALT - [command key]* *** The command key is user-definable via the configuration dialog box Please note that if you intend to modify the command key, you have to modify them on each and every of the connected computers, since the hotkey setting is stored within each connected computer.
3.6 Fix Audio Port at PC x Check this option and then select the PC to fix the audio/mic channel to the selected PC. Once this option is checked, the audio/mic channel will be fixed and become non-switchable. 3.7 Auto Scan Period Select the Autoscan period from 10 ~ 60 seconds with an increment of 5 seconds. The Autoscan period is the time your KVM Switch will wait before switching to next PC.
Glossary Cascade A connected series of devices or images. It often implies that the second and subsequent device takes over after the previous one is used up. For example, cascading tapes in a dual-tape backup system means the second tape is written after the first one is full. In a PC, a second IRQ chip is cascaded to the first, doubling the number of interrupts. Daisy chain Connected in series, one after the other. Transmitted signals go to the first device, then to the second and so on.
Hot key A user-defined key sequence that executes a command or causes the operating system to switch to another program. In DOS systems, for example, you can use hot keys to open memoryresident programs (TSRs). In Windows environments, you can often press a hot key to execute common commands. For example, Ctrl +C usually copies the selected objects. Liquid Crystal Display (LCD) A display technology that uses rod-shaped molecules (liquid crystals) that flow like liquid and bend light.
connected. PS/2 connector A 6-pin Mini-DIN plug and socket used to connect a keyboard and mouse to a computer. First introduced on IBM´s PS/2 desktop PC, the port was later used by everybody else, first on laptops, then on desktops. Resolution The degree of sharpness of a displayed or printed character or image. On screen, resolution is expressed as a matrix of dots. For example, the VGA resolution of 640x480 means 640 dots (pixels) across each of the 480 lines.
Universal Serial Bus (USB) An external bus standard that supports data transfer rates of 12 Mbps. A single USB port can be used to connect up to 127 peripheral devices, such as mice, modems, and keyboards. USB also supports Plug-and-Play installation and hot plugging.