
User's Manual

Before installation, please refer to the Read Me First documentation included with this product
for installation safety information.
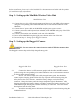
Step 1: Setting up the MiniHub Wireless Video Hub
MiniHub Rear View
1.1. Connect the two (2) 2.4 GHz purple antennas and the one (1) 900 MHz yellow antenna
using the corresponding color-coded indicators above each antenna connector on the
MiniHub.
1.2. Connect the AC power cable to the MiniHub and plug into a power source.
1.3. Connect your mouse and keyboard (not included) to the MiniHub using any of the USB
connectors.
1.4. Connect your monitor (not included) to the rear of the MiniHub.
1.5. Power on the MiniHub using the toggle power button on the rear of the unit.
1.6. Proceed to Step 2: Setting up the Rugged-I Camera.
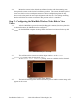
Step 2: Setting up the Rugged-i Camera
WARNING: Do not connect the camera batteries until AFTER the antennas have
been connected.
The Rugged-i camera ships with a fully charged battery pack.
Rugged-i Side View Rugged-i Rear View
2.1. Connect the shorter 2.4 GHz antenna (purple) and the taller 900 MHz antenna
(yellow) using the corresponding color-coded indicators next to each antenna connector
on the top of the camera housing.
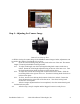
2.2. NOTE: The camera ships with a fully charged battery pack, but should the
camera require charging, please follow this step. Open the camera housing using the
safety latch at the rear of the unit. Attach the battery charger cord to the battery
connector. Charge the battery until the charge completion light is illuminated. After
charging, disconnect the battery charger cord and re-connect the battery connector. The
LED indicator light should glow red when the battery is connected. Close the camera
housing then lock the safety latch.
2.3. Attach the mounting arm to the bottom of the Rugged-i camera housing using the
included hardware.
Installation Guide v1.1 ©2011 MicroPower Technologies, Inc. 2