Internet Tablet OS 2006 edition User Guide 9249463 ISSUE 1EN
DECLARATION OF CONFORMITY We, NOKIA CORPORATION, declare under our sole responsibility that the product SU-18 is in conformity with the provisions of the following Council Directive: 1999/5/EC. A copy of the Declaration of Conformity can be found at http://www.nokia.com/phones/declaration_of_conformity/. The crossed-out wheeled bin means that within the European Union the product must be taken to separate collection at the product end-of-life.
Contents For your safety ................................ 1. Overview...................................... Nokia support on the Web.................. Touch screen ........................................... 4 6 6 7 Task navigator.......................................... Application title area............................. Status indicator area ............................. Minimize and close buttons ................ Application area...................................... Toolbar ..........................
For your safety For your safety Read these simple guidelines. Not following them may be dangerous or illegal. Read the complete user guide for further information. SWITCH ON SAFELY Do not switch the device on when wireless device use is prohibited or when it may cause interference or danger. ROAD SAFETY COMES FIRST Obey all local laws. Always keep your hands free to operate the vehicle while driving. Your first consideration while driving should be road safety.
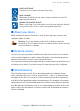
For your safety WATER-RESISTANCE Your device is not water-resistant. Keep it dry. BACK-UP COPIES Remember to make back-up copies or keep a written record of all important information. CONNECTING TO OTHER DEVICES When connecting to any other device, read its user guide for detailed safety instructions. Do not connect incompatible products. ■ About your device When using the features in this device, obey all laws and respect privacy and legitimate rights of others.
Overview 1. Overview The Nokia 770 Internet Tablet provides easy broadband access to the Internet through a WLAN/Wi-Fi or Bluetooth connection with compatible mobile phones. Its wide screen and portable size make it optimal for enjoying the Web and Internet communications away from your laptop or desktop. Your compatible WLAN access point must be compliant with the IEEE 802.11b or 802.11g standard. Read this user guide carefully before using your device.
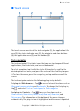
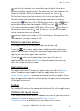
Overview ■ Touch screen The touch screen consists of the task navigator (1), the application title area (2), the status indicator area (3), the minimize and close buttons (4), the application area (5), and the toolbar (6). Task navigator The task navigator (1) includes icons that you can tap to open different applications, start new tasks, and access bookmarks. To select an option, tap it with the stylus.
Overview whenever you receive new chat messages, authorization requests and responses, or group chat invitations. You cannot change the plug-in. Applications — Tap for access to all installed applications. To change the structure of the menu, select Tools > Control panel > Task navigator. Application switcher — The task navigator also contains icons related to the applications that are open. The icons of the top four applications are shown on the task navigator; the rest are listed in a separate menu.
Overview indicates the volume level and allows you to adjust the master volume and other sound settings. The more bars the icon contains, the higher the volume. When the sounds are muted, the icon is . The Internet connection icon indicates the status and type of the Internet connection and allows you to open and close an Internet connection.
Overview Note: A small number of missing, discolored, or bright dots may appear on the screen. This is a characteristic of this type of display. Some displays may contain pixels or dots that remain on or off. This is normal, not a fault. ■ Home view When you switch on the device, the home view is displayed. The home view contains various applets that you can open, close, and rearrange. You can also install new applets using the Application manager.
Overview ■ Device control You can control the device in two ways: tap the screen with the stylus, or press the scroll key and other keys on the device. Stylus To open an application, tap an icon in the task navigator. Select the desired function from the menu next to the icon. To close an application, tap in the top-right corner of the screen. • Single tap — To activate controls and other interactive interface components, tap them once with the stylus (stylus down and up on the same object).
Overview • Full-screen key — A short keypress switches between full screen and normal screen modes. • Scroll key — A short keypress moves the focus from one item to another in the respective direction. A long keypress in the Web browser scrolls the content of the active page or frame. Press the center of the scroll key to activate the highlighted item, and to accept confirmation notes.
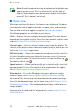
Overview On-screen keyboard • Tabulator key (1) — Adds a tabulator space or moves the cursor to the next available text input field. • [ABC] (2) — Locks the uppercase characters of the keyboard. In the handwriting recognition mode, switches between the normal and special character recognition modes. • Shift key (3) — Enters an uppercase character in the on-screen keyboard mode when you write in lowercase.
Overview Full-screen finger keyboard To begin text input with the finger keyboard, tap the text input field with your fingers. The finger keyboard opens in the full screen mode. The finger keyboard displays buttons and functions similar to the other text input methods; however, not all of the special characters are available. To close the finger keyboard, tap keyboard. in the upper right corner of the To change the finger keyboard settings, tap Control panel > Text input settings > Finger.
Overview ■ Text input settings To define the text input settings, tap Control panel > Text input settings. , and select Tools > Word completion: is turned on by default. To turn word completion off, clear the selection. When word completion is on, the device displays word candidates that match the first characters of the word that you enter with the on-screen keyboard or write by hand. ■ Volume control To adjust the master volume, tap to access the sound settings.
Overview 2. Enter the current lock code (the default code is 12345), and tap OK. 3. Enter the new code, and tap OK. 4. Enter the new code again, and tap OK. If you tap Cancel in any of these dialogs, the device lock code is not changed. Keep the new code secret and in a safe place separate from your device. Note: If you lose the device lock code, you must take the device to a Nokia authorized service facility.
Overview To free memory, delete data in File manager or other applications. To find and delete files of a certain size, use the Search application. The applications display error messages when you try to move, copy, or save files, and when there is not enough memory on the device or the memory card. Memory card You can only use FAT 16/32 formatted memory cards with this device. To view and manage the contents of the memory card, tap , select File manager, and tap the memory card icon in the folder list.
Overview To restore data, do the following: 1. Tap , and select Tools > Control panel > Backup/Restore > Restore. 2. In the Restore selection dialog, select the backup on the memory card that you want to restore. Tap OK and Restore. If you have protected the backup with a password, the Password needed dialog is displayed. Enter the password, and tap OK. Important: Always back up both e-mail settings and messages.
Define Internet connections ■ Search for information To search for items you created or downloaded on your device, do the following: 1. Tap , and select Search. 2. Enter a search word or multiple search words. The more search words you use, the more accurate the search results. 3. If needed, limit the search to e-mail messages, contacts, or bookmarks; or select all items on your device. To set additional search options, tap Options. 4. To start the search, tap OK.
Define Internet connections ■ WLAN connection To set up a WLAN connection, do the following: 1. In the Connection setup: Name and type dialog, define the following settings: Connection name — Enter a descriptive name for the connection. Connection type: — Select WLAN. 2. Tap Next. The device asks whether you want to scan for available WLAN networks. Tap Yes to start the scan, or No to skip it.
Define Internet connections is unique. When you connect to the Internet over WLAN, the connection is based on this information. If the field is dimmed and cannot be edited, the scanned SSID contains characters entered in an unknown character set, and not UTF-8 as the device expects. Network is hidden — You must select this option if the name of your WLAN network is hidden. When this option is selected, your device actively searches for the hidden WLAN network when you establish an Internet connection.
Define Internet connections Tip: Your device includes a settings database with predefined settings of some cellular operators. Select your operator from the list, and the settings are installed on your device. To access the database, tap , and select Tools > Control panel > Control panel > Tools > Mobile operator setup wizard.... Note: All cellular operators and settings are not listed, and some settings may also be out of date. • Pair a compatible mobile phone with your device.
Define Internet connections Pair a phone with your device You must always start the pairing of devices from your Nokia 770 Internet Tablet. Although you can only use one phone at a time, you can pair several phones with your device. To pair a phone with your device, do the following: 1. Activate Bluetooth connection on your mobile phone. 2. Tap , and select Tools > Control panel > Phone > New. The Select phone dialog opens, and your device begins to search for compatible Bluetooth devices. 3.
Define Internet connections network, such as HSCSD (high-speed circuit-switched data; network service), select Data call. 2. In the Cellular network dialog, select the type of cellular network over which the Internet connection takes place: GSM/UMTS or CDMA. You must select the network manually if you have not paired a mobile phone with your device. 3.
Define Internet connections have not saved any connections or they are unavailable, you are asked to select the connection (Internet access point) you want to use. In the Select connection dialog, select a connection from the list, and tap Connect. Only available connections are shown, and the connections you have saved in your device appear at the top of the list. To define the settings of Internet connections and access points, tap and select Tools > Control panel > Connectivity.
Browse the Web 3. Browse the Web To open the browser, tap bookmark. , and select Open new browser window or a Before you can connect to the Internet, you must define the proper Internet connection settings. For detailed instructions, see "Define Internet connections," p. 19. Important: Use only services that you trust and that offer adequate security and protection against harmful software.
Communicate over the Web To view the Web page in optimized size, select Web > View > Optimized view. The Web page is fit to the width of the screen; text and images are zoomed and scaled differently, if necessary. To change the Web browser settings, select Web > Tools > Settings. For more information, see the help of the application. ■ Manage bookmarks To manage the bookmarks you saved in the device, tap , and select Bookmarks.
Communicate over the Web You can have multiple accounts for Internet call and instant messaging services. By default, your device supports the Jabber and Google Talk services. Note: It is recommended to use WLAN connection for Internet calls, because cellular connection is dependent on networks. ■ Accounts To access the account setup wizard, tap Control panel > Accounts > New. , and select Tools > To complete and save the account settings, do the following: 1.
Communicate over the Web To edit the settings of an account, set your presence status to Off, select the account, and tap Edit. To delete an account, select the account, and tap Delete. ■ Presence Presence is a network service that allows you to share your presence status with those who have access to the service and request it. When you create and register an account for Internet call and instant messaging service, your presence status is connected to that account.
Communicate over the Web to chat with the contact send an e-mail message to the contact Tip: To be able to make contact, you must define account settings for the Internet call and instant messaging services. For more information, see "Accounts," p. 28. ■ Instant messaging Instant messaging application allows you to instantly communicate with people over the Internet.
Communicate over the Web ■ Internet call Internet call is based on the voice over Internet protocol (VoIP) that allows you to make and receive calls over the Internet. To be able to use this feature, you must have an active network connection, a registered Internet call account with a service provider, and a presence status that allows receiving calls (On or Away). Important: Emergency calls are not supported. To access the Internet call application, tap , and select New call.
Communicate over the Web All incoming calls you miss are registered in a log. The log remains in the device as long as the device is powered on. If the device is rebooted, the log is deleted. ■ E-mail To be able to send and receive e-mail messages, you must have an active Internet connection and a registered e-mail account with a service provider. For appropriate settings, contact the service provider that offers the e-mail service. To create a new mailbox, do the following: 1.
Communicate over the Web 4. Account setup 3/4 — Define the following settings: Incoming server — Enter the host name or IP address of the POP3 or IMAP4 server that receives your e-mail. Outgoing server (SMTP) — Enter the host name or IP address of the server through which your e-mail is sent. Tap Next. Simple mail transfer protocol (SMTP) servers are used when sending e-mail.
Communicate over the Web Important: Exercise caution when opening messages. E-mail messages may contain malicious software or otherwise be harmful to your device. Create and send e-mail To create a new e-mail message, do the following: 1. Tap , and select New e-mail. 2. Write the recipient’s e-mail address. Add a semicolon (;) to separate multiple recipients. If the recipients are in Contacts, tap , and select the recipients from the list. 3. Fill in the subject, and write the message.
Media players and viewers To send the selected message again, tap the selected message, tap . .To cancel the sending of Sent folder After a message is sent, it is moved to the Sent folder. To specify the settings of the Sent folder, select E-mail > Folders > Folder settings.... Define the following: Sent folder clean-up on: — Select this option to allow automatic deletion of sent messages. Remove messages older than: — Select how often the sent messages are deleted.
Media players and viewers The supported audio stream formats are: AAC, AMR, AMRWB, MP2, MP3, and WAV. Streaming performance depends on the bandwidth availability. ■ Internet radio With Internet radio you can listen to Internet radio channels or any other compatible audio streams. The Internet radio supports MP3 file format, and M3U, PLS, RAM, and RPM playlists. To add a radio channel to the playlist, do the following: 1.
Media players and viewers The supported video stream formats are: MPE, MPEG, MPG, RA, RM, RMJ, RMVB, RV, AVI, and 3GP/3GPP. Streaming performance depends on the bandwidth availability. ■ RSS feed reader You can receive and read RSS news feeds from service providers. The service provider may be a news agency, entertainment site, or an individual who writes an online diary or journal. Tap , and select RSS feed reader. The news folders and feeds you have created are shown on the left.
Tools 6. Tools ■ Application manager With Application manager you can install new applications, plug-ins, and other extensions from the application download storages (catalogs) on the Internet and from the inbox, Web links, or the File manager. You can also view and update installed packages and uninstall them. Tap , and select Tools > Application manager. Important: Only install and use applications and other software from sources that offer adequate security and protection against harmful software.
Tools Device — Change the name of your device, and view information about your device and end-user licenses. Device lock — Turn on the automatic device lock, set the time-out period, and change the device lock code. Display — Change the brightness of the display, set the automatic lock for touch screen and keys, and define how soon the display brightness decreases to save power, and how soon the display is turned off. Language & region — Select your region and device language.
Utilities and games ■ File manager In File manager, you can move, copy, rename, delete, and open files and folders available in the device, compatible mobile phone, or memory cards inserted in them. Tap , and select File manager. The main folders are shown on the left and the subfolders and files on the right. 7. Utilities and games ■ Calculator Note: This calculator has limited accuracy and is designed for simple calculations. To access the calculator, tap , and select Utilities > Calculator.
PC connectivity ■ Sketch To draw simple images and send them through e-mail, tap , and select Utilities > Sketch. All sketches are saved in .png format. ■ Games Your device has a set of games. To start a game, tap , and select Games and the desired game. In the game start-up screen, tap Play. For more information on how to use the tools, utilities, and games in your device, see the help of each individual application. 8.
Battery information ■ Software update To be able to update the software on your device, you must first install the Nokia 770 software update wizard on your PC. You must also have the USB cable, fully charged battery for your device, and the latest software update file available. For more information on the software update, check www.nokia.com/770. Tip: To check the version number of the current software on your device, tap , and select Tools > Control panel > Device > About product. 9.
Battery information Use the battery only for its intended purpose. Never use any charger or battery that is damaged. Do not short-circuit the battery. Accidental short-circuiting can occur when a metallic object such as a coin, clip, or pen causes direct connection of the positive (+) and negative (-) terminals of the battery. (These look like metal strips on the battery.) This might happen, for example, when you carry a spare battery in your pocket or purse.
Battery information Authenticate hologram 1. When looking at the hologram on the label, you should see the Nokia connecting hands symbol from one angle and the Nokia Original Enhancements logo when looking from another angle. 2. When you angle the hologram left, right, down, and up, you should see 1, 2, 3, and 4 dots on each side respectively. 3. Scratch the side of the label to reveal a 20-digit code, for example, 12345678919876543210. Turn the battery so that the numbers are facing upwards.
Care and maintenance • For India only: Enter Battery followed by the 20-digit battery code, for example, Battery 12345678919876543210, and send to 5555. National and international operator charges will apply. You should receive a message indicating whether the code can be authenticated. What if your battery is not authentic? If you cannot confirm that your Nokia battery with the hologram on the label is an authentic Nokia battery, please do not use the battery.
Additional safety information • Do not drop, knock, or shake the device. Rough handling can break internal circuit boards and fine mechanics. • Do not use harsh chemicals, cleaning solvents, or strong detergents to clean the device. • Do not paint the device. Paint can clog the moving parts and prevent proper operation. • Use chargers indoors. • Always create a backup of data you want to keep (such as contacts and e-mail messages) before sending your device to a service facility.
Additional safety information The product is compliant with the following standards: EN 300328-2, Harmonised standard for Data Transmission Equipment Operating in the 2.4 GHz Band. EN 50360, Product Standard to demonstrate the Compliance of Mobile Phones with the Basic Restrictions related to Human Exposure to Electromagnetic Fields. EN 301 489-01, Electro Magnetic Compatibility Standard for Radio Equipment and Services. EN 301 489-17, Specific (EMC) Conditions for Wideband Data and Hiperlan Equipment.
Open source software notice Open source software notice This product includes certain software originating from third parties that is subject to 1. the GNU Library/Lesser General Public License (LGPL), 2. the GNU General Public License (GPL), and 3. different and/or additional copyright licenses, disclaimers, acknowledgements, and notices. The LGPL, GPL and said certain other licenses are available at www.nokia.com/support/770.