
User's Manual


3
Welcome
Congratulations on your purchase of a Microsoft
®
wireless pointing device.
1
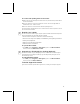
Insert the Batteries
Whenever you insert batteries, always make sure both of them are new. Alkaline
batteries are recommended, and two alkaline batteries are included in the package.
To preserve battery life, the pointing device automatically enters power saving mode
when not in use, so there is no need for a power switch.
1. Turn the pointing device upside down, and then remove the battery compartment cover.
2. Insert the batteries, making sure to properly orient the positive (+) and negative (–)
ends, as specified by the battery compartment labels.
Before boarding any aircraft, remove the batteries from the wireless pointing device.
The wireless pointing device can emit radio frequency (RF) energy, similar to a cellular
telephone, whenever batteries are installed and the mouse is activated either by touch
or button press.
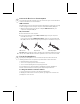
2
Position the Wireless Pointing Device and Receiver
For optimum performance, position the receiver so that it is at least 8 inches (20 cm)
away from the pointing device and any items that might cause interference, such as
computer monitors, large metal objects (including computer cases and metal
furniture), desktop fans, or fluorescent lights. The pointing device may work up to 6
feet (1.8 m) away from the receiver. This distance may vary depending on positioning,
nearby items causing interference, and other factors.