ISA Server 2004 Configuration Guide For the latest information, please see http://www.microsoft.
Contents Chapter 1 How to Use the Guide Chapter 2 Installing Certificate Services Chapter 3 Installing and Configuring the Microsoft Internet Authentication Service Chapter 4 Installing and Configuring Microsoft DHCP and WINS Server Services Chapter 5 Configuring DNS and DHCP Support for Web Proxy and Firewall Client Autodiscovery Chapter 6 Installing and Configuring a DNS Caching-only DNS Server on the Perimeter Network Segment Chapter 7 Installing ISA Server 2004 on Windows Server 2003 Chapt
ISA Server 2004 Configuration Guide: How to Use the Guide Chapter 1 For the latest information, please see http://www.microsoft.
Introduction Welcome to the ISA Server 2004 Configuration Guide! This guide was designed to help you get started using ISA Server 2004 firewalls to protect your network and allow secure remote access to your network. While the Guide isn’t a comprehensive set of documentation of all network scenarios, it will expose you to many of the most commonly used features of ISA Server 2004. Firewalls have traditionally been among the most difficult network devices to configure and maintain.
Learn about ISA Server 2004 features ISA Server 2004 is designed to protect your network from intruders located on the inside of your network and those outside of your network. The ISA Server 2004 firewall does this by controlling what communications can pass through the firewall. The basic concept is simple: if the firewall has a rule that allows the communication through the firewall, then it is passed through.
Practice configuring the ISA Server 2004 firewall The firewall is your first line of defense against Internet attackers. A misconfigured firewall can potentially allow Internet attacks access to your network. For this reason, it’s very important that you understand how to configure the firewall for secure Internet access. By default, the ISA Server 2004 prevents all traffic from moving through the firewall.
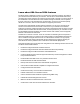
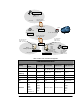
The ISA Server 2004 Configuration Guide Lab Configuration We will use a lab network configuration to demonstrate the capabilities and features of ISA Server 2004 in this ISA Server 2004 Configuration Guide. We recommend that you set up a test lab with a similar configuration. If you do not have the resources to create a physical test lab, you can use operating system virtualization software to create the test lab. We recommend that you use Microsoft’s Virtual PC software to create your test lab.
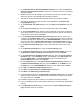
` REMOTECLIENT IP: 10.0.1.2 /24 DG: 10.0.1.1 IP: 10 .0.1.1/24 DNS: 192 .168 .1 .34 10.0.1.0 /24 IP: 192 .168 .1.71 /24 DG: 192 .168.1.60 Public REMOTEISA IP: 192.168.1.X/24 DG: 192.168 .1.60 IP: 192 .168 .1.60 /24 EXTCLIENT IP: 192 .168.1.70 /24 DG: 192.168.1.60 IP: 10.0.0.2/24 DG: 10.0.0.1 DNS: 10.0.0 .2 WINS: 10 .0.0.2 IP: 172.16.0.2/16 DG: 172 .16 .0.1 DNS: 172.16.0.2 ISALOCAL IP: 10.0.0.1 /24 IIS 6.0 Caching-only DNS TRIHOMEDLAN1 172.16.0.
Lab Network Details Setting TRIHOMELAN1 CLIENT IP Address 172.16.0.2 10.0.0.3 Default Gateway 10.0.0.1 DNS 10.0.0.2 10.0.0.2 WINS 10.0.0.2 10.0.0.2 OS Windows Server 2003 Windows 2000 DC DNS Services WINS DHCP RADIUS Enterprise CA 10.0.0.
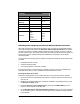
5. On the Windows Server 2003, Standard Edition Setup screen, select the Format the partition using the NTFS file system by using the up and down arrows on the keyboard. Then press ENTER. 6. Windows Setup formats the hard disk. This can take quite some time if the disk is large. Setup will copy files to the hard disk after formatting is complete. 7. The machine will automatically restart itself after the file copy process is complete. 8. The machine will restart in graphic interface mode.
Install and Configure DNS The next step is to install the Domain Naming System (DNS) server on the machine that will be the domain controller. This is required because the Active Directory requires a DNS server into which it registers domain-related DNS records. We will install the DNS server and then create the domain into which we will promote the machine. Perform the following steps to install the DNS server on the domain controller machine: 1. Click Start and point to Control Panel.
8. Expand the Forward Lookup Zones node and click on the msfirewall.org zone. Right click on the msfirewall.org and click New Host (A). 9. In the New Host dialog box, enter the value EXCHANGE2003BE in the Name (uses parent domain name if blank) text box. In the IP address text box, enter the value 10.0.0.2. Place a checkmark in the Create associated pointer (PTR) record checkbox. Click Add Host. Click OK in the DNS dialog box informing you that the record was created. Click Done in the New Host text box.
17. Click Restart Now on the Active Directory Installation Wizard page. 18. Log on as Administrator after the machine restarts. Installing and Configuring Microsoft Exchange on the Domain Controller The machine is ready for installing Microsoft Exchange.
8. Select the Create a New Exchange Organization option on the Installation Type page and click Next. 9. Accept the default name in the Organization Name text box on the Organization Name page, and click Next. 10. On the Licensing Agreement page, select the I agree that I have read and will be bound by the license agreement for this product and click Next. 11. On the Installation Summary page, click Next. 12. In the Microsoft Exchange Installation Wizard dialog box, click OK. 13.
(password is sent in clear text) checkbox. Click Yes in the IIS Manager dialog box informing you that the password is sent in the clear . In the Default domain text box, enter the name of the Internal network domain, which is MSFIREWALL. Click OK. 17. Click Apply in the ExchWeb Properties dialog box. Click OK in the Inheritance Overrides dialog box. Click OK in the ExchWeb Properties dialog box. 18. Right click the Default Web Site and click Stop. Right click the Default Web Site again and click Start.
Conclusion In this ISA Server 2004 Configuration Guide document we discussed the goals of this guide and suggested methods you can use to get the most out of this guide. The remainder of this ISA Server 2004 Configuration Guide provided detailed step-by-step instructions on how to install and configure the domain controller computer on the internal network.
ISA Server 2004 Configuration Guide: Installing Certificate Services Chapter 2 For the latest information, please see http://www.microsoft.
Introduction Microsoft Certificate Services can be installed on the domain controller on the internal network and issue certificates to hosts within the internal network domain, as well as to hosts that are not members of the Internal network domain.
Install Internet Information Services 6.0 The Certificate Authority’s Web enrollment site uses the Internet Information Services World Wide Publishing Service. Because Exchange 2003 has already been installed on this machine, we will not need to manually install the IIS Web services. The Exchange 2003 setup routine requires that you install the IIS Web services so that the Outlook Web Access site functions properly.
Install Microsoft Certificate Services in Enterprise CA Mode Microsoft Certificate Services will be installed in Enterprise CA mode on the domain controller. There are several advantages to installing the CA in enterprise mode versus standalone mode. These include: • The root CA certificate is automatically entered into the Trusted Root Certification Authorities certificate store on all domain member machines • You can use the Certificates MMC snap-in to easily request a certificate.
6. On the CA Identifying Information page, enter a name for the CA in the Common name for this CA text box. This should be the DNS host name for the domain controller. Ideally, you will have configured a split DNS infrastructure and this name will be accessible from internal and external locations, so that external hosts will be able to check the certificate revocation list. We will not cover the issue of a split DNS infrastructure in this document.
7. If the same machine had been configured as a CA in the past, you will be presented with a dialog box asking if you wish to overwrite the existing key. If you have already deployed certificates to hosts on your network, then do not overwrite the current key. If you have not yet deployed certificates to hosts on your network, then choose to overwrite the existing key. In this example, we have not previously installed a CA on this machine and we do not see this dialog box. 8.
Conclusion In this ISA Server 2004 Configuration Guide document we discussed the uses of a certificate authority and how to install an Enterprise CA on the domain controller on the internal network. Later in this guide, we will use this Enterprise CA to issue machine certificates to VPN clients and servers and issue a Web site certificate to the Exchange Server’s Outlook Web Access Web site.
ISA Server 2004 Configuration Guide: Installing and Configuring the Microsoft Internet Authentication Service Chapter 3 For the latest information, please see http://www.microsoft.
Introduction The Microsoft Internet Authentication Server (IAS) is an industry standard RADIUS server that can be used to authenticate users connecting to the ISA Server 2004 firewall machine. You can use IAS to authenticate Web Proxy clients on the internal network and VPN clients and VPN gateways calling in from an external network location. In addition, you can use RADIUS authentication to remote users who connect to Web servers published using ISA Server 2004 Web Publishing rules.
Installing the Microsoft Internet Authentication Service The Microsoft Internet Authentication Service server is a RADIUS server. We will use the RADIUS server later in this ISA Server 2004 Configuration Guide to enable RADIUS authentication for Web Publishing Rules and investigate how RADIUS authentication can be used to authenticate VPN clients. Perform the following steps to install the Microsoft Internet Authentication Server on the domain controller EXCHANGE2003BE on the internal network: 1.
Configuring the Microsoft Internet Authentication Service You need to configure the IAS server to work together with the ISA Server 2004 firewall computer so that they can communicate properly. At this time, we will configure the IAS Server to work with the ISA Server 2004 firewall. Later we will configure the firewall to communicate with the IAS server. Perform the following steps on the domain controller on the internal network to configure the IAS server: 1. Click Start and point to Administrative Tools.
4. Click the Verify button. In the Verify Client dialog box, the fully qualified domain name of the ISA Server 2004 firewall computer will appear in the Client text box. Click the Resolve button. If the RADIUS server is able to resolve the name, the IP address will appear in the IP address frame. If the RADIUS server is not able to resolve the name, this indicates that the ISA Server 2004 firewall’s name has not been entered into the DNS.
5. Click Next on the Name and Address page of the New RADIUS Client wizard. 6. On the Additional Information page of the wizard, use the default Client-Vendor entry, which is RADIUS Standard. Enter a password in the Shared secret text box and confirm the password in the Confirm shared secret text box. This shared secret will allow the ISA Server 2004 firewall and the RADIUS server to confirm each other’s identities.
8. Close the Internet Authentication Service console. Later in this ISA Server 2004 Configuration Guide series we will configure a RADIUS server entry in the Microsoft Internet Security and Acceleration Server 2004 management console and use that entry for Web and VPN client requests.
Conclusion In this ISA Server 2004 Configuration Guide document we discussed the uses of a Microsoft Internet Authentication Server and how to install and configure the IAS server on the domain controller on the internal network. Later in this guide we will use this IAS server to authenticate incoming Web and VPN client connections. This is a preliminary document and may be changed substantially prior to final commercial release of the software described herein.
ISA Server 2004 Configuration Guide: Installing and Configuring the Microsoft DHCP and WINS Server Services Chapter 4 For the latest information, please see http://www.microsoft.
Introduction The Windows Internet Name Service (WINS) enables machines to resolve NetBIOS names of hosts on remote networks. Machines configured as WINS clients register their names with the WINS server. WINS clients are also able to send name queries to a WINS server to resolve the names to IP addresses.
Installing the WINS Service The Windows Internet Name Service (WINS) is used to resolve NetBIOS names to IP addresses. On modern Windows networks, the WINS service is not required. However, many organizations want to use the My Network Places applet to locate servers on the network. The My Network Places applet depends on the functionality provided by the Windows Browser service.
The WINS server is ready to accept NetBIOS name registrations immediately. The ISA Server 2004 firewall, the domain controller, and the internal network clients are all configured to register with the WINS server in their TCP/IP Properties settings.
Configuring the DHCP Service The Dynamic Host Configuration Protocol (DHCP) is used to automatically assign IP addressing information to internal network clients and VPN clients. In the scenarios covered in the ISA Server 2004 Configuration Guide, the DHCP server will be used primarily to assign IP addressing information to the VPN clients network. Note that in a production network, you should configure all machines that do not require a static IP address to be DHCP clients.
4. Right click on the server name in the left pane of the console and click the New Scope command. 5. Click Next on the Welcome to the New Scope Wizard page. 6. On the Scope Name page, enter a name for the scope in the Name text box and enter an optional description in the Description text box. In this example, we will name the scope Scope1 and will not enter a description. Click Next. 7. On the IP Address Range page, enter a Start IP address and a End IP address in the text boxes provided.
12. On the Domain Name and DNS Servers page, enter the domain name used on the internal network in the Parent domain text box. This is the domain name that will be used by DHCP clients to fully qualify unqualified names, such as the wpad entry that is used for Web Proxy and Firewall client autodiscovery. In this example, the domain name is msfirewall.org and we will enter that value in the text box. In the IP address text box, enter the IP address of the DNS server on the internal network.
s 13. On the WINS Servers page, enter the IP address of the WINS server in the IP address text box and click Add. In this example, the WINS server is located on the domain controller on the internal network, so we will enter 10.0.0.2. Click Next. 14. On the Activate Scope page, select the Yes, I want to activate this scope now option and click Next. 15. Click Finish on the Completing the New Scope Wizard page. 16.
Conclusion In this ISA Server 2004 Configuration Guide document we discussed the uses of the Microsoft WINS and DHCP servers, installed the server services on the domain controller, and configured a scope on the DHCP server. Later in this guide we will see how the addition of the WINS and DHCP service help enhance the VPN client experience. This is a preliminary document and may be changed substantially prior to final commercial release of the software described herein.
ISA Server 2004 Configuration Guide: Configuring DNS and DHCP Support for Web Proxy and Firewall Client Autodiscovery Chapter 5 For the latest information, please see http://www.microsoft.
Introduction The Web Proxy Autodiscovery Protocol (WPAD) can be used to allow Web browsers and the Firewall client application to automatically discover the address of the ISA Server 2004 firewall. The client can then download autoconfiguration information from the firewall after the Web Proxy or Firewall client discovers the address. WPAD solves the problem of automatically provisioning Web browsers. The default setting on Internet Explorer 6.0 is to autodiscover Web proxy client settings.
Configure DHCP WPAD Support The DHCP scope option number 252 can be used to automatically configure Web Proxy and Firewall clients. The Web Proxy or Firewall client must be configured as a DHCP client, and the logged on user must be a member of the local administrators group or Power users group (for Windows 2000). On Windows XP systems, the Network Configuration Operators group also has permission to issue DHCP queries (DHCPINFORM messages).
4. In the Value frame, enter the URL to the ISA Server 2000 firewall in the String text box. The format for this value is: http://ISAServername:AutodiscoveryPort Number/wpad.dat The default autodiscovery port number is TCP 80. You can customize this value in the ISA Management console. We will cover this subject in more detail later. In the current example, enter the following into the String text box: http://isalocal.msfirewall.org:80/wpad.dat Make sure to enter wpad.dat in all lower case letters.
5. Right click the Scope Options node in the left pane of the console and click the Configure Options command. 6. In the Scope Options dialog box, scroll through the list of Available Options and put a checkmark in the 252 wpad check box. Click Apply and then click OK. 7. The 252 wpad entry now appears in the right pane of the console under the list of Scope Options. 8. Close the DHCP console.
Configure DNS WPAD Support Another method that used to deliver autodiscovery information to Web Proxy and Firewall clients is DNS. You can create a wpad alias entry in DNS and allow browser clients to use this information to automatically configure themselves. This is in contrast to the situation we saw with the DHCP method, where the logged-on user needed to be a member of a specific group in the Windows operating system.
Create the Wpad Entry in DNS The first step is to create a wpad alias entry in DNS. This alias (also known as a CNAME record) points to a Host (A) record for the ISA Server 2004 firewall. The Host (A) record resolves the name of the ISA Server 2004 firewall to the Internal IP address of the firewall. Create the Host (A) record before you create the CNAME record. If you enable automatic registration in DNS, the ISA Server 2004 firewall’s name and IP address will already be entered into a DNS Host (A) record.
4. In the Browse dialog box, double click on the Forward Lookup Zone entry in the Records frame. 5. In the Browse dialog box, double click on the name of your forward lookup zone in the Records frame.
6. In the Browse dialog box, select the name of the ISA Server 2000 firewall in the Records frame. Click OK. 7. Click OK in the New Resource Record dialog box.
8. The CNAME (alias) entry appears in the right pane of the DNS management console. 9. Close the DNS Management console.
Configure the Client to Use the Fully Qualified wpad Alias The Web Proxy and Firewall client need to be able to resolve the name wpad. The Web Proxy and Firewall client configurations are not aware of the domain containing the wpad alias. The Web Proxy and Firewall client operating system must be able to provide this information to the Web Proxy and Firewall client. DNS queries must be fully qualified before sending the query to the DNS server.
4. In the DNS Suffix and NetBIOS Computer Name dialog box, enter the domain name that contains your wpad entry in the Primary DNS suffix of this computer text box. The operating system will append this domain name to the wpad name before sending the DNS query to the DNS server. By default, the primary domain name is the same as the domain name the machine belongs to. If the machine is not a member of a domain, then this text box will be empty.
Configure the Client Browser to Use Autodiscovery The next step is to configure the browser to use autodiscovery. To configure the Web browser to use autodiscovery to automatically configure itself to use the ISA Server 2000 firewall’s Web Proxy service: 1. Right click on the Internet Explorer icon on the desktop and click Properties. 2. In the Internet Properties dialog box, click the Connections tab. Click the LAN Settings button. 3.
Conclusion In this ISA Server 2004 Configuration Guide document we discussed the uses of a Microsoft Internet Authentication Server and how to install and configure the IAS server on the domain controller on the Internal network. Later in this guide, we will use this IAS server to authenticate incoming Web and VPN client connections. This is a preliminary document and may be changed substantially prior to final commercial release of the software described herein.
ISA Server 2004 Configuration Guide: Installing and Configuring a DNS Caching-only DNS Server on the Perimeter Network Segment Chapter 6 For the latest information, please see http://www.microsoft.
Introduction DNS servers allow client systems to resolve names to IP addresses. Internet applications need to know the IP address of a destination host before they can connect. A caching-only DNS server is a special type of DNS in that is it not authoritative for any domain. This means the caching-only DNS server does not contain any domain resource records.
Installing the DNS Server Service The first step is to install the DNS server service on the perimeter network host. This machine will act as both a secure caching-only DNS server and a publicly accessible Web and SMTP relay machine. Perform the following steps to install the DNS server service on the perimeter network host computer, TRIHOMELAN1: 1. Click Start; point to Control Panel. Click Add or Remove Programs. 2.
Configuring the DNS Server as a Secure Caching-only DNS Server The DNS server on the perimeter network will be in direct contact with Internet hosts. These hosts can be DNS clients that query the perimeter network DNS server for addresses of publicly accessible domain resources. They can also be DNS servers on the Internet that the caching-only DNS server contacts to resolve Internet host names for internal network clients.
4. Click on the Forwarders tab. Make sure there is not a checkmark in the Do not use recursion for this domain check box. If this option is selected, the caching-only DNS server cannot use the root hints list of the root Internet DNS server to resolve Internet host names. Select this option only if you decide to use a forwarder. In this case, we do not use a forwarder. 5. Click the Advanced tab. Confirm that there is a checkmark in the Secure cache against pollution check box.
6. Click the Monitoring tab. Put checkmarks in the A simple query against this DNS server and A recursive query to other DNS servers check boxes. Then click the Test Now button. Note in the Test results frame that the Simple Query shows a Pass, while the Recursive Query displays a Fail. The reason is that an Access Rule has not been created that allows the caching-only DNS server access to the Internet.
7. Click Apply and then click OK in the DNS server’s Properties dialog box. 8. Close the DNS management console. At this point, the caching-only DNS server is able to resolve Internet host names. Later, we will create Access Rules allowing hosts on the internal network to use the caching-only DNS server to resolve Internet host names.
Conclusion In this ISA Server 2004 Configuration Guide document we discussed the uses of a cachingonly DNS server and how to install and configure the Microsoft DNS server service. Later in this guide we will configure Access Policies that allow hosts on the internal network to use this DNS server and allow the caching-only DNS server to connect to the Internet. This is a preliminary document and may be changed substantially prior to final commercial release of the software described herein.
ISA Server 2004 Configuration Guide: Installing ISA Server 2004 on Windows Server 2003 Chapter 7 For the latest information, please see http://www.microsoft.
Introduction In this ISA Server 2004 Configuration Guide document we will install the ISA Server 2004 software onto the Windows Server 2003 computer we installed and configured in Chapter 1. Installing ISA Server 2004 is straightforward as there are only a few decisions that need to be made during installation. The most important configuration made during installation is the Internal network IP address range(s).
Installing ISA Server 2004 Installing ISA Server 2004 on Windows Server 2003 is relatively straightforward. The major decision you make during setup is what IP addresses should be part of the Internal network. The Internal network address configuration is important because the firewall’s System Policy uses the Internal network addresses to define a set of Access Rules. Perform the following steps to install the ISA Server 2004 software on the dual-homed Windows Server 2003 machine: 1.
7. On the Custom Setup page you can choose which components to install. By default, the Firewall Services and ISA Server Management options are installed. The Message Screener, which is used to help prevent spam and file attachments from entering and leaving the network, is not installed by default; neither is the Firewall Client Installation Share. You need to install the IIS 6.0 SMTP service on the ISA Server 2004 firewall computer before you install the Message Screener.
9. In the Internal Network setup page, click the Select Network Adapter button. 10. In the Select Network Adapter dialog box, remove the checkmark from the Add the following private ranges… checkbox. Leave the checkmark in the Add address ranges based on the Windows Routing Table checkbox. Put a checkmark in the checkbox next to the adapter connected to the Internal network.
11. Click OK in the Setup Message dialog box informing you that the Internal network was defined, based on the Windows routing table. 12. Click OK on the Internal network address ranges dialog box. 13. Click Next on the Internal Network page.
14. On the Firewall Client Connection Settings page, place checkmarks in the Allow nonencrypted Firewall client connections and Allow Firewall clients running earlier versions of the Firewall client software to connect to ISA Server checkboxes. These settings will allow you to connect to the ISA Server 2004 firewall using downlevel operating systems and from Windows 2000/Windows XP/Windows Server 2003 operating systems running the ISA Server 2000 version of the Firewall client. Click Next. 15.
16. Click Install on the Ready to Install the Program page. 17. On the Installation Wizard Completed page, click Finish. 18. Click Yes in the Microsoft ISA Server dialog box informing you that the machine must be restarted. 19.
Viewing the System Policy By default, ISA Server 2004 does not allow outbound access to the Internet from any protected network and it does not allow Internet hosts access the firewall or any networks protected by the firewall. However, a default firewall System Policy is installed that allows network management tasks to be completed. • Note: A protected network is any network defined by the ISA Server 2004 firewall that is not part of the default External network.
Order number Name Action (Allow or Deny) Protocols From (source network or host) To (destination network or host) Condition (who or what the rule applies to) You may want to widen the Name column to get a quick view rule the rule descriptions. Notice that not all the rules are enabled. Disabled System Policy Rules have a tiny downpointing red arrow in their lower right corner.
5. Review the System Policy Rules and then hide the rules by clicking the Show/Hide System Policy Rules button in the console’s button bar. This is the depressed (pushed in) button seen in the figure below.
Order Name Action Protocols From To Condition NetBIOS Session 3 Allow Remote Management using Terminal Server Allow RDP(Terminal Services) Remote Management Computers Local Host All Users 4 Allow remote logging to trusted servers using NetBIOS Allow NetBIOS Datagram Local Host Internal All Users Local Host Internal All Users Local Host Internal All Users NetBIOS Name Service NetBIOS Session Allow RADIUS authentication from ISA Server to trusted RADIUS servers Allow Allow Kerbero
Order Name Action Protocols From Server 15 167 17 183 198 To Condition Remote Gateways Allow Microsoft CIFS protocol from ISA Server to trusted servers Allow Allow Remote logging using Microsoft SQL protocol from firewall to trusted servers Allow Allow HTTP/HTTPS requests from ISA Server to specified sites Allow Allow HTTP/HTTPS requests from ISA Server to selected servers for HTTP connectivity verifiers Allow Allow access from trusted computers to the Firewall Client installation share
Order Name Action Protocols From To Condition sites to specified Microsoft Error Reporting sites 244 Allow SecurID protocol from ISA Server to trusted servers Allow SecurID Local Host Internal All Users 255 Allow remote monitoring from ISA Server to trusted servers, using Microsoft Operations Manager (MOM) Agent Allow Microsoft Operations Manager Agent Local Host Internal All Users 266 Allow HTTP from ISA Server to all networks for CRL downloads Allow HTTP Local Host All Networks
Backing Up the Post-Installation Configuration Perform the following steps to back up the post installation configuration: 1. Open the Microsoft Internet Security and Acceleration Server 2004 management console and right click on the server name in the left pane of the console. Click the Back Up command. 2. In the Backup Configuration dialog box, enter a name for the backup file in the File name text box. Be sure to note where you are saving the file by checking the entry in the Save in drop down list.
4. Click OK in the Exporting dialog box when you see the The configuration was successfully backed up message. Make sure to copy the backup file to another location on the network after the backup is complete.
Conclusion In this ISA Server 2004 Configuration Guide document we discussed the procedures required to install the ISA Server 2004 software on a Windows Server 2003 computer. We also examined the firewall System Policy that is created during installation. Finally, we finished up with step by step procedures required to back up the post-installation firewall configuration. In the next document in this ISA Server 2004 Configuration Guide series, we will enable the VPN remote access server.
ISA Server 2004 Configuration Guide: Backing Up and Restoring Firewall Configuration Chapter 8 For the latest information, please see http://www.microsoft.
Introduction ISA Server 2004 includes a new and enhanced backup and restore feature set. In ISA Server 2000, the integrated backup utility could back up the ISA Server 2000 firewall configuration. That backup file could be used to restore the configuration to the same installation on the same machine. However, if the operating system or hardware experienced a catastrophic problem requiring disaster recovery, the backup file could not be used to restore the firewall configuration.
Backing up the Firewall Configuration The ISA Server 2004 integrated backup utility makes saving the firewall configuration very easy. There are only a handful of steps required to backup and restore the configuration. Perform the following steps to back up the entire firewall configuration: 5. Open the Microsoft Internet Security and Acceleration Server 2004 management console and right click on the server name in the left pane of the console. Click the Back Up command. 6.
8. Click OK in the Exporting dialog box when you see the The configuration was successfully backed up message. Make sure to copy the backup file to another location on the network after the backup is complete. The backup file should be stored off-line on media that supported NTFS formatting so that you can encrypt the file.
Restoring the Firewall Configuration from the Backup File You can use the backup file to restore the machine configuration. The restore can be to the same machine and same ISA Server 2004 firewall installation, the same machine and a new ISA Server 2004 firewall installation, or to a completely new machine. Perform the following steps to restore the configuration from backup: 1.
4. Click OK in the Importing dialog box when it shows the The configuration was successfully restored message. 5. Click Apply to save the changes and update firewall policy. 6. Select the Save the changes and restart the service(s) option in the ISA Server Warning dialog box (note that this is not the selected option in the figure, please select the appropriate option). 7. Click OK in the Apply New Configuration dialog box informing you that the Changes to the configuration were successfully applied.
The restored configuration is now fully functional and the previous firewall policies are now applied.
Exporting Firewall Policy You may not always want or need to export all aspects of the ISA Server 2004 firewall configuration. For example, you may have problems with your Access Policies and want someone to view them for you. You can export the firewall’s current Access Policies and send the export file to an ISA Server 2004 professional who can quickly import the policies into a test machine and troubleshoot the problem. In the following example we will export the VPN Clients configuration to a file.
3. In the Set Password dialog box, enter a password and confirm the password in the Confirm password text box. Click OK. 4. Click OK in the Exporting dialog box when you see the message Successfully exported the configuration.
Importing Firewall Policy The export file can be imported to the same machine or another machine that has ISA Server 2004 installed. In the following example, we will import the VPN Clients settings that were exported in the previous exercise. Perform the following steps to import the VPN Clients settings from the export file: 1. In the Microsoft Internet Security and Acceleration Server 2004 management console, expand the server name and right click on the Virtual Private Networks (VPN) node.
4. Click OK in the Importing Virtual Private Networks (VPN) dialog box when you see the Successfully imported the configuration message. 5. Click Apply to apply the changes and update firewall policy. 6. Click OK in the Apply New Configuration dialog box when you see the message Changes to the configuration were successfully applied. Note that changes in the VPN configuration may take several minutes as they are updated in the background.
Conclusion In this ISA Server 2004 Configuration Guide section, we discussed the procedures for backing up and restoring the ISA Server 2004 firewall configuration. We also explored the export and import feature that allows you to back up selected elements of the firewall configuration.
ISA Server 2004 Configuration Guide: Simplifying Network Configuration with Network Templates Chapter 9 For the latest information, please see http://www.microsoft.
Introduction The ISA Server 2004 firewall comes with a number of pre-built Network Templates you can use to automatically configure Networks, Network Rules and Access Rules. The Network Templates are designed to get you started quickly by creating a base configuration on which you can build.
Scenario 1: The Edge Firewall Configuration The Edge Firewall template configures the ISA Server 2004 firewall to have a network interface directly connected to the Internet and a second network interface connected to the Internal network. The network template allows you to quickly configure firewall policy Access Rules that control access between the Internal network and the Internet. Table 1 shows the firewall policies available to you when using the Edge Firewall template.
Firewall Policy Description access Server will prevent access from the Internet. The following access rules will be created: 1. Allow all protocols from Internal Network and VPN Clients Network to External Network (Internet) 2. Allow all protocols from VPN Clients Network to Internal Network Perform the following steps to configure the firewall using the Edge Firewall Network Template: 1.
3. Click Next on the Welcome to the Network Template Wizard page.
4. On the Export the ISA Server Configuration page, you are offered the opportunity to export the current configuration. You can return the ISA Server 2004 firewall to the state it was in prior to using the Edge Firewall network template using this file. We have already backed up the system configuration, so we will not need to export the configuration at this time. Click Next.
5. On the Internal Network IP Addresses page, you define the Internal network addresses. The current Internal network address range is automatically included in the Address ranges list. You can use the Add, Add Adapter and Add Private button to expand this list of addresses. In our current example we will keep the current Internal network address range. Click Next.
6. On the Select a Firewall Policy page you can select a firewall policy and a collection of Access Rules. In this example, we want to allow Internal network clients access to all protocols to access all sites on the Internet. After you become more familiar with the ISA Server 2004 firewall, you should increase the level of security for outbound access control. But at this point, general Internet access is more important. Select the Allow unrestricted access policy from the list and click Next.
7. Review your settings and click Finish on the Completing the Network Template Wizard page. 8. Click Apply to save the changes and update firewall policy. 9. Click OK in the Apply New Configuration dialog box after you see the message Changes to the configuration were successfully applied. 10. Click on the Firewall Policies node in the left pane of the console to view the policies created by the Edge Firewall network template.
ISA Server 2004 Configuration Guide 99
Scenario 2: The 3-Leg Perimeter Configuration The 3-leg perimeter configuration creates network relationships and Access Rules to support an Internal network segment and a perimeter (DMZ) network segment. The perimeter network segment can host your publicly-accessible resources and infrastructure servers, such as a public DNS server or a caching-only DNS server.
Firewall Policy Description The following access rules will be created: 1. Allow HTTP, HTTPS, FTP from Internal Network and VPN Clients Network to the External Network (Internet) 2. Allow DNS from Internal Network, VPN Clients Network and Perimeter Network to External Network (Internet) 3. Allow all protocols from VPN Clients Network to Internal Network Allow unrestricted access Allow all types of access to the Internet through the firewall.
3. Click Next on the Welcome to the Network Template Wizard page. 4. On the Export the ISA Server Configuration page, you can choose to export your current configuration. This is useful if you find that you need to return the firewall to its current settings in the event that the template settings do not meet your needs. We have already backed up the configuration, so we will not need to export the configuration at this time. Click Next.
5. On the Internal Network IP Addresses page, you set the addresses that represent the Internal network. The addresses included in the current Internal network are automatically included in the Address ranges list. We will not add any addresses to the Internal network. Click Next.
6. You configure the addresses that comprise the perimeter network segment on the Perimeter Network IP Addresses page. The wizard does not make any assumptions regarding what addresses should be included in the perimeter network, so the Address ranges list is empty.
7. Click the Add Adapter button. In the Network adapter details dialog box, put a checkmark in the DMZ check box. Note that the names that we previously set for network adapters appear in this list. Renaming network adapters helps you identify the network association of that adapter. Click OK.
8. The wizard automatically enters an address range to the Address ranges list based on the Windows routing table. Click Next. 9. On the Select a Firewall Policy page, you select a firewall policy that will create network relationships between the Internet, perimeter and Internal networks and also creates Access Rules. In this example, we want to allow the Internal network clients full access to the Internet and the perimeter network, and allow the perimeter network hosts access to the Internet.
10. Review the settings on the Completing the Network Template Wizard and click Finish. 11. Click Apply to save the changes and update firewall policy. 12. Click OK in the Apply New Configuration dialog box after you see the message Changes to the configuration were successfully applied. 13. Click on the Firewall Policy node in the left pane of the Microsoft Internet Security and Acceleration Server 2004 management console to view the rules created by the 3-Leg Perimeter network template.
14. Expand the Configuration node in the left pane of the Microsoft Internet Security and Acceleration Server 2004 management console. Click on the Networks node. Here you see a list of networks, including the Perimeter network created by the template. 15. Click on the Network Rules tab. Right click on the Perimeter Configuration Network Rule and click Properties.
16. In the Perimeter Configuration Properties dialog box, click on the Source Networks tab. You can see in the This rule applies to traffic from these sources list the Internal, Quarantined VPN Clients and VPN Clients networks listed as source networks. 17. Click on the Destination Networks tab. You see the Perimeter network in the This rule applies to traffic sent to these destinations list.
18. Click the Network Relationship tab. The default setting is Network Address Translation (NAT). This is a slightly higher security configuration because it hides the addresses of the Internal network clients that connect to perimeter network hosts. However, NAT relationships can complicate access for certain protocols as not all protocols support address translation.
19. Click Apply and then click OK. 20. Click Apply to save the changes and update the firewall policy. 21. Click OK in the Apply New Configuration dialog box after you see the message Changes to the configuration were successfully applied.
Conclusion In this ISA Server 2004 Configuration Guide chapter, we discussed how you can use the Edge Firewall and 3-Leg Perimeter network templates to simplify initial configuration of network addresses, Network Rules and Access Rules. In the next chapter of the ISA Server 2004 Configuration Guide, we will discuss the various ISA Server 2004 client types. This is a preliminary document and may be changed substantially prior to final commercial release of the software described herein.
ISA Server 2004 Configuration Guide: Configuring ISA Server 2004 SecureNAT, Firewall and Web Proxy Clients Chapter 10 For the latest information, please see http://www.microsoft.
Introduction An ISA Server 2004 client is a machine that connects to a resource by going through the ISA Server 2004 firewall. In general, the ISA Server 2004 client is located on an Internal or perimeter network segment and connects to the Internet through the ISA Server 2004 firewall.
• Configuring the ISA Server 2004 Web Proxy client • Configuring the ISA Server 2004 Firewall client ISA Server 2004 Configuration Guide 115
Configuring the SecureNAT Client The SecureNAT client configuration is simple. The only requirement is that the machine be configured with a default gateway that routes Internet-bound requests through the ISA Server 2004 firewall machine.
5. Click OK in the Local Area Connection Properties dialog box. 6. Confirm the new IP address assignment by using the ipconfig command. Click Start and Run. In the Open text box, enter cmd. 7. In the Command Prompt window, enter ipconfig /all and press ENTER. Here you can see the IP address assigned to the client, as well as the DNS, WINS and default gateway addresses.
8. Close the Command Prompt window. Return to the TCP/IP Properties dialog box and change the CLIENT machine to use a static IP address again. The IP address is 10.0.0.4; the subnet mask is 255.255.255.0; the default gateway is 10.0.0.1, and the DNS server address is 10.0.0.2.
Configuring the Web Proxy Client The Web Proxy client configuration requires that the Web browser be set to use the ISA Server 2004 firewall as its Web Proxy server. There are several ways to configure the Web browser as a Web Proxy client.
Enter the TCP port number that the Web Proxy filter lists on the Port text box, which is by default 8080. Click OK in the Local Area Network (LAN) Settings dialog box. 4. Click OK in the Internet Properties dialog box. The Web browser is now configured as a Web Proxy client.
Configuring the Firewall Client The Firewall client software enables you to control Internet access on a per user/group basis for all Winsock (TCP or UDP) connections to the Internet. The Firewall client software automatically sends user credentials in the background to the ISA Server 2004 firewall machine.
7. Click Install on the Ready to Install the Program page. 8. Click Finish on the Installation Wizard Completed page. You can now install the Firewall client software from the Firewall client share on the domain controller. Perform the following steps to install the Firewall client software: 1. At the CLIENT computer on the Internal network, click Start and then click the Run command. In the Open text box, enter \\EXCHANGE2003BE\mspclnt\setup and click OK. 2.
5. Click Install on the Ready to Install the Program page. 6. Click Finish on the Install Wizard Completed page. The next step is to configure Firewall client support for the Internal network. Perform the following steps on the ISA Server 2004 firewall computer: 1. Open the Microsoft Internet Security and Acceleration Server 2004 management console and expand the server name. Expand the Configuration node and click on the Networks node. Right click on the Internal Network and click Properties. 2.
3. Click on the Auto Discovery tab. Place a checkmark in the Publish automatic discovery information check box. Leave the default port as 80. Click Apply and OK.
4. Click Apply to save the changes and update the firewall policy. 5. Click OK in the Apply New Configuration dialog box. We can now configure the Firewall client. Perform the following steps on the client computer on the Internal network: 1. At the CLIENT computer, double click on the Firewall client icon in the system tray. 2. In the Microsoft Firewall Client for ISA Server 2004 dialog box, confirm that there is a checkmark in the Enable Microsoft Firewall Client for ISA Server 2004 check box.
3. Click the Detect Now button. The name of the ISA Server 2004 firewall computer will appear in the Detecting ISA Server dialog box when the client finds the ISA Server 2004 firewall. Click Close.
4. Confirm that there is a checkmark in the Enable Web browser automatic configuration checkbox and click the Configure Now button. Note that based on the settings we created on the ISA Server 2004 firewall, the browser has been automatically configured. Click OK in the Web Browser Settings Update dialog box.
5. Click Apply and then click OK in the Microsoft Firewall Client for ISA Server 2004 dialog box. The machine is now configured as a Firewall client and can access the Internet in its role as a Firewall client based on the Access Rules configured on the ISA Server 2004 firewall.
Conclusion In this ISA Server 2004 Configuration Guide section we discussed the various ISA Server 2004 client types and the features provided by each client. After discussing the types of ISA Server 2004 clients, we went over the procedures required to install and configure each client type. In the next chapter of this ISA Server 2004 Configuration Guide, we will outline the procedures for creating and modifying the outbound access policy rules created by the Network Template.
ISA Server 2004 Configuration Guide: Configuring ISA Server 2004 Access Policy Chapter 11 For the latest information, please see http://www.microsoft.
Introduction The ISA Server 2004 firewall controls what communications move between networks connected to one another via the firewall. By default, the ISA Server 2004 firewall computer blocks all traffic. The methods used to allow traffic to move through the firewall are: • Access Rules, and • Publishing Rules Access Rules control outbound access from a protected network to an unprotected network. ISA Server 2004 considers all networks that are not the External network to be protected.
Rule Element Value Order (priority) 1 Action Allow Protocols HTTP and FTP (download). From/Listener Internal Network. To www.microsoft.com and ftp.microsoft.com. Condition Limited Web Access (Group). This rule limits allows users that belong to the Limited Web Access group to use the HTTP and FTP (download) protocols. However, members of that group must be located on the internal network when they issue the request.
Create a User Account The first step is to create a user account to which we can later assign limited Internet access privileges. In practice, the user account can be created in the Active Directory or on the local user database on the firewall computer. In our current example, we will create the user account in the Active Directory. Perform the following steps to create the user account for user2: 1. At the domain controller, click Start and point to Administrative Tools.
5. Click Next on the Create an Exchange mailbox page. 6. Click Finish on the last page of the New User Wizard.
Disable the Access Rules created by the Network Template The next step is to disable the Access Rules created by the Network Template. In this example, we disable the Access Rules created by the 3-Leg perimeter template. You can perform a similar procedure if you used the Front-end firewall Network Template. We want to use these rules later, so we will disable the rules instead of deleting them. Later, we will reenable the Access Rules created by the Network Template.
ISA Server 2004 Configuration Guide 136
Create an Access Rule Limiting Protocols and Sites Users Can Access The first Access Rule will limit users access to only the HTTP and HTTPS protocols. In addition, the users will only be able to use these protocols when accessing Microsoft operated Web properties. A custom firewall group, Limited Access Web Users, will be created and user2, located in the Active Directory, will be placed into that Active Directory group.
2. On the Welcome to the New Access Rule Wizard page, enter a name for the rule in the Access Rule name text box. In this example, we will call the rule Limited Users Web Access. Click Next. 3. On the Rule Action page, select Allow and click Next. 4. On the Protocols page, select Selected protocols from the This rule applies to dropdown list. Click Add.
5. In the Add Protocols dialog box, double click on the HTTP and HTTPS protocols. Click Close. 6. Click Next on the Protocols page.
7. On the Access Rule Sources page, click Add. In the Add Network Entities dialog box, click on the Networks folder. Double click on the Internal network, and click Close.
8. Click Next on the Access Rule Sources page. 9. On the Access Rule Destinations page, click Add. On the Add Network Entities dialog box, click the New menu, and click Domain Name Set. 10. In the New Domain Name Set Policy Element dialog box, click New. Enter the first domain name *.microsoft.com and press ENTER. Enter the following three domains *.msn.com, *.hotmail.com and *.windows.com. In the Name text box, enter Microsoft and click OK.
11. In the Add Network Entities dialog box, click on the Domain Name Sets folder and then double click on the Microsoft entry. Click Close.
12. On the User Sets page, select All Users entry from the This rule applies to request from the following user sets list, and click Remove. Click Add. 13. In the Add Users dialog box, click the New menu. 14. On the Welcome to the New User Sets Wizard page, enter a name for the User Set in the User set name text box. In this example, we will name the User Set Limited Web Users. Click Next. 15. On the Users page, click Add. Select the Windows users and groups option. 16.
18. In the Select Users or Groups dialog box, enter User2 in the Enter the object names to select text box and click Check Names. When the Active Directory finds the user name, it will be underlined. Click OK. 19. Click Next on the Users page. 20. Click Finish on the Completing the New User Set Wizard page. 21. Double click the Limited Web Users entry in the Add Users dialog box and click Close. 22.
Create an Access Rule Providing Administrators Greater Access to Protocols and Sites Network administrators require a higher level of Internet access than other users on the network. However, even network administrators should be restrained from protocols that can lead to a significant risk of network compromise. One of these protocols is the Internet Relay Chat protocol, which is often used to trade viruses and pirated software.
5. In the Add Protocols dialog box, click on the Instant Messaging folder. Double click on the IRC protocol. Click Close.
6. Click Next on the Protocols page. 7. On the Access Rule Sources page, click Add. In the Add Network Entities dialog box, click on the Networks folder. Double click on the Internal entry and click Close. 8. On the Access Rule Sources page, click Next. 9. On the Access Rule Destinations page, click Add. Click the Networks folder and then double click on the External entry. Click Close. 10. On the User Sets page, click All Users and Remove. Click Add. 11. In the Add Users dialog box, click the New menu. 12.
17. Click Next on the Users page. 18. Click Finish on the Completing the New User Set Wizard page. 19. In the Add Users dialog box, double click on the Administrators entry, and click Close. 20. Click Next on the User Sets page. 21. Click Finish on the Completing the New Access Rule Wizard page.
Create a DNS Server Access Rule Allowing Internal Network DNS Servers Access to Internet DNS Servers We use a DNS server located on the Internet network to resolve Internet host names in our current scenario. This DNS server must be able to resolve Internet host names by contacting other DNS servers located on the Internet. Most machines that run critical network services do not typically have logged on users. For this reason, we will create an Access Rule that does not require a logged on user account.
6. Click Next on the Protocols page. 7. On the Access Rule Sources page, click Add. In the Add Network Entities dialog box, click the New menu, then click the Computer Set command. 8. In the New Computer Set Rule Element dialog box, click Add. Click the Computer option.
9. In the New Computer Rule Element dialog box, enter a name for the DNS server in the Name text box. In this example, we’ll name the first DNS server DNS1. Enter the IP address of the DNS server in the Computer IP Address text box. Click OK. 10. Click OK in the New Computer Set Rule Element dialog box. 11. In the Add Network Entities dialog box, click on the Computer Sets folder. Double click on the DNS Servers entry. Click Close.
12. Click Next on the Access Rule Sources page. 13. On the Access Rule Destinations page, click Add. Click the Networks folder and double click on the External entry. Click Close. 14. Click Next on the Access Rule Destinations page. 15. On the User Sets page, accept the default entry, All Users, and click Next. 16. Click Finish on the Completing the New Access Rule Wizard page.
Use HTTP Policy to Prevent Access to Suspect Web Sites You can block access to Web sites based on virtually any component of the HTTP communication using ISA Server 2004 HTTP policy. For example, you might want to prevent access to all Web sites that contain a reference to the popular file-sharing application, Kaaza. This file-sharing program can present a risk to network security because the files downloaded via this application can contain viruses, worms and copyrighted material.
6. Click Apply and OK in the Configure HTTP policy for rule dialog box.
7. Repeat the preceding steps for the Limited Access Web Users rule. 8. Click Apply to save the changes and update firewall policy. 9. Click OK in the Apply New Configuration dialog box.
Test the Access Rules Now the we have an ISA Server 2004 Access Policy in place, we can test the policy. Perform the following steps to test Access Policy: 1. First, review the Access Policies created on the ISA Server 2004 firewall. In the Microsoft Internet Security and Acceleration Server 2004 management console, expand the server name and click on the Firewall Policy node. Review the Access Rules in the Details pane of the console. 2. Log on to the CLIENT computer as User2.
8. Log off the CLIENT machine and then log on as Administrator. 9. Open the Web browser and enter www.microsoft.com in the Address bar of Internet Explorer and press ENTER. The Microsoft Web site appears. 10. Enter www.isaserver.org in the Address bar of Internet Explorer and press ENTER. As an Administrator, you are able to access the site. 11. Enter www.isaserver.org/kaaza in the Address bar of Internet Explorer. You see the same HTTP Security filter error message.
Conclusion In this ISA Server 2004 Configuration Guide section, we discussed the variety of methods you can use to control outbound access to the Internet using ISA Server 2004 Access Rules. In the walkthroughs, you created Access Rules that controlled access to specific Web sites and protocols based on user and group membership. In addition, you created policy elements “on the fly” while creating the Access Rules.
ISA Server 2004 Configuration Guide: Publishing a Web and FTP Server on the Perimeter Network Chapter 12 For the latest information, please see http://www.microsoft.
Introduction ISA Server 2004 firewalls enable you to publish resources located on protected networks so external users can access those resources. There are two primary methods available to publish resources on a protected network: • Web Publishing Rules • Server Publishing Rules Web Publishing Rules can be used to publish Web servers. External users connect to Web Published Web servers using the HTTP or HTTPS (SSL) protocols.
Configure the Web Site The first step is to configure the Web site on the perimeter network segment. In a production environment, the Web site will already be configured and be ready to publish. In this current example, we need to create a default Web site document and set a few parameters so that we can test it successfully. Perform the following steps to configure the Web site on the IIS server on the perimeter network: 1. Click Start and point to Administrative Tools.
6. Use the Move Up button to move the default.txt entry to the top of the list.
7. Click Apply; then click OK in the Default Web Site Properties dialog box. 8. Right click the server name in the left pane of the console and point to All Tasks. Click Restart IIS. 9. Select Restart Internet Services on TRIHOMEDMZLAN1 in the Stop/Start/Restart dialog box and click OK. 10. Close the Internet Information Services (IIS) Manager console.
11. Click Start and Windows Explorer. 12. Navigate to the C:\Inetpub\wwwroot folder. Click the File menu, point to New and click Text Document. 13. Double click the New Text Document.txt entry in the right pane of the console. Enter into the document the following text: This is the Web site on the perimeter network segment. Click File and then click Exit. Click Yes in the Notepad dialog box asking if you want to save the changes. 14. Right click on the New Text Document.txt file and click Rename.
Configure the FTP Site The next step is to configure the FTP site so that it is ready to be published. You will set the IP address the FTP site listens on and configure messages for the FTP site to return to users connecting to the site. In addition, you will enable users to upload files to the FTP site. In a production environment, you may want to prevent users from being able to upload to the Web site to prevent Internet intruders from placing illegal and copyrighted material on your site.
6. Click on the Home Directory tab. On the Home Directory tab, put a checkmark in the Write text box. Note that in a production environment you should be very careful about allowing write access to FTP sites. Internet intruders can take advantage of poorlysecured FTP sites and store illegal material on your site.
7. Click Apply and OK in the Default FTP Site Properties dialog box. 8. Right click the server name in the left pane of the console and point to All Tasks. Click Restart IIS. 9. Select the Restart Internet Services on TRIHOMEDMZLAN1 entry in What do you want IIS to do? and click OK. 10. Close the Internet Information Services (IIS) Manager console. 11. Click Start and Windows Explorer. 12. Navigate to the folder C:\Program Files\NetMeeting. Select all the files in that folder and copy them to the clipboard.
Disable the Custom Rules and Enable the Template Created Rules In the last chapter in this ISA Server 2004 Configuration Guide, we created Access Rules that allowed for user/group-based access control for outbound connections. We now want to disable those rules and use the rules that the 3-Leg Perimeter Network Template Wizard created. Perform the following steps to disable the custom rules created in the last chapter and enable the rules created by the Template: 1.
6. With the two Access Rules still selected, click the blue, up-pointing arrow in the console button bar to move the rules to the top of the list. 7. Click Apply to save the changes and update firewall policy. 8. Click OK in the Apply New Configuration dialog box.
Create the Web Publishing Rule You’re now ready to create the Web Publishing Rule. The Web Publishing Rule will configure the ISA Server 2004 firewall to listen for incoming requests for your Web site. Because the ISA Server 2004 firewall is an intelligent, application layer aware firewall, it will accept requests only from external users who enter the correct Web site name to access the site.
6. On the Public Name Details page, select This domain name (type below) in the Accept requests for list. In the Public name text box, enter the name that external users will use to access the site. In this example we will use the name perimeter.msfirewall.org. When users enter http://perimeter.msfirewall.org into their browsers, the name will resolve to the external IP address on the ISA Server 2004 firewall that listens for incoming Web requests for the site. In the Path (optional) text box, enter /*.
7. On the Select Web Listener page, click New. 8. On the Welcome to the New Web Listener Wizard page, enter a name for the Web listener in the Web listener name text box. In this example we will name the listener Listener1. Click Next. 9. On the IP Addresses page, put a checkmark in the External check box and click Address.
10. On the External Network Listener IP Selection page, select Specified IP addresses on the ISA Server computer in the selected network. In the Available IP Addresses list, select the IP address on the external interface of the ISA Server 2004 firewall and click Add. The address now appears in the Selected IP Addresses list. Click OK. 11. Click Next on the IP Addresses page.
12. On the Port Specification page, confirm that there is a checkmark in the Enable HTTP check box and that the default HTTP port number is 80. Click Next.
13. Click Finish on the Completing the New Web Listener Wizard page. 14. The Listener1 entry now appears in the Web listener list. Click Next. 15. On the User Sets page, accept the default entry, All Users, and click Next. 16. Click Finish on the Completing the New Web Publishing Rule Wizard page. 17. Click Apply to save the changes and update the firewall policy. 18. Click OK in the Apply New Configuration dialog box.
3. Add the following line to the HOSTS file: 172.16.0.2 perimeter.msfirewall.org Press ENTER at the end of the line so that the insertion point sits on the next line. Click File and then click Exit. In the Notepad dialog box, click Yes to indicate that you wish to save the changes.
ISA Server 2004 Configuration Guide 177
Create the FTP Server Publishing Rule Server Publishing Rules are simpler than Web Publishing Rules. A Server Publishing Rule forwards incoming requests to the published server and exposes them to application layer filters installed on the ISA Server 2004 firewall. The only information you need to supply to the Server Publishing Rule wizard is the IP address of the server to be published, the IP address you want the ISA Server 2004 firewall to listen for requests, and the Server Protocol that is published.
6. On the IP Addresses page, place a checkmark in the External check box. Click the Addresses button. 7. In the External Network Listener IP Selection dialog box, select the Specified IP addresses on the ISA Server computer in the selected network option. Select the IP address on the external interface of the ISA Server 2004 firewall in the Available IP Addresses list and click Add. The address now appears in the Selected IP Addresses list. Click OK. 8. Click Next on the IP Addresses page. 9.
Test the Connection We are now ready to test the connection. Internet Explorer 6.0 can access both Web and FTP sites within the browser. The only difference in the current example is that you will specify http:// for the Web site and ftp:// for the FTP site. You will also see in the following walkthrough how to configure the FTP site to accept uploads from external users. Perform the following steps to test the Web and FTP Server Publishing Rules: 1.
x 7. If you would like to upload files to the site, return to the Microsoft Internet Security and Acceleration Server 2004 management console and right click on the Perimeter FTP Server publishing rule and click Configure FTP. 8. In the Configures FTP protocol policy dialog box, remove the checkmark from the Read Only check box. Click Apply and OK.
9. Click Apply to save the changes and update the firewall policy. 10. Click OK in the Apply New Configuration dialog box.
Conclusion In this ISA Server 2004 Configuration Guide document we discussed two primary methods that allow external users access to resources contained on protected networks. We first used a Web Publishing Rule to allow inbound access to resources contained in a perimeter network segment. Next, we used a Server Publishing Rule to allow inbound access to an FTP server on the perimeter network segment. You can apply the same principles can when publishing resources contained on an Internet network segment.
ISA Server 2004 Configuration Guide: Configuring the Firewall as a Filtering SMTP Relay Chapter 13 For the latest information, please see http://www.microsoft.
Introduction One of the optional components included with the ISA Server 2004 is the SMTP Message Screener. The SMTP Message Screener can inspect SMTP messages at the application layer relay or reject messages based on parameters you configure.
Restore the System to its Post-installation State In order to fully test the inbound and outbound SMTP relay configuration in this scenario, we will return the machine to its post-installation state so that other Access Rules do not interfere with the scenario development. In a production environment, you would leave your current Access Rules intact and add the Server Publishing Rules required to create the inbound and outbound SMTP relays.
Assign a second IP address to the Internal interface of the ISA Server 2004 firewall We will add a second IP address to the Internal interface of the ISA Server 2004 firewall machine. This will allow us to publish the outbound SMTP relay on a different IP address than the inbound SMTP relay. While this is not required, it greatly simplifies tracking which relay is to be used by particular clients.
Install and Configure the SMTP Service Install the IIS 6.0 SMTP service before the ISA Server 2004 SMTP Message Screener. The SMTP service works together with the SMTP Message Screener to examine and block offending e-mail messages. Perform the following steps to install the IIS 6.0 SMTP service: 1. Click Start and point to Control Panel. Click Add or Remove Programs. 2. In the Add or Remove Programs window, click Add/Remove Window Components on the left side of the window. 3.
2. In the Internet Information Services (IIS) Manager console, expand the computer name in the left pane of the console. Right click the Default SMTP Virtual Server and click Properties. 3. In the Default SMTP Virtual Server Properties dialog box, click the Access tab. 4. On the Access tab, click the Relay button in the Relay restrictions frame. 5. In the Relay Restrictions dialog box, confirm that the Only the list below option is selected. Then click Add. 6.
14. Right click the Default SMTP Virtual Server node and click Stop. Right click the Default SMTP Virtual Server node and click Start.
Install the SMTP Message Screener The SMTP Message Screener is an optional ISA Server 2004 component. This feature integrates with the IIS 6.0 SMTP service to examine and block SMTP mail based on parameters you configure in the Message Screener. Perform the following steps to install the SMTP Message Screener on the ISA Server 2004 firewall computer: 1. Close the Microsoft Internet Security and Acceleration Server 2004 management console. 2.
7. Click Install on the Ready to Modify the Program page. 8. Put a checkmark in the Invoke ISA Server Management when the wizard closes check box and click Finish on the Installation Wizard Completed page. 9. Close the Autorun menu.
Create the SMTP Server Publishing Rules The SMTP Message Screener works together with SMTP Server Publishing Rules. Each SMTP Server Publishing Rule can be configured with a custom set of SMTP Message Screener parameters. This allows you to create different e-mail screening policies for the inbound and outbound SMTP relays. Different SMTP Message Screener configurations allow you to block different e-mail messages coming into the network versus what gets blocked on the way out.
6. On the IP Addresses page, put a checkmark in the External check box and click the Address button. 7. In the External Network Listener IP Selection dialog box, select Specified IP addresses on the ISA Server computer in the selected network. Click the IP address for the external interface you want to use in the rule. In this example, the IP address is 192.168.1.70. Click Add. The IP address now appears in the Selected IP Addresses list. Click OK. 8. Click Next on the IP Addresses page. 9.
7. In the External Network Listener IP Selection dialog box, select the Specified IP addresses on the ISA Server computer in the selected network option. Click the IP address on the Internal interface you want to use in the rule. In this example, the IP address is 10.0.0.10, then click Add. The IP address now appears in the Selected IP Addresses list. Click OK. 8. Click Next on the IP Addresses page. 9. Click Finish on the Completing the New Server Publishing Rule Wizard page.
2. Click on the General tab in the Configure SMTP Protocol Policy dialog box. Place a checkmark in the Enable support for Message Screener checkbox. 3. Click on the Keywords tab. Place a checkmark in the Enable this rule checkbox. Click Add. In the Mail Keyword Rule dialog box, enter resume in the Keyword text box. Select the Message header or body option. Select the Hold message option from the Action list. Click OK. 4. Click Apply and then click OK in the Configure SMTP Protocol Policy dialog box.
Perform the following steps on the Inbound SMTP Relay Server Publishing Rule: 1. Right click the Inbound SMTP Relay rule and click Configure SMTP. 2. Click on the General tab in the Configure SMTP Protocol Policy dialog box. Place a checkmark in the Enable support for Message Screener check box. 3. Click on the Keywords tab. Click the Add button. In the Mail Keyword Rule dialog box, enter mail enhancement in the Keyword text box. Select the Message header or body option.
Create the Outbound SMTP Access Rule Perform the following steps to create an outbound SMTP Access Rule that enables the ISA Server 2004 firewall to relay SMTP from the Internal Exchange Server to SMTP servers for other domains on the Internet: 1. In the Microsoft Internet Security and Acceleration Server 2004 management console, expand the computer name in the left pane of the console and click the Firewall Policy node. Right click on the Firewall Policy node, point to New and click Access Rule. 2.
10. On the User Sets page, accept the default value, All Users, and click Next. 11. Click Finish on the Completing the New Access Rule Wizard page. 12. Click Apply to save the changes and update the firewall policy. 13. Click OK in the Apply New Configuration dialog box.
Configure SMTP Message Screener Logging The SMTP Message Screener logs all messages moving the inbound and outbound SMTP relays. This logging feature helps you troubleshoot and access the e-mail messages moving through the server and confirm that the SMTP Message Screener is doing what you expect it to do. Perform the following steps to configure the SMTP Message Screener logging feature: 1.
5. Click OK in the Options dialog box. 6. Click Apply and then click OK in the SMTP Message Screener Properties dialog box. 7. Click Apply to save the changes and update the firewall policy. 8. Click OK in the Apply New Configuration dialog box.
Test SMTP Filtering Now that the SMTP Server Publishing Rule and SMTP Message Screener configurations are in place, we’re ready to test the effectiveness of the Message Screener. Perform the following on the external client machine to test the inbound SMTP relay function: 1. On the external client computer, open Outlook Express. If presented with the e-mail account Wizard, cancel out of the Wizard so that you can manually configure the e-mail account. 2.
Conclusion In this ISA Server 2004 Configuration Guide document, we discussed how to make the ISA Server 2004 firewall your front line protection as an e-mail defense in-depth plan. The ISA Server 2004 SMTP Message Screener can provide initial inspection and protection against dangerous and inappropriate e-mail messages.
ISA Server 2004 Configuration Guide: Publishing the Exchange Outlook Web Access, SMTP Server and POP3 Server Sites Chapter 14 For the latest information, please see http://www.microsoft.
Introduction One of the main reasons to deploy a ISA Server 2004 firewall is to protect Microsoft Exchange Servers. ISA Server 2004 includes a number of technologies focused on providing enhanced support to protect Microsoft Exchange Services published to the Internet. This increased level of protection for remote access to Microsoft Exchange Server services puts the ISA Server 2004 firewall in a unique position to be the firewall for Microsoft Exchange Server.
Restore the System to its Post-installation State In order to fully test the inbound and outbound SMTP relay configuration in this scenario, we will return the machine to its post-installation state so that other Access Rules do not interfere with the scenario development. In a production environment, you would leave your current Access Rules intact and add the Server Publishing Rules required to create the inbound and outbound SMTP relays.
Create the OWA Web Publishing Rule You can publish the Microsoft Exchange Outlook Web Access site using ISA Server 2004 Web Publishing after the site is configured to support secure SSL connections. These procedures include forcing SSL on the OWA directories and allowing the directories to accept only basic authentication. Perform the following steps to create the Outlook Web Access Web Publishing Rule: 1.
6. On the Bridging Mode page, select Secure connection to clients and mail server and click Next.
7. On the Specify the Web Mail Server page, enter the name for the Internal OWA Web site in the Web mail server text box. In this example, we will use the name owa.msfirewall.org. Click Next.
8. On the Public Name Details page, select This domain name (type below) in the Accept requests for list. Enter the name external users will use to access the OWA Web site in the Public name text box. In this example, the external users will use the name owa.msfirewall.org. Click Next.
9. On the Select Web Listener page, click New. 10. On the Welcome to the New Web Listener Wizard page, enter a name for the listener in the Web listener name text box. In this example, we will use the name OWA SSL Listener. Click Next. 11. On the IP Addresses page, put a checkmark in the External check box. Click the Address button. 12. In the External Network Listener IP Selection dialog box, select Specified IP addresses on the ISA Server computer in the select network.
19. In the OWA SSL Listener Properties dialog box, click the Preferences tab. 20. On the Preferences tab, click the Authentication button. 21. In the Authentication dialog box, remove the checkmark from the Integrated check box. Click OK in the Microsoft Internet Security and Acceleration Server 2004 dialog box warning that the no authentication methods are currently configured. 22. Place a checkmark in the OWA Forms-Based authentication checkbox. Click OK.
23. Click Apply and then click OK in the OWA SSL Listener Properties dialog box. 24. Click Next on the Select Web Listener page.
25. On the User Sets page, accept the default entry, All Users, and click Next. 26. Click Finish on the Completing the New Mail Server Publishing Rule Wizard page. 27. Click Apply to save the changes and update the firewall policy. 28. Click OK in the Apply New Configuration dialog box. The next step is to create a HOSTS file entry on the ISA Server 2004 firewall machine so that it resolves the name owa.msfirewall.org to the IP address of the Exchange Server on the Internal network. 4. Click Start and Run.
6. Add the following line to the HOSTS file: 10.0.0.2 owa.msfirewall.org Press ENTER at the end of the line so that the insertion point sits on the next line. Click File and Exit. In the Notepad dialog box, click Yes to indicate that you wish to save the changes.
ISA Server 2004 Configuration Guide 216
Create the SMTP Server Publishing Rule You can create an SMTP Server Publishing Rule to provide external users and servers access to the Microsoft Exchange SMTP service. In general, you will prefer to use the ISA Server 2004 firewall as a secure SMTP filtering relay to prevent external users and servers from directly connecting to the Exchange Server.
16. In the External Network Listener IP Selection dialog box, select Specified IP addresses on the ISA Server computer in the selected network. Click the IP address on the external interface you want to use in the rule. In this example, the IP address is 192.168.1.70. Click Add. The IP address now appears in the Selected IP Addresses list. Click OK. 17. Click Next on the IP Addresses page. 18. Click Finish on the Completing the New Server Publishing Rule Wizard page.
Create the POP3 Server Publishing Rule Remote access to the Exchange Server POP3 service allows users located away from the office to download their mail from the Exchange Server to virtually any e-mail client application. Users must provide a user name and password when they connect to the POP3 service. They download e-mail into their e-mail client application after sending their credentials. These user credentials are sent in clear text.
8. Click Next on the IP Addresses page. 9. Click Finish on the Completing the New Server Publishing Rule Wizard page.
Test the connection We are now ready to test the OWA, SMTP and POP3 connections to the Exchange Server located behind the ISA Server 2004 firewall. The first step is to create a HOSTS file entry on the client so that it correct resolves the name of the OWA site. In a production environment, you would create a public DNS resource record that correctly resolves this name for external network clients. Perform the following steps to test the Outlook Web Access connection: 1.
5. In the Outlook Web Access Log on form, enter the user name in the Domain\user name text box, and the password in the Password text box. Select the Premium client type and the Private computer Security type. In the current example, we will enter the user name MSFIREWALL\Administrator and the Administrator’s password. Click Log On. Next, we will test the POP3 and SMTP functionality using Outlook Express: 1. On the external client machine, open Outlook Express. Click Tools and Accounts. 2.
7. On the Internet Mail Logon page, enter Administrator in the Account name text box and the administrator’s password in the Password text box. Click Next. 8. Click Finish on the Congratulations! page. 9. Click Close on the Internet Accounts dialog box. 10. Close Outlook Express and then open it again. Click the Create Mail button and address a message to administrator@msfirewall.org. Enter a subject and text and click the Send button. To receive the mail from the POP3 server, click Send/Recv.
Conclusion In this ISA Server 2004 Configuration Guide document, we discussed how to publish a Microsoft Exchange Outlook Web Access (OWA) site and how to publish the Exchange POP3 and SMTP services. In the next document in this ISA Server 2004 Configuration Guide series, we will discuss how the firewall can be used to publish an array of Exchange Server services. This is a preliminary document and may be changed substantially prior to final commercial release of the software described herein.
ISA Server 2004 Configuration Guide: Configuring the ISA Server 2004 Firewall as a VPN Server Chapter 15 For the latest information, please see http://www.microsoft.
Introduction The ISA Server 2004 firewall can be configured as a VPN server. The VPN server component enables it to accept incoming VPN client calls so that the VPN client computer can become a member of a protected network. Traditional VPN servers allow VPN clients full access to the networks to which they connect. In contrast, the ISA Server 2004 VPN server allows you to control what protocols and servers VPN clients can connect to, based on the credentials used when connecting to the VPN server.
Enable the VPN Server By default, the VPN server component is disabled. The first step is to enable the VPN server feature and configure the VPN server components. Perform the following steps to enable and configure the ISA Server 2004 VPN Server: 1. Open the Microsoft Internet Security and Acceleration Server 2004 management console and expand the server name. Click on the Virtual Private Networks (VPN) node. 2. Click on the Tasks tab in the Task Pane. Click Enable VPN Client Access. 3.
7. Click on the Groups tab. On the Groups tab, click the Add button. 8. In the Select Groups dialog box, click the Locations button. In the Locations dialog box, click the msfirewall.org entry and click OK. 9. In the Select Group dialog box, enter Domain Users in the Enter the object names to select text box. Click the Check Names button. The group name will be underlined when it is found in the Active Directory. Click OK.
10. Click the Protocols tab. On the Protocols tab, put a checkmark in the Enable L2TP/IPSec check box.
11. Click the User Mapping tab. Put a checkmark in the Enable User Mapping check box. Put a checkmark in the When username does not contain a domain, use this domain check box. Enter msfirewall.org in the Domain Name text box.
12. Click Apply in the VPN Clients Properties dialog box. Click OK in the Microsoft Internet Security and Acceleration Server 2004 dialog box that informs that you must restart the ISA Server firewall before the settings take effect. Click OK. 13. Click Apply to save the changes and update the firewall policy. 14. Click OK in the Apply New Configuration dialog box. 15. Restart the ISA Server 2004 firewall machine.
Create an Access Rule Allowing VPN Clients Access to the Internal Network At this point, VPN clients can connect to the VPN server. However, the VPN clients cannot access any resources on the Internal network. You must first create an Access Rule that allows members of the VPN clients network access to the Internal network. In this example, you will create an Access Rule that allows all traffic to pass from the VPN clients network to the Internal network.
6. Click Next on the Access Rule Sources page. 7. On the Access Rule Destinations page, click Add. On the Add Network Entities dialog box, click the Networks folder and double click on Internal. Click Close. 8. On the User Sets page, accept the default setting, All Users, and click Next. 9. Click Finish on the Completing the New Access Rule Wizard page. 10. Click Apply to save the changes and update the firewall policy. 11. Click OK in the Apply New Configuration dialog box.
Enable Dial-in Access for the Administrator Account In non-native mode Active Directory domains, all user accounts have dial-in access disabled by default. In this circumstance, you must enable dial-in access on a per account basis. In contrast, Active Directory domains in native mode have dial-in access set to be controlled by Remote Access Policy. Windows NT 4.0 dial-in access is always controlled on a per user account basis.
Test the VPN Connection The ISA Server 2004 VPN server is now ready to accept VPN client connections. Perform the following steps to test the VPN Server: 1. On the Windows 2000 external client machine, right click the My Network Places icon on the desktop and click Properties. 2. Double click the Make New Connection icon in the Network and Dial-up Connections window. 3. Click Next on the Welcome to the Network Connection Wizard page. 4.
12. Click Start and the Run command. In the Run dialog box, enter \\EXCHANGE2003BE in the Open text box, and click OK. The shares on the domain controller computer appear. 13. Right click the Connection icon in the system tray and click Disconnect.
Conclusion In this ISA Server 2004 Configuration Guide document, we discussed how to enable the ISA Server 2004 VPN server component and how to configure the VPN server. We tested the VPN server functionality by creating a VPN client connection to the server and accessing resources on the Internal network. In the next chapter in this ISA Server 2004 Configuration Guide series, we will discuss how the firewall is used to publish an array of Exchange Server services.
ISA Server 2004 Configuration Guide: Creating a Site-to-Site VPN with ISA Server 2004 Firewalls Chapter 16 For the latest information, please see http://www.microsoft.
Introduction A site-to-site VPN connection connects two or more networks using a VPN link over the Internet. The VPN site-to-site configuration works just like a LAN router; packets destined for IP addresses at a remote site are routed through the ISA Server 2004 machine. The ISA Server 2004 firewall machine acts as a VPN gateway that joins two networks over the Internet.
Create the Remote Site at the Main Office We will begin by configuring the ISA Server 2004 firewall at the main office. First, create the Remote Site Network in the Microsoft Internet Security and Acceleration Server 2004 management console. Perform the following steps to create the Remote Site Network at the main office ISA Server 2004 firewall machine: 1. Open the Microsoft Internet Security and Acceleration Server 2004 management console and expand the server name.
5. On the Remote Site Gateway page, enter the IP address of the external interface of the remote ISA Server 2004 firewall machine. In this example, the IP address is 192.168.1.71, so we will enter this value into the text box. Click Next. 6. On the Remote Authentication page, put a checkmark in the Local site can initiate connections to remote site using these credentials check box.
7. Read the information on the Local Authentication page, and click Next. 8. On the L2TP/IPSec Authentication page, put a checkmark in the Allow pre-shared key IPSec authentication as a secondary (backup) authentication method check box. Enter a key in the Use pre-shared key for authentication text box. In this example, use the key 123. Click Next.
9. Click Add on the Network Addresses page. In the IP Address Range Properties dialog box, enter 10.0.1.0 in the Starting address text box. Enter 10.0.1.255 in the Ending address text box. Click OK.
10. Click Next on the Network Addresses page. 11. Click Finish on the Completing the New Network Wizard page.
Create the Network Rule at the Main Office The ISA Server 2004 firewall must know what method to use to route packets to the branch office network. There are two options: Route and NAT. A route relationship routes packets to the branch office and preserves the source IP address of the clients who make a connection over the site-to-site link. A NAT relationship replaces the source IP address of the client making the connection.
11. Click Finish on the Completing the New Network Rule Wizard page.
Create the Access Rules at the Main Office In this example, we want the clients on both the main and branch office networks to have full access to all resources on each network. We must create Access Rules to allow traffic from the main office to the branch office and from the branch office to the main office. Perform the following steps to create Access Rules that allow traffic to move between the main and branch offices: 1. Click the Firewall Policy node in the left Pane of the console.
11. On the User Sets page, accept the default entry All Users and click Next. 12. Click Finish on the Completing the New Access Rule Wizard page. The second rule will allow the hosts on the branch office network access to the main office network: 1. Click the Tasks tab in the Task pane. Click Create New Access Rule. 2. On the Welcome to the New Access Rule Wizard page, enter a name for the rule in the Access Rule name text box. In this example, enter Branch to Main. Click Next. 3.
Finally, to enable access for VPN clients: 1. Click on the Virtual Private Network node in the left Pane of the console. 2. Click the VPN Clients tab in the Details Pane. Click the Tasks tab in the Task Pane. Click Enable VPN Client Access. 3. Click OK in the ISA Server 2004 dialog box informing you that the Routing and Remote Access service must be restarted. 4. Click Apply to save the changes and update the firewall policy. 5. Click OK in the Apply New Configuration dialog box.
Create the VPN Gateway Dial-in Account at the Main Office A user account must be created on the main office firewall that the branch office firewall can authenticate when it creates the site-to-site connection. This user account must have the same name as the demand-dial interface on the main office computer. You will later configure the branch office ISA Server 2004 to use this account when it dials the VPN site-to-site link.
Set the Shared Password in the RRAS Console at the Main Office The pre-shared key you entered into the Microsoft Internet Security and Acceleration Server 2004 management console is not automatically copied to the Routing and Remote Access service. You must configure the Routing and Remote Access service to use the preshared key you configured when creating the Remote Site Network. To configure the L2TP/IPSec pre-shared key: 1. Click Start and point to Administrative Tools. Click Routing and Remote Access.
Create the Remote Site at the Branch Office Now that the main office is ready, we can configure the branch office ISA Server 2004 firewall. First, create the Remote Site Network at the branch office: Perform the following steps to create the Remote Site Network at the branch office: 1. Open the Microsoft Internet Security and Acceleration Server 2004 management console and expand the server name. Click on the Virtual Private Networks (VPN) node. 2. Click on the Remote Sites tab in the Details Pane.
ISA Server 2004 Configuration Guide 253
Create the Network Rule at the Branch Office Just as we did at the main office, we must create a routing relationship between the branch office and the main office networks. We will configure a route relationship so that we can get the highest level of protocol support. Perform the following steps to create the Network Rule at the branch office: 1. Expand the Configuration node in the left Pane of the console. Click on the Networks node. 2. Click on the Network Rules tab in the Details Pane.
Create the Access Rules at the Branch Office We need to create two Access Rules, one that allows traffic from the branch office to the main office, and the second to allow traffic from the main office to the branch office. To create Access Rules that allow traffic to move between the branch and main offices: 1. Click the Firewall Policy node in the left Pane of the console. Click the Tasks tab in the Task Pane. Click Create New Access Rule. 2.
The last step we need to take in the Microsoft Internet Security and Acceleration Server 2004 management console is to enable access for VPN clients: 1. Click on the Virtual Private Network node in the left Pane of the console. 2. Click the VPN Clients tab in the Details Pane. Click the Tasks tab in the Task Pane. Click p Enable VPN Client Access p. 3. Click OK in the ISA Server 2004 dialog box informing you that the Routing and Remote Access service must be restarted. 4.
Create the VPN Gateway Dial-in Account at the Main Office We must create a user account that the main office VPN gateway can authenticate when it initiates the VPN site-to-site connection. The user account must have the same name as the demand-dial interface created on the branch office machine. Perform the following steps to create the account the remote ISA Server 2004 firewall will use to connect to the main office VPN gateway: 1. Right click My Computer on the desktop and click Manage. 2.
ISA Server 2004 Configuration Guide 258
Set the Shared Password in the RRAS Console at the Branch Office The pre-shared key configured in the Microsoft Internet Security and Acceleration Server 2004 management console is not automatically copied to the Routing and Remote Access service. You must manually configure the Routing and Remote Access service to use the preshared key configured in the Remote Site Network configuration. Perform the following steps to configure the L2TP/IPSec pre-shared key: 1.
Activate the Site to Site Links Now that both the main and branch office ISA Server 2004 firewalls are configured as VPN routers, you can test the site-to-site connection. Perform the following steps to test the site-to-site link: 1. At the remote client computer behind the remote ISA Server 2004 firewall machine, click Start and the Run command. 2. In the Run dialog box, enter cmd in the Open text box, and click OK. 3. In the command prompt window, enter ping –t 10.0.0.2 and press ENTER 4.
Conclusion In this ISA Server 2004 Configuration Guide document we discussed how to use the ISA Server 2004 firewall as a VPN gateway that enables site-to-site VPN links. We configured two ISA Server 2004 firewalls, one at the main office and a second at the branch office. We tested the VPN site-to-site connectivity by pinging from clients on each side to the opposite site. This is a preliminary document and may be changed substantially prior to final commercial release of the software described herein.