Microsoft Office 365 for Small Businesses Introductory User Guide Microsoft Office 365 for professionals and small businesses | 1
Contents Introduction ..................................................................................................... 3 Why Office 365 is Right for Your Organisation ............................................................. 3 Overview of Services Provided by Office 365................................................................. 4 About My Office 365 ................................................................................................................
Introduction Microsoft Office 365 for small businesses is a set of Web-enabled tools that lets you access your e-mail, important documents, contacts and calendars from virtually anywhere and on almost any device. Designed for organisations with 5 to 50 staff, the service brings together online versions of the best communications and collaboration tools from Microsoft plus Microsoft Office Web Apps at a price that small businesses can afford.
Office 365 Services Overview E-Mail, Calendar and Contacts Office 365 provides you with access to e-mail, calendar and contacts from virtually anywhere at any time on desktops, laptops and mobile devices — while helping to protect against malicious software and spam. Easily manage your e-mail with 25GB mailboxes, and send e-mails up to 25MB in size.
Office Web Apps Office Web Apps are convenient online companions to Word, Excel, PowerPoint and Microsoft OneNote that offer you an easy way to access, view and edit documents directly from your Web browser. Simultaneously edit Excel spreadsheets and OneNote notebooks with others in real time and see exactly who is editing and viewing your documents. Access and view files from your mobile device. View documents in high fidelity.
About My Office 365 Web: www.my-office-365.com Phone: 01342 410223 email: sales@my-office-365.com My Office 365 is brought to you by Microsoft Gold Partner Ballard Chalmers recognised as Microsoft Online Services delivery experts. Our aim is to provide small and medium sized organisations with end-to-end services, to ensure they can capitalise on the revolutionary Microsoft Office 365 'cloud' service, delivered over the Web.
1: Sign Up and Get Started With Your Office 365 Account Sign Up and Access Your Office 365 Account Sign up for an account by accessing the URL that My Office 365 has provided to you. Please note that this URL can only be used to create a single Office 365 for professionals and small businesses account. Note: You will need a separate URL to create an Office 365 for enterprises account should you want to do so.
You will be prompted to enter verification text from a picture depicting numbers and/or letters. Next, decide if you want to receive offers from Microsoft and Microsoft partners and then click on the I accept button at the bottom of the page to create your account. After you successfully sign up, you will receive a welcome e-mail that will tell you how to access your Office 365 account. If you have any problems during the sign-up process, please contact Mike Mitchell (mikem@waggeneredstrom.
2. Using Office Desktop Applications For the best experience with Office 365, a set of required components and updates must be applied to each workstation. To simplify the installation and maintenance of these components and updates, Microsoft provides an installable piece of software — called Office desktop setup — at no charge. These updates are required for all workstations that use rich clients (such as Microsoft Office 2010) and connect to the Microsoft Online Services.
3. Make your selections, and click on OK to access your Inbox. Team site The Office 365 Microsoft SharePoint Online-based team site makes collaboration easier with a password-protected portal to share large files both inside and outside your organization. Please verify that you can access your team site from within the Web browser. Click on Team Site on the Home page. Note: If the Team Site link is dimmed, this feature is still being configured. Check back or reload the page in a few minutes.
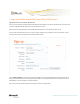
2. Now click on the New button and select User. 3. Next enter the name, display name and user name for the account you're creating.
4. Optionally, you can add any of these Additional properties by clicking on the blue arrow to expand the entry fields list. 5. When you are done, click on Next to review Settings.
6. Leave Assign permissions set to No unless you want to grant this user administrator privileges. At minimum, you need to select a user location here and then click on Next to review Licenses. 7. To provide the new user with access to e-mail, SharePoint and Lync, you must check the box next to Microsoft Office 365 Beta for small businesses to assign license. Optionally, you can also grant access to a purchased license of Microsoft Office Professional Plus. Click on Next to assign a password.
8. Here you can enter up to five e-mail addresses to send the new user's temporary password. By default, your e-mail address is prepopulated so that you will receive a copy to provide to the user. Add any additional e-mail addresses separated by semicolons (up to five recipients), make sure the Send e-mail box is checked, and click on Create. This will open a summary page confirming that the account was created and showing you the temporary password.
2. Click on the user's name to make changes to properties, licenses and other settings. To make the user an administrator, go to the Settings section, click on the Yes radio button under Assign permissions and confirm the email address for service notifications.
3. To add details such as an office phone number, click on Properties.
4. When you're done making changes, click on the Save button at the bottom of the page. 2: E-Mail, Calendar and Contacts Connect Your Office 365 E-Mail to Your Outlook Desktop Application Microsoft designed Office 365 to work with the functionality of your desktop version of Outlook e-mail, calendar and contacts. You can set up your Office 365 e-mail to be accessed through your Microsoft Outlook desktop application or through Microsoft Entourage 2008 for Mac. 1.
3. Enter your e-mail address and password, and click on Next. When the account is done auto-configuring, click on Finish. Set Up and Access E-Mail, Calendar and Contacts on a Mobile Device Office 365 gives you anywhere access to your e-mail, important documents, contacts and calendar on nearly any device — 4 including iPhone, Android, BlackBerry and Windows Mobile phones.
and to find times that your colleagues are available as well. You can choose to share only whether you are available or not, or the details of your calendar appointments. Note: You can only see the availability of your colleagues who are also on your Microsoft Office 365 Beta accounts. You can still send a meeting request to anyone, but you won't see their free/busy information unless they are in the beta and have been added as users for your organization.
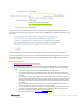
Change the Color and Size of the Text 1. Click on the Edit button or icon on your navigation ribbon to open the Editing Tools. 2. Select the text you want to change and then click on the Font Size selector on the ribbon. 3. To change the color, select your text and click on the Font Color selector. Add an Image to the Page 1. While still in Edit mode, click in the body of the page where you want to add the image. Click on the Insert tab and then on the Picture button.
2. Select the source of the picture you want to add — for example, From Computer — to open a dialog box that lets you browse or paste the address of the image file. Add a Table to Your Page 1. This is similar to adding a picture. While in Edit mode, click in the body of the page where you want to add the table. Click on the Insert tab and then on the Table button. 2. Now select the dimensions you want from the drop-down menu and click to insert it.
When you're done making changes to your team site page, click on the Save icon or go to the Format Text tab and click on Save & Close. If you do NOT want to keep your changes, click on the Check Out button and select Discard Check Out: Upload a Document to Your Team Site A team site gives your organization a single, password-protected location to find the very latest file or document version.
3. Click on Create and then on Add document when your library appears. 4. Add any file from your desktop and then click on OK.
Share Your Team Site outside Your Organization As an administrator, you can grant access to users both inside and outside your organization to view and make changes to documents and data. By default, users within your organization will be granted access to your team site. Use an existing nonOffice 365 e-mail account (e.g., Yahoo, Gmail or Hotmail account) to test sharing your team site with a user outside your organization. 1.
2. Type the nonemployee e-mail address in the group you want to add it to, and click on Share. 3. Verify that the external user can access the team site. Then send them a link to the document you uploaded in the task above and start collaborating. Remove a User From a Team Site 1. Click on Site Actions and then on Site Settings.
2. Click on Site permissions under Users and Permissions. 3. Find the user you want to remove, click on the checkbox next to the name, click on Actions and select Remove Users from Group.
Create a List Then Create a New View of This List You can create a list on your team site to store, share and manage team information. For example, you can create a task list to track work assignments or track team events on a calendar. Try creating a basic task list on your team site. 1. On your Team Site, click on the Site Actions menu and then click on More Options.
2. Click on List in the left navigation, and choose the type of list you want to create and give it a title. 3. Click on Create. 4. You can now add list items, configure different views on this list, set up alerts, subscribe via RSS, and take the content offline with Office.
Create a New Team Site You can create a new team site for a specific team or project. There are several types of site templates to give you a head start on creating a new site. 1. On your Team Site, click on the Site Actions menu and then click on New Site. 2. Choose the Express Site for a basic Team Site, or click on the Browse All tab for a variety of site choices including Document Workspace, Meeting Workspace, Blog and more.
3. Make your choice, enter a title and URL name, and click on Create. View Your Team Sites on Your Mobile Device You can view your SharePoint Online team sites from your mobile device browser. SharePoint Online supports mobile access to SharePoint pages and list data. Users of mobile devices navigate to the same URLs as do users of desktop browsers. The mobile device is automatically redirected to a version of the page that is optimized for mobile devices.
4: Explore Office Web Apps and Using Team Sites with Microsoft Office Edit a Document on Your Team Site Using Office Web Apps With Office 365, you can view and edit Microsoft Word, Excel, PowerPoint and OneNote documents directly from your Web browser using Office Web Apps. Office 365 is the only set of Web-enabled tools designed to be fully compatible with Microsoft Outlook, Word, PowerPoint and Excel.
1. 2. If you haven’t already, add a colleague as an Office 365 user using the steps outlined in Walkthrough 1 above. Add an Excel spreadsheet or a OneNote notebook to your team site then try to edit the file at the same time as your colleague. Note that as you work you can see your colleague’s name within the document and the area the colleague is working on.
2. If SharePoint Workspace 2010 does not open, you may need to run and configure it. Open your Windows Search box and type “SharePoint” to locate it. Once it's set up, try again.
3. Once the site is initially synchronized on your desktop, try adding new documents or list items from within SharePoint Workspace 2010 and note how they automatically synchronize back to the team site.
Microsoft Office 365 for Professionals and Small Businesses | 35
5: Databases Publish a Microsoft Access Desktop File as a SharePoint Online, Web-Based Database (List) Access 2010 is a database application included in Office Professional Plus, which you downloaded in Walkthrough 1. You can use Office 365 to publish Access databases to your SharePoint Online environment, allowing you to securely share your data with others, view and edit your database directly from your Web browser, and create database applications that don't require Access on the desktop to use. 1.
3. Enter the URL path to your team site. Be sure to omit any filenames and unnecessary paths For example, http://cohovineyard.spoppe.com/TeamSite/SitePages/Home.aspx would be shortened to http://cohovineyard.spoppe.com/TeamSite.
4. Click on the Publish to Access Services button. Once complete, the SharePoint Online database becomes the primary source of data and the desktop copy remains in sync but is no longer primary (it’s secondary). Visit your team site, and click on and select View All Site Content.
5. Scroll down to Sites and Workspaces, and click on the name of your database to open it. 6. Click on Options at the top to Share Site and adjust Site Permissions and Settings.
Once granted access, users can view, edit and search the database from anywhere. 6: Public Websites Design a Basic Public Website Using the SharePoint Online Site Designer Tool Microsoft SharePoint Online comes with two types of sites — team sites and public sites. The public site is a lightweight, publicfacing website that provides your customers with your company information, such as your products, services and contact information.
3. Click on the Design tab to begin designing your public website’s home page. 4. Use the ribbon to change the Style and Theme of your website.
5. Click on Text to customize your header. Make other changes/additions to your website.
6. Click on File and Save & Publish to record your changes. 7. View what your site will look like to the public by going to the Home tab and then clicking on View.
Microsoft Office 365 for Professionals and Small Businesses | 44
7: Instant Messaging, Video Chat and Online Meetings Sign In to the Microsoft Lync Client Microsoft Lync Online is a next-generation online communications service that connects people in new ways, anytime from virtually anywhere. Lync Online provides rich and intuitive communications capabilities including presence, instant messaging, audio-video calling, and a rich online meeting experience that supports audio-, video- and webconferencing. 1. Launch Lync 2010, which you downloaded in Walkthrough 1.
3. Click on the default photo to add a custom photo and personalize your contact information.
Locate and Organize Your Contacts You can search for contacts by title, team or other keyword as well as name. You can organize them in handy groups and display them in a variety of ways, including their current status (such as “online” or “away”) or their relationship to you (such as “colleagues” or “friends and family”). 1. Use the Find a contact search box to locate a person in your organization that you’d like to add to your Contact List. 2.
Send an Instant Message to One Contact and Then Add More People to the Conversation Once you’ve located a contact and seen that he or she is available, it’s simple to instant message that person then add additional people to the conversation as needed. 1. Double-click on a contact to start an instant message session. 2. Drag another contact from your company to add to the conversation. Note: You can only communicate one-on-one with Windows Live Messenger contacts.
Schedule an Online Meeting Microsoft Lync Online makes it easy for users to create, moderate and join conferences with internal and external users. A rich user experience and a unified interface make it easy for workers to collaborate frequently and effectively, even when time or distance prevents in-person meetings. With Lync Online, it’s easier to schedule an online meeting and invite additional people once the meeting has started.
2. If you already have an Outlook appointment or meeting request open, you can make it an online meeting by clicking on the Online Meeting button.
Conduct a Meeting As the meeting leader, you can control who enters the meeting and who has permission to share content. The meeting conversation window is designed to help you lead presentations and keep the meeting on course. Note: Meeting participants inside and outside your organization will have access to audio and video during the meeting through their PCs. Dial-in conferencing requires a separate agreement with an audioconferencing provider.