User Guide Nokia Lumia 925 Issue 1 EN
Psst... This guide isn't all there is... Check out the videos at www.youtube.com/NokiaSupportVideos. For info on Nokia Service terms and Privacy policy, go to www.nokia.com/privacy. © 2013 Nokia. All rights reserved.
User Guide Nokia Lumia 925 Contents Safety 5 Mail 55 Get started 6 Camera 61 Keys and parts 6 Camera basics 61 Back, start, and search key 7 Advanced photography 64 Antenna locations 7 Photos and videos 66 Insert the SIM card 7 Maps & navigation 70 Remove the SIM card 9 Switch location services on 70 Charge your phone 9 HERE Maps 70 First start-up 12 HERE Drive+ 75 Lock the keys and screen 15 HERE City Lens 79 Connect the headset 16 Positioning methods 82 Change
Use your work phone 101 Tips for business users 101 Phone management & connectivity 104 Keep your phone up to date 104 Use a high speed connection 105 Wi-Fi 105 NFC 106 Bluetooth 109 Memory and storage 110 Copy content between your phone and computer 111 Security 112 Wallet 113 Access codes 115 Help and support 117 Find your model number and serial number (IMEI) 119 Product and safety information 120 © 2013 Nokia. All rights reserved.
Safety Read these simple guidelines. Not following them may be dangerous or illegal. SWITCH OFF IN RESTRICTED AREAS Switch the device off when mobile phone use is not allowed or when it may cause interference or danger, for example, in aircraft, in hospitals or near medical equipment, fuel, chemicals, or blasting areas. Obey all instructions in restricted areas. ROAD SAFETY COMES FIRST Obey all local laws. Always keep your hands free to operate the vehicle while driving.
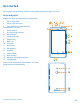
Get started Get to grips with the basics, and have your phone up and running in no time. Keys and parts Explore the keys and parts of your new phone. 1 Micro-SIM holder 2 Micro-USB connector 3 Connector for headphones and loudspeakers (3.
Back, start, and search key The back, start, and search keys help you navigate your phone. • • • • To switch between open apps, press and hold , swipe left or right, and tap the app you want. To go back to the previous screen you were in, press . Your phone remembers all the apps and websites you've visited since the last time your screen was locked. To go to the start screen, press . The app you were in remains open in the background.
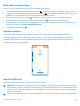
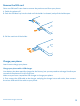
The phone must be switched off before inserting the SIM card. 1. Push the key into the hole until the holder is released, and pull the holder open. 2. Make sure the contact area is facing up, and put the card in the holder. 3. Push the holder back into your phone until it locks into place. © 2013 Nokia. All rights reserved.
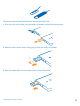
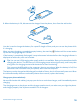
Remove the SIM card Got a new SIM card? Learn how to remove the previous card from your phone. 1. Switch the phone off. 2. Push the SIM door key into the hole until the holder is released, and pull the holder open. 3. Pull the card out of the holder. Charge your phone Learn how to charge your phone. Charge your phone with a USB charger Your battery has been partially charged at the factory, but you may need to recharge it before you can switch the phone on for the first time.
2. When the battery is full, disconnect the charger from the phone, then from the wall outlet. You don't need to charge the battery for a specific length of time, and you can use the phone while it's charging. When you start charging a completely empty battery, the start key up and the charging progress is shown. flashes until the screen wakes If the battery is completely discharged, it may take several minutes before the charging indicator is displayed or before any calls can be made.
You need a Nokia wireless charging cover CC-3065, marked with the Qi logo inside the cover, for wireless charging to work. The cover may be included in the sales box, or it may be sold separately. Only use original Nokia wireless charging covers. Nokia wireless chargers, such as the wireless charging plate DT-900, are sold separately. Use only Qi certified chargers for wireless charging. 1. Make sure the wireless charger is switched on. 2.
Battery Take good care of your battery, it's the life force of your phone. Your phone has an internal, non-removable, rechargeable battery. Use only Nokia approved chargers designated for this phone. You can also use a compatible USB cable to charge your phone (included). Do not attempt to remove the battery from the device. To replace the battery, take the device to your nearest authorised service facility. Authorised retail points may also offer a battery replacement service.
Microsoft account With a Microsoft account, you can access all Microsoft services with a single username and password on your computer or phone. You can also use the same username and password on your Xbox. With your Microsoft account, you can, for example: • • • • • • • • Download content from Store Back up your contacts Upload, store, and share pictures and documents. Back up your phone on SkyDrive.
To create a Microsoft account, you need an internet connection. If you don't have a data plan, the data transmission costs may pile up quickly. For info about possible data costs, contact your network service provider. If you can't connect to the internet, you can create the account later. 1. Switch on your phone with the SIM card in the phone. 2. To set up your phone, follow the instructions shown on the screen. 3. Create your Microsoft account, or sign in with your existing username and password.
Tip: If you have an older Windows Phone device, or have previously backed up your contacts in Windows Live, you can also add your account to your phone, and import the contacts to your phone straight from the service. Your old phone needs to support Bluetooth. The contacts on your old phone need to be stored in the phone memory, not on the SIM. The app does not work with all phone models. 1. On your old phone, switch Bluetooth on. 2.
Unlock the keys and screen Press the power key, and drag the lock screen up. Set the keys and screen to lock automatically On the start screen, swipe left, tap Settings > lock screen > Screen times out after, and select the length of time after which the keys and screen are locked automatically. Connect the headset Enjoy your favourite music, or free your hands for other things when in a call. Connect the headset to your phone. © 2013 Nokia. All rights reserved.
Do not connect products that create an output signal, as this may damage the device. Do not connect any voltage source to the audio connector. If you connect an external device or headset, other than those approved for use with this device, to the audio connector, pay special attention to volume levels. Change the volume Trouble hearing your phone ringing in noisy environments, or calls too loud? You can change the volume to your liking. Use the volume keys.
Battery power level The battery is charging. Battery saver mode is switched on. Your calls are forwarded to another number or your voice mailbox. There is no SIM card in your phone. Your SIM card is locked. A Bluetooth device is connected to your phone. A Wi-Fi connection is available. A Wi-Fi connection is active. An app or service is using your location info. Your phone is roaming and not on your home mobile network. Vibrate mode is switched on. Flight mode is switched on. Silent mode is switched on.
Basics Learn how to get the most out of your new phone. Get to know your phone Your phone has two views, making it easy for you to keep up with what's going on. To switch between the start screen and the apps menu, simply swipe left or right. Start screen: The animated live tiles show your missed calls and received messages, the latest news and weather forecasts, and more. You can rearrange and resize the tiles, and pin contacts, apps, feeds, mailboxes, websites, and other favourites.
Tip: If you've got lots of different things to do, it's easy to switch between the tasks at hand. Press and hold , swipe to the app you want, and tap the app. Some apps may not show up here if they're running in the background. To view them, go to the apps menu, tap Settings, swipe left, and tap background tasks. Use the touch screen Explore your phone with a tap, swipe, or drag. 1. To use your phone, simply tap or tap and hold the touch screen. 2.
Example: To open an app or other item, tap the app or item. To edit or delete a calendar appointment, tap and hold the appointment, and select the appropriate option. Tap and hold to drag an item Place your finger on the item for a second or two, and slide your finger across the screen. Swipe Place your finger on the screen, and slide your finger in the desired direction. © 2013 Nokia. All rights reserved.
Example: Swipe left or right between the start screen and the apps menu, or between different views in the hubs. To quickly scroll through a long list or menu, slide your finger quickly in a flicking motion up or down the screen, and lift your finger. To stop the scrolling, tap the screen. Zoom in or out Place two fingers on an item, such as a map, photo, or web page, and slide your fingers apart or together. © 2013 Nokia. All rights reserved.
Important: Avoid scratching the touch screen. Use your phone with ease Struggling with small text or blurry images? Make the fonts larger and the screen easier to view. You can also use your phone with a teletypewriter (TTY/TDD). 1. On the start screen, swipe left, and tap 2. Tap ease of access. Settings. Change the font size Drag the Text size slider. Switch high contrast on Switch High contrast to On . Magnify the screen Switch Screen magnifier to On , and double-tap the screen with two fingers.
Use your phone with a TTY/TDD Switch TTY/TDD to full. The available TTY/TDD modes may vary depending on your network service provider. Use your phone with a hearing aid . Switch Telecoil to On Use your phone in flight mode In places where you don't want to make or receive calls, you can still access your music, videos, and offline games if you switch flight mode on. Flight mode closes connections to the mobile network and switches your phone's wireless features off.
Personalise your phone Learn how to personalise the start screen, and how to change ringtones. Personalise the start screen Would you like to have only your most-used apps on the start screen? You can pin your favourite apps, websites, and much more to the start screen, and move or resize tiles as you like. 1. To pin an app, swipe left to go to the apps menu. 2. Tap and hold the app, and tap pin to start. Pin a contact Tap People, tap and hold the contact, and tap pin to start.
Resize or unpin a tile To resize, tap and hold the tile, and tap the arrow icon. The tiles can be either small, medium, or wide. The bigger the tile is, the more info it can show. To unpin the tile, tap and hold the tile, and tap . Change the Glance screen settings Always keep your phone at your service. When your phone is on standby, you can easily check the time even when your screen times out. 1. On the start screen, swipe left, tap 2. Switch Glance to Always on.
Switch double-tap on or off On the start screen, swipe left, tap tap to wake up phone check box. Settings > display+touch, and swipe to touch. Tap the Double Create a safe, fun start screen for kids You can let your kids use some apps on your phone without having to worry about them accidentally deleting your work mail, making online purchases, or doing anything else they shouldn't. Put selected apps, games, and other favourites for kids to enjoy in their own start screen. 1.
Change your theme You can change the display colours to match your taste and mood. 1. On the start screen, swipe left, and tap 2. Tap Background or Accent colour. Settings > theme. Change colour profile To adjust the saturation and colour temperature of your screen, tap Lumia colour profile > adjust. Settings > display+touch > Personalise the lock screen Would you like to make your lock screen look more unique? You can, for example, have your own favourite photo in the background.
Add new ringtones from your PC to your phone Connect your phone to your PC with a USB cable, and use the file manager of your PC to move the song you want to the ringtone folder in your phone. To set the song as your ringtone, in the ringtones+sounds view, tap Ringtone, and under Custom, tap the song. You can use a song as your ringtone if it is not protected with digital rights management (DRM), and it’s smaller than 30 MB. Tip: Want to create your own unique ringtone? Tap app.
2. Tap Photos > albums > Screenshots. 3. Tap and hold the screenshot you want to send, and tap share.... Extend battery life Get the most out of your phone while getting the battery life you need. There are steps you can take to save power on your phone. • • • Always charge the battery fully. Mute unnecessary sounds, such as key press sounds. Use wired headphones, rather than the loudspeaker. Tip: You can set your phone to automatically save power when the battery charge level is low.
Lower the screen brightness • Use double-tap to wake up your phone only when needed. On the start screen, swipe left, and tap Settings > display+touch. Swipe to touch, and clear the Double tap to wake up phone check box. • On the start screen, swipe left, and tap Settings > brightness. Make sure that Automatically adjust is . Switch Level to low, and switch switched to Off Automatically adjust to On .
• • Stop your phone connecting to games. On the start screen, swipe left, tap Settings, swipe to applications, tap games, and switch all relevant settings off. If you're listening to music or otherwise using your phone, but don't want to make or receive calls, switch flight mode on. Save on data roaming costs Want to save on your phone bills? You can cut data roaming costs by changing mobile data settings.
1 2 3 4 5 6 7 8 Character keys Shift key Numbers and symbols key Language key Smiley key Space key Enter key Backspace key The keyboard layout can vary in different apps and languages. The language key is only shown when more than one language is selected. The example shows the English keyboard. Switch between upper and lower case characters Tap the shift key. To switch caps lock mode on, double-tap the key. To return to normal mode, tap the shift key again.
Copy or paste text Tap a word, drag the circles before and after the word to highlight the section you want to copy, and tap . To paste the text, tap . Add an accent to a character Tap and hold the character, and tap the accented character. Delete a character Tap the backspace key. Switch between the writing languages Tap and hold the language key, and select the language you want. The language key is only shown when more than one language is selected.
Use keyboard word suggestions Your phone suggests words as you write, to help you write quickly and more accurately. Word suggestions are available in several languages. When you start writing a word, your phone suggests possible words. When the word you want is shown in the suggestion bar, select the word. To see more suggestions, swipe left. Tip: If the suggested word is marked in bold, your phone automatically uses it to replace the word you wrote.
Switch word suggestions off On the start screen, swipe left, and tap clear the Suggest text check box. Settings > keyboard. Tap your language keyboard, and Add writing languages You can add several writing languages to your keyboard and switch between the languages when writing. 1. Tap Settings > keyboard > add keyboards. 2. Select the languages you want to write in. Tip: To remove a pre-installed keyboard, tap and hold the language you don't want to use, and tap remove.
Scan codes or text Use your phone camera to scan things, such as QR codes, barcodes, and book and DVD covers, and get further info on what your phone recognises. Press , and tap . 1. Point the camera at a code. 2. Tap a result for more info. Tip: Keep the camera steady, and make sure what you're scanning is completely visible in the camera viewfinder. Example: Try scanning the following code, and see what happens.
1. On the start screen, swipe left, and tap Alarms. 2. Tap . 3. Fill in the alarm details, set the time, and tap . For the alarm to sound, your phone must be switched on, and the phone volume needs to be loud enough. Tip: You can quickly see the time of the next active alarm if you have pinned the Alarms app to the start screen. The tile size must be at least medium. Switch an alarm off Switch the alarm to Off Delete an alarm Tap the alarm, and tap . .
SkyDrive Store your stuff in the clouds. You don't need to worry about freeing memory for your favourites or new apps. SkyDrive is cloud storage for all your documents and photos, so you can access, share, or restore them if needed. You can also set it to back up your stuff automatically, so when you take a photo or a video, it's copied to your cloud album. With SkyDrive, you can access your photos, documents, and more from your phone, tablet, or computer.
Share your photos and documents between your devices With SkyDrive, you can easily access your photos, documents, and other stuff you have uploaded from any of your devices. To upload your photos, documents, or other stuff saved on your phone, tablet, or computer to SkyDrive, you need to sign in to your Microsoft account. To access the uploaded content on another device, you need to sign in to the same Microsoft account that was used when uploading the content.
You can download: • • • • • Apps Games Music Videos Podcasts You can also: • • Get content that is relevant to your tastes and location Share recommendations with your friends The availability of Store and the selection of items available for download depend on your region. To download from Store, you need to be signed in to your Microsoft account on your phone. When you're signed in, you are offered content compatible with your phone.
View or browse categories Tap a category on the front page, or swipe left or right to see more categories and items. Tap an item to view its details. When you view an item, related items are also shown. Search Store Tap , write your search words, and tap . Tip: Did you find something in Store that you know your friends would be interested in? You > share. can send them a link. If the item is free, tap share.
People & messaging Contact your friends and family, and share files, such as photos, using your phone. Stay tuned with the latest updates to your social networking services even when on the go. Calls Want to make calls on your new phone and talk to your friends? Read on and you'll learn how. Call a contact Calling your friends is quick and easy when you've saved them as contacts in your phone. 1. Tap > . 2. Tap the contact and the number.
To search for a call record, tap > , and type in the contact's name or phone number. Use your voice to make a call You can use your voice to call a contact. 1. Press and hold . 2. Say Call and the contact's name. To cancel, press . Tip: You can also use voice dialling with a Bluetooth headset. This feature may not be available in all languages. Call the last dialled number Still have some words to say to your friends? Call them again.
Have a private conversation with someone Tap and the person's name or phone number. The conference call is put on hold on your phone. The other people continue the conference call. To return to the conference call, tap . Forward calls to another phone Can't always answer the phone, but don't want to miss any incoming calls? You can forward them to another phone number. > settings, or tap Settings > network+, depending on your software version. 1. Tap > . 2. Switch Call forwarding to On 3.
1. On the start screen, tap > . 2. If asked, type in the voicemail password. 3. You can listen or reply to voicemail messages, delete them, or record a greeting message. For the availability of the voice mailbox service, and for info on setting up how long before calls are forwarded, contact your network service provider. Contacts You can save and organise your friends' phone numbers, addresses, and other contact information in the People hub.
Save a number from a received call Have you received a call from a person whose phone number is not yet saved in the People hub? You can easily save the number in a new or existing contact list entry. 1. Tap . 2. In the call history list, tap a phone number and . 3. Tap , edit the phone number and phone number type, and tap 4. Edit other contact details, including the name, and tap . .
Unlink a contact Tap the main contact and , and tap the contact to be unlinked and unlink. Copy contacts from a SIM card If you have contacts stored on your SIM card, you can copy them to your phone. 1. Tap 2. Tap People. > settings > import SIM contacts. Share your plans with your family and friends Want to gather with people, but find it difficult to set a date and time convenient for everybody? You can invite others to chat, and privately share a calendar, photos, or notes.
Share a contact It's easy to share a contact with your friends by using tap+send. Just tap their phones, and you're done. 1. To make sure tap+send is switched on, on the start screen, swipe left, tap Settings > tap+send, . and switch NFC sharing to On 2. On the start screen, tap People, and swipe to all. > share contact > > Tap+Send. 3. Tap a contact and 4. Touch your friend's phone with your phone. The other phone must support NFC. For more info, see the user guide of the other phone.
See your friends' status updates After you set up your social networking services on your phone, you can follow your friends' status updates in the People hub. Tap People, and swipe to what's new. Post your status If you feel like reaching out to your friends, let them know what's on your mind. Post a status update to the social networking services that you use. 1. Tap People, and swipe to all. 2. Tap your own contact card and post an update. 3. Write your message. 4.
Share photos in social networking services After you take a photo, upload it to the web so all your friends can see what you're up to. You can also set up your phone to upload photos automatically to social networking services. 1. Tap Photos. 2. Browse your photo albums for the photo you want to share. 3. Tap and hold the photo, and tap share.... 4. Tap the social networking service where you want to upload the photo. 5. Add a caption if you want, and tap .
You can send text messages that are longer than the character limit for a single message. Longer messages are sent as two or more messages. Your service provider may charge accordingly. Characters with accents, other marks, or some language options, take more space, and limit the number of characters that can be sent in a single message. Using services or downloading content may cause the transfer of large amounts of data, which may result in data costs.
1. Tap Messaging. 2. To read a message, tap a conversation. Save an attachment Tap the attachment, such as a photo, and tap > save to phone. Delete a conversation In threads, tap , the conversation you want to delete, and Delete all messages in your phone > select all, and tap Tap > . . Reply to a message Don't keep your friend waiting – reply to the message straight away. 1. Tap Messaging. 2. In threads, tap the conversation containing the message. 3. Tap the message box, and write your message.
Send location in a message Asked your friends to come and meet you, but they don't know the place? Send them your location on a map. This feature may not be available for all regions. Your phone may ask you about using your location. You need to allow it to use this feature. 1. When writing a text message, tap > my location. Sending a message with an attachment may be more expensive than sending a normal text message. For more info, contact your service provider. 2. Tap .
Chat with your friends Do you like chatting online with your friends? If you are out and about, you can send instant messages from your phone, no matter where you are. You need a Microsoft account to chat. When you connect your Facebook account to your Microsoft account, you can use Facebook chat in Messaging. For more info, see www.windowsphone.com. Before starting to chat, set up a chat service. Tap instructions shown on the phone.
2. Tap an account, and write your username and password. Tip: To add your work mail, contacts, and calendar to your phone, use advanced setup. Write your username and password, tap Exchange ActiveSync, and type in the required details. 3. Tap sign in. Tip: Depending on your mail account, you can also sync other items than just mails to your phone, such as contacts and your calendar. If your phone doesn't find your mail settings, you can use advanced setup.
You can pin several mailboxes to the start screen. For example, dedicate a tile for business mail and another for personal mail. If you link several mailboxes into a unified inbox, you can open mails from all your inboxes in one tile. To read your mail, tap the tile. Send mail Don't let your mails pile up. Use your phone to read and write mails on the go. 1. On the start screen, tap . 2. Tap and an account, if you have linked inboxes. 3.
1. On the start screen, tap . 2. In your mailbox, tap the mail. Unread mail is marked in a different colour. Tip: To zoom in or out, place two fingers on the screen, and slide them together or apart. Tip: If a mail contains a web address, tap it to go to the website. Read mail in a conversation In your mailbox, tap the conversation that includes the mail, and tap the mail. A conversation with unread mail is marked in a different colour.
All the mails you selected are deleted. Depending on your mail account, the mails may be deleted from your mail server, too. Delete one mail Open the mail and tap . View mails separately Mails are grouped by title in conversations. A conversation also includes your replies. If you'd like to view all your mails separately, you can switch the conversations feature off. 1. On the start screen, tap . 2. Tap > settings. 3. Switch Conversations off.
Link several mailboxes as a unified inbox If you have more than one mail account, you can choose which inboxes you want to link together into one inbox. The unified inbox lets you see all your mail at a glance. 1. On the start screen, tap a mailbox. > link inboxes. 2. Tap 3. In the other inboxes list, tap the inboxes you want to link to the first one. 4. Tap rename linked inbox, write a new name for the mailbox and tap . The new unified inbox is pinned to the start screen.
Camera Why carry a separate camera if your phone has all you need for capturing memories? With your phone camera, you can easily take photos or record videos. Camera basics Take a photo Shoot sharp and vibrant photos – capture the best moments in your photo album. 1. To switch the camera on, press the camera key. 2. To zoom in or out, place two fingers on the screen, and slide your fingers together or apart. 3. To focus, press and hold the camera key halfway down.
To view the photo you just took, swipe right. Photos are saved in your Camera Roll in the Photos hub. Take a photo without using the camera key If needed, switch touch capture on in the camera settings. On the start screen, swipe left, and tap Settings. Swipe to applications, and tap photos+camera > Tap screen to take pictures and videos when using the built-in Camera app. To focus on a specific object or area, tap the object or area on the screen.
3. To take the photo, press the camera key. Tip: You can also record videos with the front camera. To switch to video recording, tap start recording, press the camera key. . To Record a video Besides taking photos with your phone, you can also capture your special moments as videos. 1. To switch the camera on, press the camera key. 2. To switch from photo to video mode, tap . 3. To zoom in or out, place two fingers on the screen and slide them together or apart. 4.
• • • • To change camera settings, such as aspect ratio, scene mode, and white balance, tap and photo settings... or video settings..., and tap the setting you want. To quickly switch on the camera when your phone is locked, press and hold the camera key for a couple of seconds. If you don't use the camera for about a minute, it goes to sleep. To wake the camera up, press the power key, and drag the lock screen up. To see the screen at its best, make sure you're not covering the light sensor.
Take an action shot Want to take great photos of moving objects? Use Nokia Smart Camera to convert photos of moving objects into a single dynamic photo. 1. Take a photo using Nokia Smart Camera. 2. Swipe up to the 2nd photo on the list, and tap the photo. 3. To delete moving objects from the photo, tap the white circles at the bottom of the screen. 4. To select which moving object you want to highlight, move the circle at the bottom right corner of the screen.
The camera automatically removes moving objects in the photo. 3. Tap . Tip: To undo the object removal, tap the screen, and tap . . Then tap the screen again, and tap Download Nokia Lenses from Store Would you like to make your camera even better and find new fun ways to take great photos? Download Nokia Lenses apps from Store. 1. To switch the camera on, press the camera key. 2. Tap > find more lenses, and follow the instructions.
To find your photos and videos easily, mark your favourites, or organise them into albums. View photos Relive those important moments – view the photos on your phone. Tap Photos. 1. To view a photo you've taken, tap Camera Roll and the photo. 2. To view the next photo, swipe left. To view the previous photo, swipe right. Zoom in or out Place two fingers on the screen, and slide your fingers together or apart. Tip: To quickly zoom in or zoom back out, tap the photo twice.
Upload photos and videos to the web Want to upload your photos and videos to a social networking service for your friends and family to see? You can do that directly from the Photos hub. 1. Tap Photos, and browse to a photo or video. > share... and the service. 2. Tap 3. Tap or . Tip: To select several photos at once, in the Photos hub, tap the album and and tap . , select the photos, Tip: To access your photos from all your devices, you can set up uploading to SkyDrive.
1. Connect your phone to a compatible computer with a compatible USB cable. 2. On your computer, open a file manager, such as Windows Explorer or Finder, and browse to the folder for photos. 3. Add a new folder, give it a name, and add photos to the folder. The folder appears as an album in the albums view on your phone. Tip: If your computer's operating system is Windows 7 or Windows 8, you can also use the Windows Phone app. With Windows 7, you can download it from www.windowsphone.com.
Maps & navigation Explore what’s out there and how to get there. Switch location services on Find out where you are using Maps, and save your location to the photos you take – let apps use your location info to offer you a wider variety of services. 1. Swipe left, and tap Settings. 2. Tap location, and switch Location services to On . HERE Maps HERE Maps shows you what is nearby, and directs you where you want to go.
Using services or downloading content may cause the transfer of large amounts of data, which may result in data costs. Some content is generated by third parties and not Nokia. The content may be inaccurate and is subject to availability. See where you are on a map If you need to get your bearings, check where you are on a map. You can also explore different cities and countries. 1. On the start screen, swipe left, and tap HERE Maps. shows where you are.
If no search results are found, make sure the spelling of your search words is correct. Discover nearby places Looking for a new restaurant, hotel, or shop? HERE Maps suggests nearby places for you. 1. On the start screen, swipe left, and tap HERE Maps. 2. Tap to find suggested places nearest to you, or browse to a point on the map. 3. Tap . You can see all types of suggested places on the map.
Tip: To pin a category to the start screen, after selecting a category, tap quickly discover new places wherever you are. . This way you can Find your way inside a shopping centre No more zig-zagging in a shopping centre, looking for a particular shop. HERE Maps can guide you through maze-like shopping centres and other vast buildings. On the start screen, swipe left, and tap HERE Maps. To use this feature, indoor map data must be available.
2. Tap > directions. 3. If you don't want the start point to be your current location, tap from, and search for a start point. 4. Tap to, and search for a destination. The route is shown on the map, along with an estimate of how long it takes to get there. To see detailed directions, swipe up from the bottom of the screen. Tip: To get directions to a place, you can also tap the place on the map, or tap and hold a point on the map, and tap the info bubble. Tap directions to here or directions from here.
Sync your saved places Have your favourite places always backed up and at hand – sync your favourites with your Nokia account. On the start screen, swipe left, and tap HERE Maps. You can plan a trip on your computer at here.com, sync the saved places with HERE Maps on your phone, and access the plan on the go. Syncing is also a handy way of transferring your saved places from your previous Nokia phone to your new phone. Sync your old phone with your Nokia account, and then your new phone.
Tap HERE Drive+. You can: • • • • • • Find your way with turn-by-turn directions and voice guidance Track your location, speed, and the distance driven, even if not navigating Avoid ferries and tunnels, or certain types of roads, such as unpaved roads Preload maps before travelling and use HERE Drive+ offline to save data costs Have your favourite places backed up and at hand on all HERE apps and here.
4. To start navigation, tap START. By default, the map rotates to your driving direction. The compass always points north. Tip: If you want to take a look at the remaining route during navigation, you can drag the map with your finger. To return to your current location, tap . 5. To stop the navigation, tap > Stop navigation. See the map in full screen Tap the map.
Get voice guidance Voice guidance, if available for your language, helps you find your way to a destination, leaving you free to enjoy the journey. Tap HERE Drive+. 1. Tap > Settings > Navigation voice. 2. Tap a language. If you don't want to use voice guidance, tap None. Download new navigation voices Tap > Settings > Navigation voice > Download new, and tap a voice.
Change the look of the Drive+ view Are you using HERE Drive+ at night, when it's dark? With day and night modes, you can see the screen clearly at all times. You can also change other settings to suit your needs. Tap HERE Drive+. 1. Tap > Settings. 2. Switch Map colours to Night. To switch night mode on automatically when it's dark, tap Automatic. Switch between 2D and 3D and 2D or 3D.
You can: • • • • • Find places of interest Search for specific places, such as restaurants or shops Get contact info and walking or driving directions to the places that interest you Have your favourite places backed up and at hand on all HERE apps and here.com: save places to your Nokia account Share places with your friends The HERE City Lens service is free of charge. Using services or downloading content may cause the transfer of large amounts of data, which may result in data costs.
The radar in the top right corner helps you quickly see where there are places near you. If there are many places in the same location, to view them, tap . Tip: If you're in a crowded area with hundreds of places just around the corner, you may want to filter your view so that you only see the places that are in your direct line of sight. Tap . This feature may not be available in all areas. View places in a list Hold your phone in portrait mode.
Tip: Like to check out bookstores or sushi restaurants when you're out and about? You can pin your searches to the start screen, so you can find what you're looking for with a single tap. Tap and hold an item on the search history list, and tap pin to start. Get contact info and directions to a place Found a nice restaurant? Get directions to the place, and call them right away to make a reservation. If you're meeting friends, it's easy to send the info to them. 1. Swipe left, and tap HERE City Lens. 2.
A-GPS and other enhancements to GPS and GLONASS may require transferring small amounts of data over the cellular network. If you want to avoid data costs, for example when travelling, you can switch the mobile data connection off in your phone settings. Wi-Fi positioning improves positioning accuracy when satellite signals are not available, especially when you are indoors or between tall buildings. If you're in a place where the use of Wi-Fi is restricted, you can switch Wi-Fi off in your phone settings.
Internet Learn how to create wireless connections and browse the web while keeping your data costs down. Define internet connections Does your network service provider charge you a fixed fee for data transfer or on a pay as you use basis? Change the Wi-Fi and mobile data settings to reduce your data costs while roaming and at home. Important: Use encryption to increase the security of your Wi-Fi connection. Using encryption reduces the risk of others accessing your data.
Connect your computer to the web Want to use the internet on your laptop but don't have access? You can use your phone's mobile data connection with your laptop or other devices. A Wi-Fi connection is then created. 1. On the start screen, swipe left, and tap Settings > internet sharing. 2. Switch Sharing to On. 3. To change the name of your connection, tap setup > Broadcast name, and write a name. Tip: You can also type in a password for the connection. 4. Select the connection on the other device.
Tip: You can also double-tap the screen. Open a new tab When you want to visit several websites at the same time, you can open up to 6 browser tabs and switch between them. Tap Tap Internet Explorer. > tabs > . Switch between tabs Tap > tabs and a tab. Close a tab > tabs > Tap . Add a website to your favourites If you visit the same websites all the time, add them to your favourites, so you can access them quickly. Tap Internet Explorer. 1. Go to a website. > add to favourites. 2.
Share a web page When you've found an interesting web page, you can send it to your friends. If your friends are next to you, just tap their phones. Otherwise, you can send the page in a mail or text message or post it to your social networks. 1. To make sure tap+send is switched on, tap Settings > tap+send, and switch NFC sharing to On . 2. Tap Internet Explorer, and go to a website. 3. Tap > share page > Tap+Send. 4. Touch your friend's phone with your phone. The other phone must support NFC.
Close a mobile data connection On the start screen, swipe left, and tap to off . © 2013 Nokia. All rights reserved.
Entertainment Having a spare moment and in need of entertainment? Learn how to watch videos, listen to your favourite music, and play games. Watch and listen You can use your phone to watch videos and listen to music and podcasts while on the move. Tap Music+Videos. Play music, podcasts, and videos Have your favourite media with you while on the move – watch videos, and listen to music and podcasts wherever you are. 1. Tap Music+Videos. 2. Tap music, videos, or podcasts. 3.
Nokia wireless speakers, such as JBL PowerUp, are sold separately. The availability of accessories varies by region. You need a Nokia wireless charging cover, marked with the Qi logo inside the cover, for wireless charging to work. The cover may be included in the sales box, or it may be sold separately. Only use original Nokia wireless charging covers. 1. Touch the NFC area of the speaker with the NFC area of your phone. The speaker connects to your phone automatically. 2.
To listen to the radio, you need to connect a compatible headset to the device. The headset acts as an antenna. 1. On the start screen, swipe left, and tap 2. Connect a compatible headset. Music+Videos > radio. Go to the next or previous station Swipe left or right. Save a radio station Save your favourite radio stations so you can easily listen to them later. On the start screen, swipe left, and tap Music+Videos. To save the station that you are listening to, tap . View your saved stations list Tap .
If you have any credit, or a Nokia Music Unlimited membership associated with your Nokia account, do not close it. If you do, all these will be lost. Mix Radio The easiest way to check out new artists and songs in different genres is to stream music from Nokia Mix Radio. You can stream hand-picked mixes from different artists and genres and save them on your phone to listen to offline. 1. On the start screen, swipe left, and tap Nokia Music > mix radio. 2. Select what kind of music you want to listen to.
Tip: Where available, use a Wi-Fi connection to stream and download music from Nokia Music. For info on connecting to the internet, see your phone user guide. 1. On the start screen, swipe left, and tap Nokia Music. 2. Browse to the song or album you want to download. 3. Tap the price of the song or album. Some songs can only be downloaded as part of an album. 4. If asked, sign in to your Nokia account. 5. Select a payment method.
Windows Phone app Windows Windows Windows Phone app for Phone app for Explorer desktop Mac Windows 8 x x Windows 8 RT x Windows 7 x x x x Windows Vista/XP Mac x x Games Want to have some fun? Keep yourself entertained by downloading and playing games on your phone. Download games Get new games on your phone on the go from Store. 1. Tap Games. 2. Browse the selection in Store, and tap the game you want. 3. To download a free game, tap install. 4. To try a game for free, tap try. 5.
Play a game Gaming on your phone is a truly social experience. Xbox, Microsoft's gaming service, lets you play games with your friends and use your gamer profile to keep track of game scores and achievements. You can do this online, on your Xbox console, and on your phone in the Games hub. Tap Games. Swipe to collection, and select a game. If it's an Xbox game, sign in to your Xbox account. If you don't yet have an account, you can create one. Xbox is not available in all areas.
Office Keep yourself organised. Learn how to use the calendar and the Microsoft Office apps. Microsoft Office Mobile Microsoft Office Mobile is your office away from the office. Go to the Office hub to create and edit Word documents and Excel workbooks, open and view PowerPoint slide shows, and share documents with SharePoint. You can also save your documents to Windows SkyDrive. SkyDrive is cloud storage that you can use to access your documents from your phone, tablet, computer, or Xbox.
Create a Word document You can create new documents with Microsoft Word Mobile. 1. Tap Office. 2. Swipe to recent. 3. Tap . 4. Tap a blank Word file or a template. 5. Write your text. > save. 6. To save your document, tap Edit a Word document Polish your documents on the road with Microsoft Word Mobile. You can edit the documents and share your work on a SharePoint site. 1. Tap Office, and swipe to places. 2. Tap the location of the file. 3. Tap the Word file you want to edit. 4. To edit the text, tap .
5. To save your workbook, tap > save. Add a comment to a cell > comment. Tap Apply a filter to cells > apply filter. Tap Change the cell and text format Tap > format cell.... Find data from a workbook Tap the Excel file and . Send a workbook in a mail > share.... Tap the Excel file and Delete a document Phone memory filling up? You can delete any Office documents you no longer need. 1. Tap Office, and swipe to places. 2. Tap phone or any other location of the document you want to delete. 3.
Share documents with SharePoint Workspace Mobile Work on shared Microsoft Office documents, and collaborate on projects, schedules, and ideas. With Microsoft SharePoint Workspace Mobile, you can browse, send, edit, and synchronise your documents online. 1. Tap Office, and swipe to places. 2. Tap , write the web address for a SharePoint site, and tap 3. Select a document. . A copy is downloaded to your phone. 4. View or edit the document, and save your changes.
Calendar Learn how to keep your appointments, tasks, and schedules up-to-date. Add a task to your to-do list Do you have important tasks to handle at work, library books to return, or maybe an event you want to attend? You can add tasks (to-dos) to your calendar. If you have a particular deadline, set a reminder. 1. On the start screen, swipe left, and tap Calendar. 2. Swipe to to-do. 3. Tap , and fill in the fields. 4. To add a reminder, switch Reminder to on , and set the reminder date and time. 5. Tap .
1. On the start screen, swipe left, and tap Calendar. > settings, and switch the calendar on or off. 2. To show or hide a calendar, tap Tip: When a calendar is hidden, the calendar events and reminders are not displayed in different calendar views. Change the colour for each calendar > settings, and tap the current colour and the new colour. Tap Make a calculation Need to make a calculation on the go? You can use your phone as a calculator. 1. On the start screen, swipe left, and tap Calculator.
Work with mail and calendar on your phone and PC You can use different mail addresses for business and leisure. You can add several mailboxes to your phone and use the same mail account both on your phone and on your PC, be it Outlook, Office 365, or any other mail account. Your mail and calendar remain in sync, and you can join meetings directly from calendar invitations.
Use Skype to make calls or send messages You can use your phone to make Skype-to-Skype calls or send Skype-to-Skype instant messages. With Skype global rates, you can also call landlines or other mobile phones, and pay as you go with your credit card or get a monthly subscription for the best rates. Download the app to your Nokia Lumia phone. For more info, see the user documentation on the Skype for Windows Phone support site at https:// support.skype.com/en/category/SKYPE_FOR_WINDOWS_PHONE.
Phone management & connectivity Take care of your phone and its contents. Learn how to connect to accessories and networks, transfer files, create backups, lock your phone, and keep the software up to date. Keep your phone up to date Stay in step with the beat – update your phone software and apps to get new and enhanced features for your phone. Updating the software may also improve your phone performance.
Before starting the update, connect a charger or make sure the device battery has enough power. After the update, go to www.nokia.com/support to get your new user guide. Update your phone software No computer needed – update your phone software wirelessly for new features and improved performance. Before starting the update, make sure your phone has enough battery power. Using services or downloading content may cause the transfer of large amounts of data, which may result in data costs.
Wi-Fi connections Your phone periodically checks for and notifies you of available connections. The notification appears briefly at the top of the screen. To manage your Wi-Fi connections, select the notification. On the start screen, swipe left, and tap Settings > WiFi. Wi-Fi positioning improves positioning accuracy when satellite signals are not available, especially when you are indoors or between tall buildings. You can also switch Wi-Fi off in your phone settings.
On the start screen, swipe left, and tap Settings > tap+send.
Disconnect the accessory Tap the NFC area of the accessory again. For more info, see the accessory's user guide. Read NFC tags NFC tags can contain info, such as a web address, a phone number, or a business card. The info you want is just a tap away. Tap a tag with the NFC area of your phone. Pay with your phone Forgot your wallet or purse at home? Not a problem – you can pay with your phone or use it as a ticket, if supported by your network service provider.
1. To activate the service, contact your network service provider. 2. To make a payment, tap the reader with the NFC area of your phone. Your service provider may ask you to confirm the payment. Bluetooth You can connect wirelessly to other compatible devices, such as phones, computers, headsets, and car kits. You can also send your photos to compatible phones or to your computer.
Connect to your friend’s phone via Bluetooth Use Bluetooth to wirelessly connect to your friend's phone, to share photos, music and much more. 1. On the start screen, swipe left, and tap Settings > Bluetooth. 2. Make sure Bluetooth is switched on in both phones. 3. Make sure the phones are visible to other phones. 4. You can see the Bluetooth phones within range. Tap the phone you want to connect to. 5. If the other phone needs a passcode, type in or accept the passcode.
Check and increase available memory on your phone Want to check how much memory you have available? On the start screen, swipe left, and tap Settings > phone storage. To check the details of your phone memory, tap phone.
Windows Phone app Windows Windows Windows Phone app for Phone app for Explorer desktop Mac Windows 8 x x Windows 8 RT x Windows 7 x x x x Windows Vista/XP Mac x x Security Learn how to protect your phone, and to keep your data secure. Set your phone to lock automatically Want to protect your phone against unauthorised use? Define a security code, and set your phone to lock itself automatically when you're not using it. 1. On the start screen, swipe left, and tap Settings > lock screen. 2.
Unlock your phone Press the power key, drag the lock screen up, and type in your security code. Use your phone when it's locked You can use certain features of your phone when it is locked, without having to enter the security code. To wake up your phone, press the power key. Open the camera Press and hold the camera key. Change how incoming calls are notified Press the volume keys, and tap , , or .
Wallet is a virtual wallet on your phone. You can: • • • • • • Store your credit and debit cards on your phone. To add a card to Wallet, you must sign in to your Microsoft account on your phone. If you already have a credit card on your Microsoft account, it is automatically added to Wallet.
1. On the start screen, swipe left, and tap Wallet. 2. To add a credit or debit card, tap > credit or debit, and follow the instructions on the screen. Your phone searches for an app, available from your service provider, that can be linked to your card. Add a membership or loyalty card to Wallet Tap > other. Your phone searches for an app, available from your service provider, that can be linked to your card.
To view your IMEI number, dial *#06#. © 2013 Nokia. All rights reserved.
Help and support When you want to learn more about your phone, or if you're unsure how your phone should work, there are several support channels for you to check. To help you get the most out of your phone, you can explore www.nokia.com/support.
Tip: If you need to identify your phone, to view the unique IMEI number of the phone, dial *#06#. © 2013 Nokia. All rights reserved.
Find your model number and serial number (IMEI) If you need to contact Nokia Care or your service provider, you may need info, such as the model number and the serial number (IMEI). To see the info, tap Settings > about. You can also find the info on your phone label, which is located under the SIM holder. To open the SIM holder, push the SIM door key into the hole until the holder is released, and pull the holder open. © 2013 Nokia. All rights reserved.
Product and safety information Network services and costs You can only use your device on the LTE 700, 850, 1700/2100, 1900; WCDMA 850, 900, 1700/2100, 1900, 2100; and GSM 850, 900, 1800, 1900 MHz networks. Support for LTE networks may have been disabled on your device depending on your country or service provider. You need a subscription with a service provider. Using some features and downloading content require a network connection and may result in data costs.
• To keep your important data safe, store it in at least two separate places, such as your device, memory card, or computer, or write down important info. During extended operation, the device may feel warm. In most cases, this is normal. To avoid getting too warm, the device may automatically slow down, close apps, switch off charging, and if necessary, switch itself off. If the device is not working properly, take it to the nearest authorised service facility.
Additional safety information Small children Your device and its accessories are not toys. They may contain small parts. Keep them out of the reach of small children. Medical devices Operation of radio transmitting equipment, including wireless phones, may interfere with inadequately shielded medical devices' function. Consult a physician or the medical device's manufacturer to determine if it is adequately shielded from external radio energy.
• If you access preinstalled bookmarks and links to third party internet sites, take the appropriate precautions. Nokia does not endorse or assume liability for such sites. Operating environment This device meets radio frequency exposure guidelines in the normal use position at the ear or at least 5/8 inch (1.5 centimetres) away from the body. Any carry case, belt clip, or holder for body-worn operation should not contain metal and should position the device the above-stated distance from your body.
Your mobile device is a radio transmitter and receiver. It is designed not to exceed the limits for exposure to radio waves recommended by international guidelines. These guidelines were developed by the independent scientific organisation ICNIRP and include safety margins designed to assure the protection of all persons, regardless of age and health. The exposure guidelines for mobile devices employ a unit of measurement known as the Specific Absorption Rate or SAR.
received, including interference that may cause undesired operation. Any changes or modifications not expressly approved by Nokia could void the user's authority to operate this equipment. Note: This equipment has been tested and found to comply with the limits for a Class B digital device, pursuant to part 15 of the FCC Rules. These limits are designed to provide reasonable protection against harmful interference in a residential installation.