User's Guide Windows CE 5.0 Version for FUTRO A2xx Series Management by Scout Enterprise Build # 5 August 2007 ©2007 by UniCon Software GmbH. All rights reserved Information in this document is subject to change without notice. No part of this document may be reproduced or transmitted in any form or by any means, electronic or mechanical, for any purpose, without the express consent of UniCon Software GmbH.
Contents 1 About This Guide......................................................................................................................................0 Keyboard Shortcuts ............................................................................................................................0 Hotkeys ...............................................................................................................................................0 First Contact Wizard .............................
Table of Figures Figure 1: Windows Thin Client Setup Wizard – Management and keyboard layout ......................................... 1 Figure 2: Windows Thin Client Setup Wizard – Management address............................................................. 2 Figure 3 Windows Thin Client Setup Wizard – Group from Manager ............................................................... 2 Figure 4 Windows Thin Client Setup Wizard – Completed (managed by Scout Enterprise) ............................
Figure 46:Licenses .......................................................................................................................................... 28 Figure 47:Device Password............................................................................................................................. 29 Figure 48:Security Management .....................................................................................................................
1 About This Guide This documentation presents step-by-step directions to run the Windows CE Thin Client. For your convenience there are a few remarks about handling the dialog boxes: The dialog boxes are equipped with the buttons OK and ☒ in the upper right corner. To apply / save modifications you have to click OK. Alternatively press ENTER which both saves the modifications and closes the dialog at the same time. Click on ☒ only or press ESC to close the dialog without modifications to apply. 1.
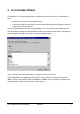
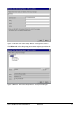
2 First Contact Wizard The Windows Thin Client Setup Wizard is used for the terminal's initial setup. The wizard runs when • the client has never been configured before or • in the General tab the check box "Reset the terminal to factory-default property settings" is activated to restart the terminal. There are eight dialog boxes for the Setup Wizard process. We show the most important ones.
Figure 2: Windows Thin Client Setup Wizard – Management address Click Next and select the group you want to register your client in: Figure 3 Windows Thin Client Setup Wizard – Group from Manager User's Guide for A2xx with WinCe Build # 5 2
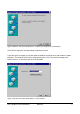
Figure 4 Windows Thin Client Setup Wizard – Completed (managed by Scout Enterprise) Click Finish to apply the specified settings and exit the wizard. If you deny to be managed, you get the option to modify the terminal name and show the network properties. The terminal name can be recognized by your server. The maximum length of the terminal name is 15 characters due to server limitation.
Click Next to show and - if desired - modify the desktop area and refresh frequency. Figure 6: Windows Thin Client Setup Wizard – Desktop Area and Refresh Frequency Click Next to open the control panel (see chapter 4.4 for detailed description).
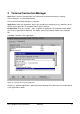
3 Terminal Connection Manager Note: When using the ‘Standard Shell’ you will find the connection manager by selecting Start Programs Connection Manager. The Terminal Connection Manager has two tabs: Application: shows the applications which have already been configured, if any, and offers you to connect to the application, to shutdown or to restart the terminal. Configuration: Here you can add…, edit… or delete an application. The Properties button allows you to set an application for Autostart.
Click Edit… to modify an existing application. It depends on the application which tabs are available and which settings can be modified. Editing an RDP application is described in chapter 5.4.1 Edit an RDP Application, Click the button Delete to delete the selected application. You are asked for confirmation: yes or no. Click Properties… to define the application properties. Figure 9: Configure tab, Define application properties Startup Options: Here you can set an application for Autostart.
4 Terminal Properties 4.1 General Starting from the Terminal Connection Manager press to open the Terminal Properties Window with the tabs • General • Display • Diagnosis • Control Panel Note: When using the ‘Standard Shell’ you will find the Terminal Properties Dialog (with tabs General, Display and Diagnosis) under Start Settings Setup Device and the Control Panel by selecting Start Settings Control Panel.
• Remote Desktop Protocol Version • Citrix ICA Client Version • Ericom PowerTerm Version Terminal Name: Enter the terminal name which can be recognized by your server. The maximum length of the terminal name is 15 characters due to server limitation. Option: Reset the terminal to factory default property settings. Click on the check box to reset the terminal to its factory default settings.
4.3 Diagnosis Shows IP address and other parameters, sets the debug level, shows and transfers system and log files and leads to Console and Ping Figure 12: Terminal Properties– Diagnosis tab with Ping window Console: offers the command prompt; User's Guide for A2xx with WinCe Ping: allows you to check for the connection.
4.4 Control Panel This is the tab to define the terminal settings. Figure 13: Terminal Properties– Control Panel 4.4.
Connection: Enter Proxy server address if required Figure 15: Internet Options – Connection Security: Settings for the different zones Figure 16: Internet Options – Security Privacy: Allow session cookies or not Figure 17: Internet Options – Privacy User's Guide for A2xx with WinCe Build # 5 11
Advanced: Customize the options for accessibility and browsing Figure 18: Internet Options – Advanced Popups: Customize the behavior of popup windows Figure 19: Internet Options – Popups User's Guide for A2xx with WinCe Build # 5 12
4.4.2 Printers In the Control Panel double-click the Printers icon to open the "Add printer" dialog box. Double click on the "Add Printer" icon to open the Printer Wizard. This wizard provides four major steps to setup the printer. Step 1: Select the Printer Port By default there are 3 different printer ports: COM1, LPT1, Network, for your selection. Whenever you add another printer, LPT2 will show in the port list, even if connected via USB.
Step 3: Name your Printer Figure 22:Control Panel – Printer Name 1. Your printer is on the list. The printer you select will display in the "Printer name" field. 2. Your printer is not on the list. If the printer is not in the list, please type the printer name which is identical with the printer name on the server. 3. You select a network printer If you select a network printer, please enter precisely the printer name and network path.
4.4.3 ThinPrint Settings ThinPrint .print Client CE allows you to print directly from the terminal to network printers. Together with the Citrix MetaFrame application server software, this feature provides a powerful solution for remote offices and wireless LAN hotspots. With this ThinPrint Client a print job can be delivered over the Citrix ICA protocol & Microsoft RDP protocol to the device and from there directly to the network printer through TCP/IP protocol.
Add local port… “Add local port…" to enter the printer name and printer port in the dialog box. Add network printer…: Click (shared) printers and double-click one of the listed printers. Enter the printer name and the printer's network path. A new network printer is installed by double clicking the NET0 printer icon. Advanced settings contain Bandwidth, Port number and Device Write Timeout in sec.
4.4.4 Keyboard The Repeat settings for the characters can be modified. Figure 26:Control panel – Keyboard Properties 4.4.5 System The system properties window is divided into five tabs: • General • Memory • Device Name • Firmware • Copyrights Most of them are self-explanatory, so this manual will not go into details except for the FIRMWARE tab. 4.4.5.1 Firmware Update To update the terminal over the network, download an available image from the website www.myelux.
Password: If you selected the FTP protocol it is mandatory to enter the password. Image: Enter the name of the new image file in the Image field. Proxy: (optional) Enter proxy name or IP address if you selected HTTP Server. This field is disabled if you chose FTP. Proxy-Port:(optional) Enter proxy port number, if used and if you selected HTTP Server. This field is disabled if you chose FTP. You have the option to enable the check boxes "Check update on start" and "Ask user before update".
4.4.6 Display The Display Properties dialog allows to modify the appearance, i.e. the color scheme of the applications windows. Figure 29: Display Properties 4.4.7 Mouse Set the double-click sensitivity for both speed and physical distance between clicks. Set the mouse acceleration and swap mouse buttons. Swapping mouse buttons requires a device restart to take effect.
4.4.8 Volume and Sounds Move the slide from Soft to Loud to modify the volume. 4.4.9 Date/Time This dialog allows to set the current time and the time zone as well as the option to automatically adjust the clock for daylight saving time. Further, an SNTP Time Server may be selected or added by entering IP name or address. Figure 30: Date/Time Properties 4.4.
4.4.11 VNC Settings Set password requested for mirroring the terminal. Enable the check boxes • Launch on startup: • Enable remote input: to allow input from remote • Query on connection: Request to Thin Client user if you wish to allow mirroring from the very start of the terminal. Figure 32: VNC Settings Figure 33: VNC Settings – Query on connection 4.4.12 Auto Shutdown The terminal provides automatic shutdown when all connections have been closed. It is convenient for some special applications.
4.4.15 Network Files Network files can be mapped, if required, to save files from the local Internet Explorer. Figure 34: Network File Mapping 4.4.16 Global ICA Client Settings The four tabs to define the global ICA Client settings are desribed in short, for detailed information please consult the ICA WinCE Guide on http://support.citrix.com in the download area.
Preferences: Enter the serial number and define your default window colors. PNAgent: Option: Enable and specify server Option: Force PNAgent on Reboot Select from drop-down list when to apply Windows key combinations. Figure 36: Global ICA Client Settings – Preferences Server Location: Either select a server group from the drop-down list or add a new server address or rename server location group.
Firewall Settings: Enter proxy address if required to assure a secure connection. Figure 38: Global ICA Client Settings – Firewall Settings 4.4.17 ICA Options This allows to map local disk drives and modify the mouse timer settings as well as the scroll speed for ICA sessions.
4.4.18 Network and Dial-Up Connections Shows the parameters of the network card or defines a new network connection. 4.4.18.1 PCI-RTCENIC1 IP Address: This is to enter an IP address or to obtain an IP address from the DHCP server. Figure 40:Network Connection - IP Address Name Servers: This is to enter addresses from name servers.
Link speed: The link speed can be set here. Modifications take effect after the next restart. If the speed has been 1Gbit/s before modification (setting: 1Gbit/s or Auto) and is to be reduced, then the device must be shut down and restarted. In case a required speed should not be available, the next lower speed is chosen. Figure 42:Network Connection – Link speed 4.4.18.2 Make New Connection A new VPN connection can be created here.
4.4.19 LPD Settings Figure 44:LPD Server Settings Click Start or Stop to start or stop the LPD Server. If Launch on startup is enabled the LPD Server will always be started during the start of the device. The names of the printer queues correspond to the names of the printers. 4.4.20 Shell Settings Figure 45:Shell Settings Here you define, whether to work with the Thin Client Shell or the Standard Shell. Restart the device for modifications to take effect.
4.4.21 Licenses The window contains a list of the licensed products and the state of the licenses (Gained / Not gained). Figure 46:Licenses Request license from server: The Scout server gets a request for a license. Clicking the button 'Release License' returns the license to the Scout server. If you do not use Scout, i.e. no license is available on the Scout server, switch to Input local license key, in order to enter a local license key.
4.4.22 Security Management Figure 47:Device Password To modify security settings a device password is required. Having entered this password the security dialog opens. This is to enable or disable the right of access to the Setup dialog and the tabs ‚Configuration’ of the Connection Managers. Further, the device password can be modified here. The modifications take effect immediately.
5 Configuration of Applications 5.1 Add New Application – Microsoft Remote Desktop Client From the Terminal Properties window click OK to switch to the Terminal Connection Manager and open the tab Configuration. Click Add… to open the dialog New Application.
5.1.1 WTS Connection Wizard This chapter describes the configuration of a new application of the type RDP. Step 1: Enter name for the new connection and the server you want to connect to. Figure 50 WTS Connection Wizard – Step 1 Step 2: For automatic logon you have to enter your user name, password and domain.
Step 3: On connection the default display is the Desktop, enter an application file name, if you want to start an application on connection. Figure 52 WTS Connection Wizard – Step 3 Step 4: Click Finish to save your new connection.
5.2 Add New Application - Media Player From the Terminal Properties window click OK to switch to the Terminal Connection Manager and open the tab Configuration Click Add… to open the dialog New Application, and choose Media Player from the drop-down list. Figure 54 Configuration – Add New Application – Media Player 5.3 Add New Application - Internet Explorer Click Add… to open the dialog New Application, and choose Microsoft Internet Explorer from the drop-down list.
5.4 Edit Connections 5.4.1 Edit an RDP Application Once the application has been added, it can be edited any time. As an example, this chapter describes the edit procedure of an RDP Application.
Figure 57 Edit Connection – Local Resources tab Using the RDP Programs tab, you can enter a file name for the application to run on connection.
Using the RDP Experience tab, you can choose your connection speed to optimize performance. Figure 59 Edit Connection – Experience tab 6 Standard Shell The dialogs described above may also be opened from a Standard Shell. The Standard Shell is activated in the Control Panel ‚Shell Settings’. Starting Programs from the Windows menu offers to start the defined connections, the Connection Manager as well as service programs.
Selecting Settings from the Windows menu the 'Setup Device' dialog and the 'Control Panel' can be opened. Figure 61 Settings The menu option Run enables to start executable files. The button ‚Browse’ opens the File Explorer.
7 Index accessibility.........................................................13 Add printer ..........................................................14 Application ............................................................6 automatic logon ..................................................32 Bandwidth ...........................................................17 browsing .............................................................13 Configuration add .................................... 6 delete ....