DS5 User Guide Table of Contents CHAPTER 1 - INTRODUCTION ---------------------- 1 SYSTEM REQUIREMENTS .............................. 2 PC Requirements .................................. 2 Display Panel Requirements ................. 2 Other equipment .................................... 2 OPTIONAL ACCESSORIES .............................. 2 PACKAGE CONTENTS.................................... 2 DETAILED VIEW - DS5 .................................. 3 Front View...........................................
DS5 User Guide System Requirements PC Requirements x Minimum Intel Processor III 500MHz, 128MB RAM. The faster the processor the better, as more devices can be connected and you will experience better playback. x Operating System; WinXP Home, WinXP Professional or Windows Vista. x 10Mbps, 100Mbps or 10/100Mbps Fast Ethernet card, or a USB-to-Ethernet converter equipped PC. Display Panel Requirements x Video/Audio input, standard Composite RCA input.
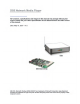
DS5 User Guide Detailed View - DS5 The images below depict the standard DS5 enclosure showing the front view with its LED lights and the rear view with the interface and connections. Front View 1. 802.11b/g Antenna 2. LAN Access LED 3. Infrared Receiver 4. Power LED X YZ [ Rear View 1. ON/OFF Switch 2. Power Receptacle 3. A/V multi connector 4. SPDIF audio connector 5. USB 2.0 upstream ports 6. Ethernet RJ-45 port 7. Micro security slot X Y Z [ \ ] ^ Note: These images are for reference only.
DS5 User Guide Detailed View - DS5M The images below depict the standard DS5M enclosure showing the front view with its LED lights and the rear view with the interface and connections. Front View 1. 802.11b/g Antenna 2. Infrared Receiver 3. LAN Access LED 4. USB LED 5. Power LED X Y Z [ \ Rear View 1. ON/OFF Switch 2. Power Receptacle 3. USB 2.0 downstream port 4. A/V multi connector 5. SPDIF audio connector 6. USB 2.0 upstream ports 7. Ethernet RJ-45 port 8.
DS5 User Guide Remote Control Power ON/OFF No Function Input for time, search, login, URL and other text. Copy Clear (Delete or Backspace) [COPY] Copy the selected file from an external storage media to the local drive. [CLEAR] Delete a letter/number when entering text or delete the selected file. No Function TV Mode Setup Volume Adjustment Mute Sound Navigation Keys No Function Return [TV MODE] Each time this button is pressed, the video output will change - use this when you only see a blank screen.
DS5 User Guide A: N/A B: N/A Playback Functions A: N/A B: Repeat A: N/A B: File Info A: N/A B: N/A No Function No Function A: N/A B: Shuffle No Function Fast forward by time No function No Function [REPEAT] Press this button to toggle through the different repeat functions. [INFO] Press this button to show the file info during playback. [SHUFFLE] Press this button to turn the shuffle mode ON or OFF. Note: See Appendix for detailed functions of each key.
DS5 User Guide Chapter 2 - Hardware Installation For the download function to work, an internal drive has to be installed. Depending on the model, this can be following: DS5-OE x 3.5” IDE drive up to 750GB x 2.5” IDE drive (requires HDD module) x CF card (requires CF module) DS5 x 2.5” IDE drive (requires HDD module) x CF card (requires CF module) DS5M x 3.5” SATA drive up to 750GB x 2.5” SATA drive Note: The DS5 only supports the FAT32 file system or for CF cards also FAT16.
DS5 User Guide 3.5” HDD Modification - DS5-OE For the DS5 to recognise the internal drive, the HDD has to spin up and be ready before the system boots. For some hard drives, the spin up time can be quite long and some drives may not be recognised at all. If this is the case with your drive, adjust the jumper on the DS5-OE bridge board to delay the boot time and leave more time for the drive to spin up. Refer to the following image for the modified jumper setting.
DS5 User Guide Drive Assembly - DS5 If your setup requires an internal drive, open the case and install a hard drive before turning the unit on. Note: Format the drive using FAT32 before installing it. 2.5” HDD or CF card 1. Lift the top cover off the body. 2. Take the drive module and insert your CF card or the 2.5” HDD. Note: The DS5 can not work with a CF card AND hard drive installed together! 3. If your are installing the 2.5” HDD, mount it with two screws from beneath. 4.
DS5 User Guide Drive Assembly - DS5M If your setup requires an internal drive, open the case and install a hard drive before turning the unit on. 2.5” HDD 1. Lift the top cover off the body. If it’s already locked in place, push it upwards with a thin and small item through the opening at the bottom. 3. Lift the frame out of the plastic casing. 4. Align the screw threads of the hard drive with the holes in the framing and place it in the frame. 2.
DS5 User Guide 5. Fasten the screws from the bottom to mount the drive to the framing. 7. Mount it on the heat sink by fastening the screws. 8. Align the top cover with the body and push lightly into place. 6. Place the assembled drive back in the plastic framing and connect the cables. Note: Be careful not to damage any cables or components during the installation! The additional metal sheet is not required for the 2.5” HDD. Store it in a dry place until you install a 3.5” HDD.
DS5 User Guide 3.5” HDD 1. Lift the top cover off the body. If it’s already locked in place, push it upwards with a thin and small item through the opening at the bottom. 3. Lift the frame out of the plastic casing. 4. Align the screw threads of the hard drive with the holes in the framing and place it upside down in the frame. 2. Remove the screws which are holding the aluminium frame in place.
DS5 User Guide 5. Place the metal sheet cover over the drive and align it with the holes of the framing. 7. Place the assembled drive back in the plastic framing, connect the cables and mount it on the heat sink by fastening the screws. 6. Fasten the screws from the side. 8. Align the top cover with the body and push lightly into place.
DS5 User Guide Wireless Kit Assembly - DS5 If your DS5 did not come with the wireless kit and you would like to install this module yourself, simply follow these instructions: 1. Insert the antenna into the slot opening ensuring it is pointing upright. 2. Place the lock on the internal end of the antenna to secure it to the unit. 3. Fasten the antenna cable to the “MAIN” connector on the PCI module. 4. Insert the PCI module in the PCI slot at a slight angle. 5.
DS5 User Guide Wireless Kit Assembly - DS5M If your DS5M did not come with the wireless kit and you would like to install this module yourself, simply follow these instructions: 1. Lift the top cover off the body. Push it upwards with a thin and small item through the opening at the bottom. 2. Remove the screws which are holding the aluminium frame in place. 3. Disconnect the cables, then lift the frame and the hard drive out of the plastic casing. 4.
DS5 User Guide 5. Turn around the bridge board, insert the PCI module in the PCI slot on a slight angle and gently press down on the PCI module till the side clasps lock it into place. 6. Remove the plastic cap for the antenna opening. 7. Insert the antenna into the slot opening ensuring it is pointing upright and then place the lock on the internal end of the antenna to secure it to the unit. 8.
DS5 User Guide 9. Fasten the screws to mount the bridge board to the heat sink. 11. Fasten the screws. 10. Place the assembled drive back in the plastic framing and connect the cables. 12. Align the top cover with the body and push lightly into place. Note: Be careful not to damage any cables or components during the installation! Remark: Only use the wireless kit designed for the DS5. We do not support 3rd party PCI cards and installation of any other components will void the warranty.
DS5 User Guide Chapter 3 - Software Configuration In following chapters, by DS5 we are referring to all of the models, as the software is identical. To configure your DS5, connect it to your TV or any other display. Turn on the device and wait for it to boot. Depending on the drive installed and the network, this could take between 10 and 30 seconds. Note: The DS5 will only look for new network devices during boot up.
DS5 User Guide Network Category In this category, you can configure how the DS5 is connected to the local network and set up the links to a local computer or network disk for PC1/2. Use the arrow keys on your remote control for navigation and the ENTER button to configure the settings. [Network Type] Select between Wired and Wireless network connection. For the wireless function, you will need to have the optional 802.11b/g wireless kit installed.
DS5 User Guide Misc1 Category In this category, you can set the time using an NTP server via the internet. Once the time is set, you can configure the playlist, download function and schedule for these functions. Use the arrow keys on your remote control for navigation and the ENTER button to configure the settings. [Date Time] Displays current date and time.
DS5 User Guide Misc2 Category In this category, you can manage your files using the copy and erase functions and set the playback mode for automated playback. Use the arrow keys on your remote control for navigation and press the ENTER button to configure the settings. [File Copy] Use this to easily and quickly copy new files to or from your local drive. This will copy all files found in the root directory of either your local drive or the remote location but does not include any sub-folders.
DS5 User Guide Misc3 Category In this category, you can disable the onscreen messages (OSD) and configure the options for the scrolling text message. Use the arrow keys on your remote control for navigation and the ENTER button to configure the settings. [OSD] Option to enable or disable the on-screen messages (OSD). By default, this is enabled but if you prefer not seeing the OSD messages during playback, turn it OFF here. [Scrolling Text] Turn the scrolling text message ON or OFF.
DS5 User Guide Audio & Video Category In this category, you can configure the audio and video output of your DS5. Use the arrow keys on your remote control for navigation and the ENTER button to configure the settings. [SPDIF] Depending on the audio cable you are using, set this to Analog if you are using the simple RCA left/right audio cables or to Digital if you are using the optical SPDIF cable.
DS5 User Guide Configuration File Instead of entering all the settings manually via remote control, you can load the configurations from a text file. To create it, either do so manually, using the Configuration Tool on the PC or save the current settings and then modify the text file. To save the current settings, do following: 1. 2. 3. 4. Turn on your DS5 and wait for it to boot. Turn it off using the power button on the remote control.
DS5 User Guide Configuration Structure The config.conf file can also be edited manually with a text editor. Leave the settings empty if you do not want to set it. For the structure, please refer to following example: [NETWORK SETTING] [NetWork Type]=Wired [Automatic IP]=Off [IP Address]=11.128.229.257 [IP Mask]=255.255.255.0 [IP Gateway]=11.128.229.240 [IP Primary DNS]=11.128.229.1 [IP Secondary DNS]= [Wireless SSID]= [Wireless KEY]= [PC1 Address]=11.128.229.
DS5 User Guide Configuration Values Following are the available settings for the config.conf file: Setup Menu config.conf Value Network Type: [NetWork Type] Wired Wireless Automatic IP Address: [Automatic IP] On Off IP Address: [IP Address] e.g. 11.128.229.257 Mask: [IP Mask] e.g. 255.255.255.0 Gateway: [IP Gateway] e.g. 11.128.229.240 Primary DNS : [IP Primary DNS] e.g. 11.128.229.1 Secondary DNS: [IP Secondary DNS] e.g. 11.128.229.1 SSID: [Wireless SSID] e.g.
DS5 User Guide Play Mode: [Play Mode] Standard Repeat Manual Remote Command Path: [Remote Command Path] HDD PC2 Auto On/Off: [Auto On/Off] On Power Off Time: [Power Off Time] e.g. 18:20 Power On Time: [Power On Time] e.g. 09:00 OSD: [OSD] On Off Scrolling Text: [Scrolling Text] On Off Scrolling Text Speed: [Scrolling Text Speed] e.g.
DS5 User Guide Firmware Update Your current firmware date can be seen once you enter the setup menu. The date will be displayed in the top left corner. Periodically, the DS5 firmware will be upgraded to offer new functions and improvements. You will find it on your vendor’s website. Download the latest version, store it on a USB drive and start the upgrade procedure as follows. 1. 2. 3. 4. 5. 6. 7. 8. Download the latest firmware, save it on your local disk and unzip it.
DS5 User Guide Shared Folder on WinXP To access a shared folder on a local PC, you will need a computer which is connected to the same local network as your DS5. The guest account has to be enabled for the DS5 to access the computer. 1. Set up a shared folder on your PC. To do so, right click on a folder, go to Properties and select the Sharing tab. Enable sharing for this folder and apply the settings. 2. Your folder should now have a new icon with a picture resembling a hand. 3.
DS5 User Guide Shared Folder on Windows Vista To access a shared folder on a local PC, you will need a computer which is connected to the same local network as your DS5. To use this function on Windows Vista, file sharing has to be turned on, password protected sharing turned off and a guest account with at least contributor level has to be added. 1. Go to the Control Panel, then to the Network and Sharing Center. Make sure file sharing is turned on and password protected sharing is turned off. 2.
DS5 User Guide 3. Select the guest account from the drop down list and add it. Change the permission level to Contributor or Co-owner and then click on Share. 4. Your folder is now shared. Write down the share name and then click on Done to close the dialog. 5. Make sure your Firewall is set up to allow access to the shared folder. 6. On DS5, press SETUP on your remote control to enter DS5’s setup menu.
DS5 User Guide Disk Management To manage the data on the local hard drive and to update the files with new content, access the file copy and erase command in the MISC2 category. File Copy 1. Press the SETUP button and go to File Copy in the MISC2 category. 2. Choose one of the functions and press ENTER to start the copy process. 3. The copy status will be displayed on screen and once finished, it will return to the main screen. Note: Only files in the root directory will be copied.
DS5 User Guide FTP Server For demonstrations and a convenient way to update the content, following is an example of how to set up the Cerberus FTP server on a PC. You can of course also use a different application or a device like the LAN disk. 1. Install the Cerberus FTP server on your computer. 2. Follow the setup wizard and set up an anonymous user. In this example, the files for the download are stored in the ftp directory on the F: drive.
DS5 User Guide 7. Store the files you like to download in the root folder or in a sub-folder in the same directory you set up in step 2. In this example, it’s a WMV video. 8. On the DS5, go to the Misc1 category in the setup menu and enter the path to your FTP server. In this example, both DS5 and computer are on the same local network. The path is ftp://, followed by the IP address of the computer and the location of the root folder /ftp. 9.
DS5 User Guide Mode 3 There is no network connection or local drive whatsoever. The data is accessed from a USB drive via one of the DS5’s USB ports. Advantage: No network connection or local hard drive is required. Set up is simple and quick. Data can easily be exchanged by unplugging the USB drive and using a computer to change the files. Disadvantage: No remote update possible, and the USB drive has to be physically removed if content needs to be updated.
DS5 User Guide Automated Play Modes [Standard] Default setting for the standard media player with user input via remote control. The DS5 will show the main page after boot up and present the user a choice to access the files using the file library. [Repeat] In this mode, the playlist function will be turned OFF, the DS5 automatically plays all files stored in the root directory as soon as the unit is turned on and play them continuously.
DS5 User Guide [Manual & Standby] Playback mode with quick access to certain files via numeric buttons on the remote control from 000-999. This mode can be used for kiosks and other digital signage applications, where users may request certain information with the push of a button. Reboot the device after you have enabled this function. When this mode is used, the player will require a title file (000.avi or 000.jpg & 000.mp3) and up to 999 AVI files, which are played when the numeric buttons are pressed.
DS5 User Guide Daily Playlist In order to have different playlists throughout the week without having to manually update them every day, you can create daily playlists based on the date. 1. Create a playlist as seen in the previous steps. 2. Rename the file from play.lst to the date when that list should be used. As an example: 20070408.lst 3. Create as many lists as you like and store them on the local drive or the remote folder in the root directory. 4.
User Guide DS5 Remote Commands To remotely control the DS5, certain basic commands are available. As an example, they can be used to restart the unit, change the scrolling text or get the HDD content. Additionally, for maintenance, setup and immediate updates, the following commands are available: [reboot] This command will reboot the device. [downnow] This command will initialise the download function if a path has been set.
DS5 User Guide Creating a Command file 1. Create a new text file. 2. Rename it and call it reboot as an example or any other command seen above. This file can have the .txt extension but can also be saved with no extension at all. 3. Place the command file in the root directory of your remote folder at PC1 or PC2. 4. The DS5 will check the remote folder every 5 seconds for the any new commands. 5. If a new command file is found, it will delete it, show an onscreen message and initialise the command.
DS5 User Guide Chapter 5 - Appendix FAQ Q: I’ve modified some of the settings but there seems to be no change! A: Make sure you have saved the new settings, then exit the Setup menu and restart the unit by turning off the power switch, then turning it back on a few seconds later. Q: I’ve set up the scheduled download but the files are nowhere to be found! A: The download function only works with an internal drive.
DS5 User Guide Remote Control Key Functions Item Button 1 Power 2 1 3 2 4 3 5 4 6 5 7 6 8 7 9 8 10 9 11 0 12 CLEAR 13 SELECT 14 TV MODE 15 SETUP 16 MUTE 17 VOLUME 18 UP 19 DOWN 20 LEFT 21 RIGHT 22 ENTER 23 RETURN 24 MENU 25 A-B 26 PREV 27 PLAY 28 NEXT 29 REPEAT 30 REV 31 STOP 32 FWD 33 INFO 34 SLOW REV 35 PAUSE/STEP 36 SLOW FWD 37 EDIT/PROGRAM 38 TITLE 39 SUBTITLE 40 AUDIO 41 SHUFFLE 42 ANGLE/ROTATE 43 SEARCH 44 ZOOM Browser Mode Power OFF 1 - .
DS5 User Guide Download Command [Put Down.lst] Prompts for and uploads the download list. [Put Play.lst] Prompts for and uploads the play list. [Download Now] If the path has previously been set, this initialises the download function. [Refresh Content] Refreshes and updates current playlist and repeat list if new files exist. File List Command [Get HDD List] Creates file index of the current media files on the DS5 and downloads the list to your computer.
DS5 User Guide About this Manual This manual covers all versions for the DS5 and some of its optional accessories. Firmware, images and descriptions may therefore slightly vary between this manual and the actual product you have. Throughout this manual, the products are referred to as DS5, unless a certain function or feature is specific to one particular model only, in which case DS5M or DS5-OE will be used.