09 Feb 2004 USER GUIDE Following is a preliminary draft copy of the US English User Guide for FCC ID: QURNHL-12, IC: 661AC-NHL12 Exhibit 08: User Guide Applicant: Nokia Corporation FCC ID: QURNHL-12 IC: 661AC-NHL12 Copyright © 2004 Nokia. All rights reserved.
Nokia 6620 User Guide Phone information Numbers Where is the number? My number Wireless service provider Voice mail number Wireless service provider Wireless provider’s number Wireless service provider Provider’s customer care Wireless service provider Model number Label on back of phone (under battery). Type number Label on back of phone (under battery). IMEI number Label on back of phone (under battery).
ii Copyright © 2004 Nokia
LEGAL INFORMATION 168 PART NO. 9310640, ISSUE NO. 1 Copyright © 2004 Nokia. All rights reserved. Nokia, Nokia 6620, Nokia Connecting People, and the Nokia Original Enhancements logos are trademarks or registered trademarks of Nokia Corporation. Other company and product names mentioned herein may be trademarks or trade names of their respective owners. Nokia tune is a sound mark of Nokia Corporation. This product includes software licensed from Symbian Ltd © 1998-2003 © 1998-2003 Symbian Ltd.
FCC/INDUSTRY CANADA NOTICE Your device may cause TV or radio interference (for example, when using a telephone in close proximity to receiving equipment). The FCC or Industry Canada can require you to stop using your telephone if such interference cannot be eliminated. If you require assistance, contact your local service facility. This device complies with part 15 of the FCC rules. Operation is subject to the condition that this device does not cause harmful interference. Stac ®, LZS ®, ©1996, Stac, Inc.
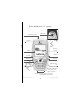
Nokia 6620 phone at a glance Camera lens Power key (on top) Earpiece Speaker Display Five-way joystick Send key End key Menu key Clear key Edit key Right selection key Left selection key Note: The internet symbol on the 0 key does not appear on all phones.
Quick guide Make a call Enter a phone number, and press the Send key. Answer a call Press the Send key. Answer call during call Select Options > Answer call. End a call Press the End key. Decline a call Press the End key. Mute a call Select Options > Mute during a call. Redial Press the Send key twice. Adjust call volume Scroll left or right with the joystick during a call. Use the in-call menu Select Options during a call.
Nokia 6620 phone at a glance . . . . . . . . . . . . . . . . . v Quick guide . . . . . . . . . . . . . . . . . . . . . . . . . . . . . . . . vi 1 FOR YOUR SAFETY . . . . . . . . . . . . . . . . . . . . . . . . . . 1 Network services. . . . . . . . . . . . . . . . . . . . . . . . . . . . . . . . . . . . . . . 2 Shared memory . . . . . . . . . . . . . . . . . . . . . . . . . . . . . . . . . . . . . . . . 3 2 General information . . . . . . . . . . . . . . . . . . . . . . . . . 4 Register your phone . . . .
Icons . . . . . . . . . . . . . . . . . . . . . . . . . . . . . . . . . . . . . . . . . . . . . . . 14 Menu . . . . . . . . . . . . . . . . . . . . . . . . . . . . . . . . . . . . . . . . . . . . . . . 16 Options lists . . . . . . . . . . . . . . . . . . . . . . . . . . . . . . . . . . . . . . . . . 17 Help . . . . . . . . . . . . . . . . . . . . . . . . . . . . . . . . . . . . . . . . . . . . . . . . 17 Navigation bar . . . . . . . . . . . . . . . . . . . . . . . . . . . . . . . . . . . . . . .
Write text . . . . . . . . . . . . . . . . . . . . . . . . . . . . . . . . . . . . . . . . . . . 50 Write and send messages. . . . . . . . . . . . . . . . . . . . . . . . . . . . . . . 53 View a multimedia presentation . . . . . . . . . . . . . . . . . . . . . . . . . 55 Inbox—receiving messages. . . . . . . . . . . . . . . . . . . . . . . . . . . . . . 55 My folders . . . . . . . . . . . . . . . . . . . . . . . . . . . . . . . . . . . . . . . . . . 57 Remote mailbox (network service) . . . . . . . . . . .
Instant messaging (IM) (network service) . . . . . . . . . . . . . . . . . 91 Memory card . . . . . . . . . . . . . . . . . . . . . . . . . . . . . . . . . . . . . . . . . 97 11 Web Browser and Applications . . . . . . . . . . . . . . . . 99 Web (Mobile browser) . . . . . . . . . . . . . . . . . . . . . . . . . . . . . . . . . 99 Configuration manager . . . . . . . . . . . . . . . . . . . . . . . . . . . . . . . 105 Application manager . . . . . . . . . . . . . . . . . . . . . . . . . . . . . . . . .
Certification Information (SAR). . . . . . . . . . . . . . . . . . . . . . . . . 131 Nokia 6620 technical information . . . . . . . . . . . . . . . . . . . . . . 133 Message from the CTIA . . . . . . . . . . . . . . . . . . . . . 139 Message from the FDA . . . . . . . . . . . . . . . . . . . . . 143 Index . . . . . . . . . . . . . . . . . . . . . . . . . . . . . . . . . . .
[ xii ]
FOR YOUR SAFETY 1 FOR YOUR SAFETY Read these simple guidelines. Not following them may be dangerous or illegal. Read the complete user guide for further information. SWITCH ON SAFELY Do not switch the phone on when wireless phone use is prohibited or when it may cause interference or danger. ROAD SAFETY COMES FIRST Obey all local laws. Always keep your hands free to operate the vehicle while driving. Your first consideration while driving should be road safety.
ENHANCEMENTS Use only approved enhancements. Do not connect incompatible products. WATER-RESISTANCE Your phone is not water-resistant. Keep it dry. BACK-UP COPIES Remember to make back-up copies or keep a written record of all important information stored in your phone. CONNECTING TO OTHER DEVICES When connecting to any other device, read its user guide for detailed safety instructions. Do not connect incompatible products. EMERGENCY CALLS Ensure the phone is switched on and in service.
FOR YOUR SAFETY Warning: To use any features in this phone, other than the alarm clock, the phone must be switched on. Do not switch the device on when wireless phone use may cause interference or danger. • SHARED MEMORY The following features in this device may share memory: contacts, text messages, e-mail messages, multimedia messages, instant messages, images and ringing tones, Video recorder, RealOne Player™, calendar and to-do notes, themes, and downloaded applications.
2 General information Congratulations on your purchase of a Nokia mobile phone. Your phone provides many functions that are practical for daily use, such as a digital camera, a video recorder, an mp3 player, messaging, e-mail, a clock, an alarm clock, a calculator, and a calendar. Your phone can connect to a PC, laptop, or other device using a data cable, Bluetooth technology, or the built-in IR port. For more information on connectivity, refer to the PC Connectivity Guide.
General information • FINDING THE PHONE LABEL Information label under battery If you ever need to call the Nokia Customer Care Center or your service provider, you will need to provide specific information about your phone. This information is located on the phone label, which is found on the back of the phone beneath the battery. The inside cover of this guide has a chart in which you can enter the information from your phone label so that you can refer to it easily.
• The phone or accessory in question. Nokia Customer Care Center, USA Customer Care, Canada Nokia Mobile Phones 7725 Woodland Center Blvd. Suite #150 Tampa, Florida 33614 Nokia Products Ltd. 601 Westney Road South Ajax, Ontario L1S 4N7 Tel:1-888-22-NOKIA (1-888-226-6542) Tel:1-888-NOKIA-2U (1-888-665-4228) Website: www.nokia.
Getting started 3 Getting started To begin using your Nokia 6620 phone, a SIM card must be inserted into the phone. You may also use a memory card with the phone. Before you attempt to insert or remove a SIM card or memory card, review the following procedures to become familiar with the inside of your phone. For a better understanding of your SIM card and memory card, see “SIM card” on page 119 and “Memory card” on page 97.
• REMOVE THE BACK COVER Before removing the phone cover, always switch off the power and disconnect the phone from the charger or any other device. Always store and use the phone with the cover attached. 1 To open the cover, with the back of the phone facing you, press the locking catch in the direction of the arrow. 2 While pressing the locking catch, slide the back cover off of the phone. 3 Remove the battery from the phone if necessary.
Getting started • INSERT THE SIM CARD Keep all SIM cards out of the reach of small children. For availability and information on using SIM card services, contact your SIM card vendor. This may be the service provider, network operator, or other vendor. For a better understanding of your SIM card, see “SIM card” on page 119. 1 Locate the SIM card slot. 2 Slide the gray catch toward the bottom of the phone until it reaches its lowest position.
• INSERT THE MEMORY CARD Keep all memory cards out of the reach of small children. See “Insert the SIM card” on page 9 for details on removing the phone cover. See “Memory card” on page 97 for important information about what kind of memory card to use with this phone. 1 Slide the gray catch toward the top of the phone until it reaches its highest position.
Getting started • INSERT THE BATTERY 1 Align the golden contacts of the battery with the corresponding connectors on the phone, and push the opposite end of the battery until it snaps into place. 2 Slide the cover back onto the phone. • CHARGE THE BATTERY 1 Connect the power cord to the charger. (You will hear it click into place.) 2 Connect the power cord from the charger to the base of the phone. 3 Connect the charger to an ac wall outlet. The battery indicator bar starts scrolling.
• SWITCH THE PHONE ON (OR OFF) Press and hold the Power key. Warning: Do not switch on the phone when wireless phone use is prohibited or when it may cause interference or danger. • TIPS ON EFFICIENT OPERATION Your phone has an internal antenna on the back of the phone above the camera lens. As with any other radio transmitting device, do not touch the antenna unnecessarily when the device is switched on.
Getting started • SET THE TIME AND DATE Use the number keys 0–9 to key in first the current time and then the date. Press the Right selection key to accept the settings. • MAKE A CALL 1 In the standby mode, key in the phone number, including the area code. 2 If you make a mistake, press the Clear key to clear numbers. 3 Press the Send key and wait for the answer. 4 Press the End key to finish the call or to cancel the call attempt.
The background image (G) may be any image you select in the standby mode. See "Themes" on page 79. Note: Your phone has a screen saver. If there are no actions for one minute, the display is cleared and a screen saver becomes visible. To deactivate the screen saver, press any key. You can also modify the screen saver display and the amount of time that elapses before the screen saver starts. See “Themes” on page 79 and “Standby mode” on page 67.
Getting started Indicates that all calls to the phone are forwarded. Indicates that all calls to the phone are forwarded to voice mail. See "Call forwarding (network service)" on page 24. If you have two phone lines, the forward indicator for the first line is and for the second line . See “Line in use (network service)” on page 68. Indicates that you can make calls using phone line 2 only (network service). See "Line in use (network service)" on page 68.
• MENU Press the Menu key to display the main menu. In the menu, you can access all the applications in your phone. Menu options are Open, List view / Grid view, Delete, Move, Move to folder, New folder, Rename, Download Applications, Memory details, Help, and Exit. Move in the menu Move the joystick as follows to navigate the menu: • • • • • 5 Scroll up by pressing the joystick up (1). 1 Scroll down by pressing the joystick down (2). Scroll left by pressing the joystick left (3).
Getting started 2 Scroll to the folder to which you want to move the application and select OK. Switch between applications If you have several applications open and want to switch from one application to another, press and hold the Menu key. The application switching window opens showing a list of applications that are currently open. Scroll to an application and press the joystick to go to it. Note: If memory is getting low, the phone may close some applications.
• ACTIONS COMMON TO ALL APPLICATIONS • Opening items for viewing—When you are viewing a list of files or folders, to open an item, scroll to an item and press the joystick, or select Options > Open. • Editing items—To open an item for editing, you sometimes need to first open it for viewing and then select Options > Edit, if you want to change its contents. Use the joystick to scroll through all fields of the item.
Getting started • • recipient in the To: field. Add text or sound and select Options > Send. See "Write and send messages" on page 53. If you select Via infrared, see “Send and receive data by infrared” on page 114 If you select Via Bluetooth, see “Send data by Bluetooth connection” on page 111 • SEARCH FOR ITEMS You can search for a name, file, folder, or shortcut by using the search field.
Note: The loudspeaker cannot be activated when you have a headset connected to the phone. Important: Do not hold the phone near to your ear when the loudspeaker is in use, because the volume may be extremely loud. • KEYGUARD Use the keyguard (keypad lock) feature to help prevent accidental key presses. In the standby mode, press the Left selection key and then quickly press the * key. When the keys are locked, appears on the display.
Your phone 4 Your phone • MAKE A CALL 1 In the standby mode, key in the phone number, including the area code. Scroll right or left to move the cursor. Press the Clear key to remove a number. For international calls, press the * key twice for the international prefix (the + character replaces the international access code), and then key in the country code, the area code without 0, and the phone number.
• If the phone asks for the voice mail number, key it in and press OK. You can obtain this number from your service provider. To forward calls to your voice mail, see “Call forwarding (network service)” on page 24. Each phone line may have its own voice mail number. See "Line in use (network service)" on page 68. CHANGING THE VOICE MAIL NUMBER To change the phone number of your voice mail, select Menu > Tools > Voice mail and select Options > Change number.
Your phone 4 have a private discussion with one participant only. Once you have finished the private conversation, press Options > Conference to return to the conference call. • To drop one participant from the conference call, select Options > Conference > Drop participant, then scroll to the participant and press Drop. To end the active conference call, press the End key. Note: The quickest way to make a new call is to dial the number and press the Send key to start the call.
Send DTMF is used to send DTMF tone sequences, for example, passwords or bank account numbers: 1 Key in the digits with the 0–9 keys. Each keystroke generates a DTMF tone, which is transmitted while the call is active. Press the * key repeatedly to produce: *, p (inserts a pause of approximately two seconds before, or between DTMF characters), and w (if you use this character, the remaining sequence is not sent until you press the Send key again during the call). Press the # key to produce #.
Your phone In the log you can monitor phone calls, text messages, packet data connections, and fax and data calls registered by the phone. You can filter the log to view just one type of event and create new contact cards based on the log information. Note: Connections to your remote mailbox, multimedia messaging center, or browser pages are shown as data calls or packet data connections in the general communications log. GPRS data counter Select Menu > Log > GPRS counter.
To clear one of the call registers, open the register you want to erase and select Options > Clear list. To clear an individual event, open a register, scroll to the event, and press the Clear key. Call timers Select Menu > Log > Call timers. Allows you to view the duration of your incoming and outgoing calls. Note: The actual time invoiced for calls by your service provider may vary, depending upon network features, rounding-off for billing, and so forth.
Your phone • Log duration—The log events remain in the phone memory for a set number of days after which they are automatically erased to free memory. Note: If you select No log, all the log contents, Recent calls register, and Messaging delivery reports are permanently deleted. • Show call duration—Set to On or Off. See "Call timers" on page 26.
5 Personal information • CONTACTS To open Contacts, press the joystick in the standby mode or select Menu > Contacts. In Contacts, you can store and manage contact information, such as names, phone numbers, and addresses. You can also add a personal ringing tone, voice tag, or a thumbnail image to a contact card. You can create contact groups, which allow you to send text messages or e-mail to many recipients at the same time.
Personal information select Options > Edit and then select Options > Add thumbnail. The thumbnail image is also shown when the contact is calling you. After you attach a thumbnail image to a contact card, you can select Add thumbnail to replace the image with a different thumbnail or Remove thumbnail to remove the thumbnail from the contact card. • To assign default numbers and addresses to a contact card, open an contact card and select Options > Defaults.
Before using voice dialing, note that: • Voice tags are not language-dependent. They are dependent on the speaker’s voice. • Voice tags are sensitive to background noise. Record voice tags and use them in a quiet environment. • Very short names are not accepted. Use long names and avoid similar names for different numbers. Note: You must say the name exactly as you said it when you recorded it.
Personal information Note: Voice dialing cannot be used when a data call or a GPRS connection is active. Assign 1-touch dialing keys 1-touch dialing is a quick way to call frequently used numbers. You can assign 1-touch dialing keys to eight phone numbers. Number 1 is reserved for voice mail. 1 Open the contact card for which you want a 1-touch dialing key and select Options > Assign 1-touch no.. The 1-touch dialing grid opens, showing you the numbers from 1-9. 2 Scroll to a number and press Assign.
CREATING CONTACT GROUPS 1 In the Contacts directory, scroll right to open the groups list. 2 Select Options > New group. 3 Write a name for the group or use the default name Group 1 and press OK. ADDING MEMBERS TO A GROUP 1 In the Contacts directory, scroll to the contact you want to add to a group and select Options > Add to group. A list of available groups opens. 2 Scroll to the group to which you want to add the contact and press the joystick.
Personal information Change your availability information Select Options > Current Availability and select: • Available—You are available for people to call or send you messages; for example, your phone is in general profile. See "Profiles" on page 78. • Discreet—You may be available for people to call or send you messages; for example, your phone is in meeting profile. • Not available—You are not available for people to call or send you messages; for example, your phone is in silent profile.
2 Select Options > Update presence. The option is only available when you are logged in to the server and have changed your presence information in Private Presence or Public Presence view and have not updated it yet. 3 To log out, select Options > Log out. Presence settings Select Options > Settings from the Presence main menu: • Publishing—Select: • • • • • Private and Public—Both public and private presence is published. Only private—Only private viewers can see your presence information.
Personal information 3 entries are repeated every year. Fill in the fields. Use the joystick to move between fields. • • • • • 4 Subject / Occasion—Write a description of the event. Location—the place of a meeting, optional. Start time, End time, Start date, and End date. Alarm—Select Active to display the Alarm time and Alarm date fields. Repeat—Press the joystick to change the entry to be repeating. Shown with in the Day view.
• • Icons in Day and Week view: —Memo, and Synchronization icons in Month view: —Private, —Public, —None, 36 —Anniversary.
Personal information Settings Select Options > Settings and select: Calendar alarm tone—To select a personalized alarm tone, or no tone at all. Default view—To select the view that is shown first when you open Calendar. Week starts on—To change the starting day of the week. Week view title—To change the title of the Week view to be the week number or the week dates. • TO-DO In To-do you can keep a list of tasks that you need to do. The To-do list uses shared memory. See "Shared memory" on page 3.
• IMPORT DATA FROM COMPATIBLE NOKIA PHONES You can move calendar, contacts, and to-do data from compatible Nokia phones to your phone using the PC Suite Data Import application. Instructions for using the application can be found in the help function of PC Suite on the CD-ROM.
Multimedia 6 Multimedia • CAMERAS With the Cameras application you can take pictures and record videos while on the move. The images are automatically saved in the Gallery application, where you can rename them and organize them in folders. You can also send images and video recordings in a multimedia message, as an e-mail attachment, or by infrared or a Bluetooth connection. The camera produces JPEG images, and video clips are recorded in the 3GPP file format with the .3gp file extension.
Note: The resolution of a zoomed picture is lower than that of a nonzoomed picture, but the image remains the same size. You may notice the difference in image quality if viewed on a PC, for example. Note: The camera goes into battery saving mode if there have been no key presses within a minute. To continue taking pictures, press the joystick.
Multimedia IMAGES AND MEMORY CONSUMPTION Your phone has approximately 6 MB (megabytes) of free memory for images, contact information, calendar, messages, and so on. See "Shared memory" on page 3. Portrait images (always taken in High quality) are so small that they take up very little memory. Images taken using the High quality setting and those taken in Night mode take up the most memory. By using a memory card with your phone you can increase the number of images you can store.
The video clip is saved to either phone memory or the memory card, depending on the setting of your Memory in use. See "Setting up the Video recorder" on page 42. To immediately play the video clip you just recorded, select Options > Play. To play previously saved video clips, go to the Gallery. See "Gallery" on page 45. Options after you have recorded a clip: New, Play, Delete, Send, Rename video, Go to Gallery, Settings, Help, and Exit.
Multimedia You can view animated GIF files in the same way as other images. Zoom on a saved image 1 Select Options > Zoom in or Zoom out. You can see the zooming ratio at the top of the display. See "Keyboard shortcuts" on page 43. 2 Press the Left selection key to return to the initial view. The zooming ratio is not stored permanently. If you zoom in on GIF animations while they are playing, the animation will freeze until normal zoom is resumed, when play will continue.
With RealOne Player™, you can play local media files stored in the phone memory, or memory card, or stream media files over the air from a streaming link. The streaming link can be activated during a browsing session or stored in the phone memory, or memory card. Media files are video, music, or audio clips. Files with extensions such as .mp3, .3gp, .mp4, .rm, .ram, .ra, and .rv. are supported by RealOne Player.
Multimedia Note: In RealOne Player, you can only open an rtsp:// URL address. You cannot open an http:// URL address; however, RealOne Player will recognize an http link to a .ram file since a .ram file is a text file containing an rtsp link. SHORTCUTS DURING PLAY When a media file is playing, use the joystick to seek (move quickly through the media file), and to mute the sound, as follows: Scroll up and hold to seek forward, or scroll down and hold to seek backward through the media file.
Open the Gallery to see a list of the folders in the phone memory. Scroll right to see the folders on the memory card, if you use one. Select a folder Images, Sound clips, or Video clips (or other folder that you have created) and press the joystick to open it. In the open folder you can see: • An icon depicting the type of each file in the folder, or in the case of an image, a small thumbnail picture; a preview of the image. • • • The name of the file.
Multimedia Use this folder to store logos for Presence. See "Presence (network service)" on page 32. Download files To download files into the Gallery using the browser, select Options > Gallery downloads and choose from Graphic downloads, Video downloads, or Tone downloads. The browser opens and you can choose a bookmark for the site to download from. See "View bookmarks" on page 100. To download files, you must first configure your default access point. See "Access points" on page 68.
3 In the Select sound clip window, scroll to the first sound clip you want to add, and press the joystick to select it. The media player opens, and the first sound clip begins playing. You can pause or stop the clip if you do not want it to play while you are building the rest of your track list. • • 4 To add multiple tracks at one time, press the Edit key and the joystick simultaneously to place a checkmark beside each track that you want to add.
Messaging 7 Messaging Select Menu > Messaging. In Messaging you can create, send, receive, view, edit, and organize: • • • • text messages multimedia messages e-mail messages smart messages (special text messages containing data) Options in the Messaging main view: Create message, Connect (shown if you have defined settings for the mailbox) or Disconnect (shown if there is an active connection to the mailbox), SIM messages, Cell broadcast, Service commands, Settings, Help, and Exit.
Outbox—Temporary storage place for messages waiting to be sent. Reports—You can request the network to send you a delivery report of the text messages, smart messages, and multimedia messages you have sent. To turn on delivery report reception, select Options > Settings > Text message or Multimedia message, scroll to Receive report, and select Yes. Note: Receiving a delivery report of a multimedia message that has been sent to an e-mail address might not be possible.
Messaging 1 key repeatedly to reach the desired punctuation mark. You can also press the * key to open a list of special characters. Use the joystick to move through the list and press Select to select a character. • To insert a space, press the 0 key. To move the cursor to the next line, press the 0 key three times. • To switch between upper and lower case, press the # key.
To remove the ? and clear characters one by one from the word, press the Clear key. TIPS ON PREDICTIVE TEXT INPUT • To erase a character, press the Clear key. Press and hold the Clear key to clear more than one character. • To change between the different character cases Abc, abc, and ABC, press the # key. Note that if you press the # key twice quickly the predictive text input is turned off.
Messaging Copy and paste text If you want to copy text to the clipboard, the following is the easiest method: 1 To select letters and words, press and hold the Edit key. At the same time, scroll right or left. As the selection moves, text is highlighted. To select lines of text, press and hold the Edit key. At the same time scroll down or up. 2 3 To end the selection, release the joystick while still holding the Edit key. To copy the text to the clipboard, while still holding the Edit key, press Copy.
Note: When you are sending a multimedia message to any phone other than Nokia 6620, it is recommended to use a smaller image size and a sound clip that is no longer than 15 seconds. The default setting is Image size: Small. When you are sending a multimedia message to an e-mail address or another Nokia 6620, if possible use the larger image size (network dependent). To change the setting, select Messaging > Options > Settings > Multimedia message > Image size > Large.
Messaging SETTINGS NEEDED FOR E-MAIL Before you can send, receive, retrieve, reply to, and forward e-mail to a separate email account, you must: • Configure an Internet access point (IAP) correctly. See "Connection" on page 68. • Define your e-mail settings correctly. See "E-mail" on page 63. Note: Follow the instructions given by your remote mailbox and Internet service provider.
View multimedia objects Options in the Objects view: Open, Save, Send, Call, and Exit. To see what kinds of media objects have been included in the multimedia message, open the message and select Options > Objects. In the Objects view you can view files that have been included in the multimedia message. You can choose to save the file in your phone or to send it, for example, by Bluetooth connection or infrared connection to another compatible device.
Messaging • E-mail notification—Tells you how many new e-mails you have in your remote mailbox. An extended notification may list more detailed information such as subject, sender, attachments, and so on. • In addition, you can receive a text message service number, voice mail number, profile settings for remote synchronization, access point settings for the browser, multimedia messaging or e-mail, access point login script settings, or e-mail settings.
Open the mailbox When you open the mailbox, you can choose whether you want to view the previously retrieved e-mail messages and e-mail headings offline or connect to the e-mail server. When you scroll to your mailbox and press the joystick, the phone asks you if you want to Connect to mailbox? Select Yes to connect to your mailbox or No to view previously retrieved e-mail messages offline. Another way to start a connection is to select Options > Connect.
Messaging Important: E-mail attachments may contain viruses or otherwise be harmful to your phone or PC. Do not open any attachment if you are not sure of the trustworthiness of the sender. See "Certif. (certificate) management" on page 75. Note: If your mailbox uses the IMAP4 protocol, you can decide whether to retrieve e-mail headings only, messages only, or messages and attachments. With the POP3 protocol, the options are e-mail headings only or messages and attachments. See "E-mail" on page 63.
Sending—A connection is being made and the message is being sent. Waiting / Queued—For example, if there are two similar types of messages in Outbox, one of them is waiting until the first one is sent. Resend at (time)—Sending has failed. The phone will try to send the message again after a time-out period. Press Send if you want to restart the sending immediately. Deferred—You can set documents to be ‘on hold’ while they are in Outbox.
Messaging • SERVICE COMMAND EDITOR Select Messaging > Options > Service commands. Key in and send service requests (also known as USSD commands) for network services to your service provider (for example, a request for activation commands). • SETTINGS The Messaging settings have been divided into groups according to the different message types. Scroll to the settings you want to edit and press the joystick.
Options when editing message center settings: New msg. center, Edit, Delete, Help, and Exit. Multimedia messages Select Messaging > Options > Settings > Multimedia message to open the following list of settings: • Access point in use (Must be defined)—Select which access point is used as the preferred connection for the multimedia message center. See "Settings needed for multimedia messaging" on page 54.
Messaging • Deny report sending—Choose Yes if you do not want your phone to send delivery reports of received multimedia messages. • Message validity (network service)—If the recipient of a message cannot be reached within the validity period, the message is removed from the multimedia message center. Maximum time is the maximum amount of time allowed by the network. • Image size—Define the size of the image in a multimedia message. The options are Small (max. of 160x120 pixels) and Large (max.
• • User name—Write your user name, given to you by your service provider. • Incoming mail server (Must be defined)—The IP address or host name of the computer that receives your e-mail. • Mailbox type—Defines the e-mail protocol your remote mailbox service provider recommends. The options are POP3 and IMAP4. Password—Write your password. If you leave this field blank, you will be prompted for the password when you try to connect to your remote mailbox.
Messaging existing topics, Topic detection > On allows you to save the topic number automatically. The topic number is saved to the topic list and shown without a name. Choose Off if you do not want to save new topic numbers automatically. Sent messages Select Messaging > Options > Settings > Other to open the following list of settings: • Save sent messages—Choose if you want to save a copy of every text message, multimedia message, or e-mail that you have sent to the Sent items folder. • No.
8 Tools • SETTINGS Select Menu > Tools > Settings. 1 Scroll to a setting group and press the joystick to open it. 2 Scroll to a setting you want to change and press the joystick to: • Switch between options if there are only two (On/Off). • Open a list of options or an editor. • Open a slider view (scroll right or left to increase or decrease the value, respectively). You may be able to receive some settings from your service provider in a short message. See "Smart messages" on page 56.
Tools Dictionary—To set predictive text input On or Off for all editors in the phone. Select a language for entering predictive text from the list available. You can also change this setting when you are in an editor. Press the Edit key and select Dictionary > Dictionary on or Off. Welcome note or logo— The welcome note or logo is displayed briefly each time you switch on the phone. Select Default if you want to use the default image or animation. Select Text to write a welcome note (max. 50 letters).
AUTOMATIC REDIAL When this setting is activated, your phone will make a maximum of ten attempts to connect the call after an unsuccessful call attempt. Press the End key to stop automatic redialing. SUMMARY AFTER CALL Activate this setting if you want the phone to briefly display the duration of the last call. 1-TOUCH DIALING Select On and the numbers assigned to the 1-touch dialing keys (2–9) can be dialed by pressing and holding the key. See "Assign 1-touch dialing keys" on page 31.
Tools Here you can see a short explanation for every setting that may be needed for different data connections and access points. Start to fill in the settings from the top because depending on what data connection you select (Data bearer) only certain setting fields are available: • • Connection name—Give a descriptive name for the connection. Data bearer—The options are GPRS and Data call. Depending on which data connection you select, only certain setting fields are available.
/ 14400 / 19200 / 28800 / 38400 / 43200, depending on what you have chosen in Data call type. This option allows you to limit the maximum connection speed when GSM data is used. Higher data rates may cost more, depending on the service provider. Note: The speeds above represent the maximum speed at which your connection will operate. During the connection, the operating speed may be less, depending on network conditions.
Tools GPRS Select Menu > Tools > Settings > Connection > GPRS. GPRS connection—If you select When available and you are in a network that supports packet data, the phone registers to the GPRS network and sending short messages will be done by GPRS. Also, starting an active packet data connection, for example, to send and receive e-mail, is quicker. If you select When needed, the phone will use a packet data connection only if you start an application or action that needs it.
The Data call settings affect all access points using a data call. Online time—If there are no actions the data call is dropped automatically after a time-out period. The options are User defined (in which case you enter a time) or Unlimited. Date and time Select Menu > Tools > Settings > Date and time. The Date and time settings allow you to define the date and time used in your phone, as well as change the date and time format and separators.