Using the printer with Windows 95 For better performance and added features when printing from Windows 95, it is recommended that you use the Windows 95 printer driver and not the Windows 3.1 printer driver. Using the Windows 3.1 printer driver in Windows 95 may cause printing problems. To print to a Phaser 340 printer from Windows 95, do the following steps: ■ Remove Windows 3.1 printer drivers, if you have any installed under Windows 95. For better printing performance, use the Windows 95 printer driver.
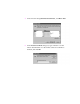
Removing a Windows 3.1 driver in Windows 95 If you installed a Tektronix Windows 3.1 printer driver in Windows 3.1, then upgraded from Windows 3.1 to Windows 95, the driver will appear in Windows 95. You should remove any Windows 3.1 drivers and install the Windows 95 driver and your printer. Removing printers and older drivers 1. Start Windows 95. 2. Click the Start icon in the taskbar on your screen; a menu appears. 3. Move the cursor over Settings; another menu appears. 4.
6. Move the cursor over a printer icon, and click the right mouse button; a menu appears. 7. In the menu, click Delete. When prompted, click Yes to delete the printer files. If you are prompted to delete other software files associated with the printer, click Yes. 8. The printer’s icon should now be removed from the Printers window. 9. Repeat Steps 6 and 7 for all Tektronix printers you have installed. 10.
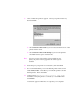
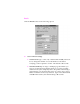
Adding the Phaser 340 printer to the Windows 95 driver 1. Start Windows 95. 2. Insert the Phaser 340 CD-ROM into your computer’s CD-ROM drive, or insert the Printer Software for Windows diskette into your computer’s disk drive. 3. Click the Start icon in the taskbar on your screen. In the menu that appears, click Settings. 4. In the menu that appears, click Printers; the Printers windows appears. 5. In the Printers window, double-click Add Printer; the Add Printer Wizard appears. Click Next. 6.
7. In the window listing Manufacturers/Printers, click Have Disk. 8. In the Install From Disk dialog box, type in the drive for the Phaser 340 CD-ROM or for the Printer Software for Windows diskette, and click OK.
9. Note A list of Tektronix printers appears. Select your printer in the list, then click Next. ■ Select Tektronix Phaser 340 if you have the standard version of the printer with 17 fonts. ■ Select Tektronix Phaser 340 600 dpi if you have the printer’s extended features option with 69 fonts. If you are not sure of the number of fonts installed in your printer, the printer’s startup page lists the number of fonts installed. 10. Select the port your printer is connected to, then click Next. 11.
13. If prompted, select the path for the PostScript driver file ICONLIB.DLL; this should be in your WINDOWS/SYSTEM directory. If the file isn’t installed on your hard disk, do one of the following: ■ Insert the Microsoft CD-ROM for Windows 95, select the WIN95 directory, and click OK. ■ Insert the requested Microsoft floppy diskette for Windows 95, select the drive, and click OK. The software you need is installed. 14.
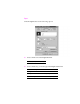
Using printer options in the Windows 95 driver In the Printers window, click the Phaser 340 printer icon with the right mouse button, then select Properties from the menu. Click the following tabs to see printing options; refer to your Windows 95 documentation for information on other tabs and options.
Details Click the Details tab to see the following options: ■ Set the Timeout settings. ■ Not Selected: Type a value of 0, or between 15 and 999, in this text box to change the number of seconds Windows waits before notifying you that a printer is off-line. The default is 15 seconds. ■ Transmission Retry: On large or multiple-page documents you may see an Alert message that the printer is no longer accepting data before the job is completely sent to the printer.
Paper Click the Paper tab to see the following options: ■ Select a media size in the Paper size field. ■ ■ Letter (U.S.) ■ A4 (metric) Select a media tray or media type in the Paper source field.
Graphics Click the Graphics tab to see the following options: Note Use the Print Quality selections in the Device Options tab to select 300 x 300 dpi and 600 x 300 dpi options. Note If you are using host color correction, you need to make selections in the Graphics and Device Options tabs.
Device Options Click the Device Options tab to see the following options: ■ To select TekColor printer color corrections, follow these steps: a. Highlight Color Correction in the Printer features field. b. Select a color correction in the Change setting for: Color Correction field.
■ To select print quality modes, follow these steps: a. Highlight Print Quality in the Printer features field. b. Select a print quality mode in the Change setting for: Print Quality field. ■ 300x300 dpi* ■ 600x300 dpi* * These options are available only with the printer’s extended features option.
PostScript Click the PostScript tab to see the following options: ■ The PostScript header contains important PostScript information that must accompany each print job; it is not a banner page printed with each job. If an option is not selected, an error message is displayed on your computer screen and your job does not print. Click one of the following in the PostScript header field: ■ Select Download header with each print job. This option downloads PostScript header information with each print job.
■ Click the Advanced button to see the following options. ■ Note Select Use PostScript Level 2 features. Click OK when finished. For faster printing, select Binary communications protocol under Data format.