Nokia 1110 User Guide 9240048 Issue 1 1
DECLARATION OF CONFORMITY We, NOKIA CORPORATION declare under our sole responsibility that the product RH-70 is in conformity with the provisions of the following Council Directive: 1999/5/EC. A copy of the Declaration of Conformity can be found at http://www.nokia.com/phones/declaration_of_conformity/. Part No. 9240048, Issue No. 1 Copyright© 2005 Nokia. All rights reserved.
EXPORT CONTROLS This device may contain commodities, technology, or software subject to export laws and regulations from the U.S. and other countries. Diversion contrary to law is prohibited. FCC/INDUSTRY CANADA NOTICE Your device may cause TV or radio interference (for example, when using a telephone in close proximity to receiving equipment). The FCC or Industry Canada can require you to stop using your telephone if such interference cannot be eliminated.
Table of contents Table of contents For your safety..................................................................................... 6 Access codes.......................................................................................................................... 9 Shared memory..................................................................................................................... 9 1. Get started ....................................................................................
Table of contents 7. Reference information.................................................................. 40 Additional safety information........................................................................................ Emergency calls ................................................................................................................. Certification information (SAR)..................................................................................... Technical information ............
For your safety For your safety Read these simple guidelines. Not following them may be dangerous or illegal. Read the complete user guide for further information. SWITCH ON SAFELY Do not switch the phone on when wireless phone use is prohibited or when it may cause interference or danger. ROAD SAFETY COMES FIRST Obey all local laws. Always keep your hands free to operate the vehicle while driving. Your first consideration while driving should be road safety.
For your safety WATER-RESISTANCE Your phone is not water-resistant. Keep it dry. BACK-UP COPIES Remember to make back-up copies or keep a written record of all important information stored in your phone. CONNECTING TO OTHER DEVICES When connecting to any other device, read its user guide for detailed safety instructions. Do not connect incompatible products. EMERGENCY CALLS Ensure the phone is switched on and in service.
For your safety changes in menu names, menu order and icons. Contact your service provider for more information. ■ Chargers and enhancements Always switch the device off and disconnect the charger before removing the battery. Check the model number of any charger before use with this device. This device is intended for use when supplied with power from the ACP-7 and ACP-12 chargers. Warning: Use only batteries, chargers, and enhancements approved by Nokia for use with this particular model.
General information General information ■ Access codes For details about access codes and their operations, see "Security settings," p. 30. • Security code: This code, supplied with the phone, helps to protect your phone against unauthorized use. The preset code is 12345. • PIN code: This code, supplied with the SIM card, helps to protect the card against unauthorized use.
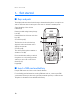
Get started 1. Get started ■ Keys and parts The display indicators described below are shown when the phone is ready for use and no characters have been keyed in. This state is called the standby mode. Signal intensity of the cellular network (1) Battery bar indicating battery charge level (2) Current function of the two selection keys (3) Selection keys (4) The function of the selection keys depends on the text shown on the display above them.
Get started 1. Press the back cover release button (1), open the back cover, and remove it (2, 3). 2. Lift the battery (if present) and remove it (4), and carefully lift the SIM card holder (5). 3. Insert the SIM card (6). Make sure that the SIM card is properly inserted, and that the gold-colored contact area on the card is facing downward. 4. Close the SIM card holder (7), and press it to lock it into place. 5. Insert the battery (8, 9). 6. Replace the back cover. ■ Charge the battery 1.
Get started 3. When the battery is fully charged, the bar stops scrolling. Disconnect the charger from the phone and the ac outlet. The BL-5C battery provides up to 6 hours of talk time, and up to 18 days of standby time. Operation times are estimates and may vary depending on network conditions, charging, and device use. ■ Switch on or off Press and hold the end key for a few seconds. Warning! Do not switch on the phone when wireless phone use is prohibited or when it may cause interference or danger.
Get started ■ Change the cover and keymat Note: Always switch off the power and disconnect the charger and any other device before removing the cover. Avoid touching electronic components while changing the cover. Always store and use the device with the cover attached. To change the covers, do the following: 1. Press the back cover release button (1), open the back cover, and remove it (2, 3). 2. Take off the front cover carefully (4). 3.
Get started To change the keymat, do the following: 1. Press the top of the keymat, and lift it out of the front cover (1, 2). 2. Pull the keymat out of the front cover (3). 3. Carefully align the bottom of the new keymat into the front cover (4), and press the top of the keymat into the front cover (5). ■ Demo mode You may view how to use certain features of your phone. To access the demo, use one of two ways: • If the SIM card is not installed, select Demo.
Get started ■ Shortcuts in the standby mode Scroll up to access Call log. Scroll down to access the names and numbers saved in Contacts. Scroll left to write a message. Scroll right to acess the demo mode. Press and hold * to activate the speaking clock. Press the call key once to access the list of dialed numbers. Scroll to the name or number that you want, and press the call key to call the number. ■ Lock the keypad The keypad lock helps to prevent keys from being pressed accidentally.
Call functions 2. Call functions ■ Make a call 1. Enter the phone number and the area code if necessary. To make international phone calls, press * twice quickly to display the plus sign (+), add the country (or region) code, then the area code. Delete the leading 0 if necessary. To delete the last digit entered, select Clear. 2. Press the call key to call the number. Scroll right or left to increase or decrease the volume of the earpiece or headset during the phone call. 3.
Call functions Scroll to select the number key you want (2 to 9), and select Assign; choose if you want to assign to call or to SMS, and select the name you want. To dial a number using 1-touch dial, press and hold the relevant assigned number key in the standby mode. ■ Answer a call When there is an incoming call, press the call key to answer. To reject the call without answering, press the end key. ■ Loudspeaker If available, you may select Loudsp. or Hands.
Write text 3. Write text You can enter text in two different ways: traditional text input predictive text input . , or To use traditional text input, repeatedly press the key marked with the letter that you want until the letter appears. Not all characters available under a number key are printed on the key. The characters available depend on the Language you have chosen. See "Phone settings," p. 29.
Write text To add a compound word with predictive input, enter the first half of the word, scroll right, and enter the second half. Following are tips for writing text with traditional and predictive text input. • To move the cursor left, right, up, or down, press the respective scroll key. • To add a space, press 0. • To delete the character to the left of the cursor, select Clear. To clear all the text you entered, press and hold the right selection key.
Menu functions 4. Menu functions In the standby mode, select Menu and the desired menu and submenu. Select Exit or Back to exit the current level of menu. Press the end key to return to the standby mode directly. ■ Messages Create a message Your device supports the sending of text messages beyond the character limit for a single message. Longer messages will be sent as a series of two or more messages. Your service provider may charge accordingly.
Menu functions an indication that the message has been received at the intended destination. For more details about messaging services, check with your service provider. When you edit a message, if you selected Options > Clear text, you can restore the text you just cleared. If you have not entered any new text, or changed input method, language, or predictive text mode, select Options > Undo clear to restore the cleared text.
Menu functions Picture messages (network service) You can receive and send messages that contain pictures. Received picture messages are saved in the Inbox. Each picture message comprises several text messages. Therefore, sending one picture message may cost more than one text message. Note: The picture message function can be used only if it is supported by your network operator or service provider. Only compatible devices that offer picture message features can receive and display picture messages.
Menu functions Message counter Select Menu > Messages > Message counter. Scroll down to view the number of sent and received messages. To reset the message counters, select Clear counters and the counters you want to reset.
Menu functions No. screening—To view or edit the list of filtered numbers Scroll to a number, and select Options > Add number or Delete from list to add a number to the filtered list or delete the highlighted number from the list. Messages from the filtered numbers are saved directly to the Screened messages folder. When a filtered number calls, your phone will not ring or vibrate, regardless of the mode. If the call is not answered, it will be stored in the folder of Missed calls under Call log.
Menu functions No. screening—To view or edit the list of filtered numbers. For more information, see "No. screening," p. 24.
Menu functions Recent call lists In the standby mode, select Menu > Call log > Missed calls, Received calls, or Dialed numbers > Options to view the time of the call; edit, view or call the logged phone number; add it to the contact list or to the list of screened numbers; or delete it from the recent call list. You can also send a text message . To reset the recent call lists, in the standby mode, select Menu > Call log > Delete recent call lists, and select the lists you want to reset.
Menu functions Message alert tone—To set the tone to sound when you receive a text message Keypad tones—To set the volume for keypad tones Warning tones—To set the phone to sound tones, for example, when the battery is running out of power Rhythmic backlight alert—To set the phone backlight to follow the rhythm of the ringing tone when there is an incoming call or message Display settings Select Menu > Settings > Display settings and one of the following options: Power saver clock—To set the phone to show
Menu functions Time settings Select Menu > Settings > Time settings and one of the following options: Clock—To hide or show the clock, to set the time, or to edit the time format Date setting—To set the date Auto-update of date and time (network service)—To set your phone to automatically update time and date from network Using this feature may cause some set alarms to expire. If the battery was removed from the phone, you may need to set the time and date again.
Menu functions Phone settings Select Menu > Settings > Phone settings and one of the following options: Language—To select the language for the display texts Keyguard settings • Automatic keyguard > On to activate the automatic keyguard Enter the delay time in the format of minutes:seconds, and select OK. You can set the time from 10 seconds to 59 minutes and 59 seconds. To deactivate the automatic keyguard, select Off.
Menu functions Call costs (network service)—To view the approximate cost of your last call or all calls in terms of units specified within the Show costs in function Fixed dialing—To restrict your outgoing calls to selected phone numbers, if allowed by your SIM cards (PIN2 code may be required) Enhancement settings The accessory settings item becomes visible only after one of the accessories has been connected to the phone.
Menu functions list, or select Off to set the phone to not ask for the security code when a new SIM card is inserted or the internal contact list is selected. When you change the security level, all the recent calls lists, including missed calls, received calls and dialed numbers, may be cleared. Change access codes—To change the security code, PIN code, PIN2 code or restriction password These codes can include the numbers 0 to 9 only.
Menu functions Repeat alarm—To set the alarm to sound only once or repeatedly on certain days of the week Speaking clock—To let the phone speak the time Time settings. See "Time settings," p. 28. When the alarm sounds, select Stop to stop the alarm, or Snooze to stop the alarm and set it to ring again in 10 minutes. If the alarm time is reached while the device is switched off, the device switches itself on and starts sounding the alarm tone.
Menu functions Select Menu > Extras > Calculator. 1. Press keys 0 to 9 to insert digits and # to insert a decimal point. To delete the last digit, select Clear. To change the sign of the entered number, press *. 2. Scroll up or down to highlight +, -, x, or /. 3. Repeat steps 1 and 2 if necessary. 4. To get the result, select Equals. Converter You can convert different measurement units. In the standby mode, select Menu > Extras > Converter. To access your last five conversions, select Last 5 conv.
Menu functions Select Start to start timing. To take the time, select Stop. When the timing is stopped, you can select Options > Start, Reset, or Exit . To set the timing to continue in the background when it is running, press the end key. While the time is running, flashes in the standby mode. Using the stopwatch or allowing it to run in the background when using other features increases the demand on battery power and reduces the battery life. Composer Select Menu > Extras > Composer and a tone.
Battery information 5. Battery information ■ Battery information Charging and discharging Your device is powered by a rechargeable battery. The full performance of a new battery is achieved only after two or three complete charge and discharge cycles. The battery can be charged and discharged hundreds of times but it will eventually wear out. When the talk and standby times are noticeably shorter than normal, replace the battery.
Battery information Successful completion of the four steps is not a total assurance of the authenticity of the battery. If you have any reason to believe that your battery is not an authentic original Nokia battery, you should refrain from using it, and take it to the nearest authorized Nokia service point or dealer for assistance. Your authorized Nokia service point or dealer will inspect the battery for authenticity. If authenticity cannot be verified, return the battery to the place of purchase.
Battery information To find out more about original Nokia batteries, visit www.nokia.com/battery.
Enhancements 6. Enhancements If you want to enhance device functionality, a range of enhancements is available for you. You can select any of these items to help accommodate your specific communication needs. For availability of these and other enhancements, contact your dealer. Check the model number of any charger before use with this device. This device is intended for use when supplied with power from an ACP-7 or ACP-12 charger.
Enhancements • TTY adapter (HDA-9) ■ Car • Car kit (CK-10) ■ Covers and carrying • Xpress-on cover 39
Reference information 7. Reference information ■ Additional safety information Operating environment Remember to follow any special regulations in force in any area and always switch off your device when its use is prohibited or when it may cause interference or danger. Use the device only in its normal operating positions. This device meets RF exposure guidelines when used either in the normal use position against the ear or when positioned at least 1.5 centimeters (5/8 inch) away from the body.
Reference information consistent with the independent research by and recommendations of Wireless Technology Research. To minimize the potential for interference, persons with pacemakers should • Always keep the device more than 15.3 centimeters (6 inches) from their pacemaker • Not carry the device in a breast pocket • Hold the device to the ear opposite the pacemaker to minimize the potential for interference. If you suspect interference, switch off your device, and move the device away.
Reference information Potentially explosive environments Switch off your device when in any area with a potentially explosive atmosphere and obey all signs and instructions. Potentially explosive atmospheres include areas where you would normally be advised to turn off your vehicle engine. Sparks in such areas could cause an explosion or fire resulting in bodily injury or even death. Switch off the device at refueling points such as near gas pumps at service stations.
Reference information ■ Certification information (SAR) THIS MOBILE DEVICE MEETS GUIDELINES FOR EXPOSURE TO RADIO WAVES. Your mobile device is a radio transmitter and receiver. It is designed not to exceed the limits for exposure to radio waves recommended by international guidelines. These guidelines were developed by the independent scientific organization ICNIRP and include safety margins designed to assure the protection of all persons, regardless of age and health.
Reference information ■ Technical information Feature Specification Weight 80 g (2.8 oz) with BL-5C Li-Ion 900 mAh battery Size Volume: 69 cm3 (4.2 in3) Length: 103.8 mm (4.1 in) Width: 43.8 mm (1.7 in) Thickness: 17 mm (0.7 in) Frequency range GSM 850 824–894 MHz (TX) 869–894 MHz (RX) GSM 1900 1850–1910 MHz (TX) 1930–1990 MHz (RX) GSM 900 880–915 MHz (TX) 925–960 MHz (RX) GSM 1800 1710–1785 MHz (TX) 1805–1865 MHz (RX) Transmitter output power Up to 2 W 44 Battery voltage 3.
Care and maintenance Care and maintenance Your device is a product of superior design and craftsmanship and should be treated with care. The suggestions below will help you protect your warranty coverage. • Keep the device dry. Precipitation, humidity and all types of liquids or moisture can contain minerals that will corrode electronic circuits. If your device does get wet, remove the battery and allow the device to dry completely before replacing it.
Index Index 1-touch dial 16, 24 D A demo mode 14 display indicators 10 settings 27 distribution lists 22 access codes 9 B battery authenticate 35 charge 11, 35 charge indicator 10 information 35 insert 10 C calculator 32 call 1-touch 16 answer 17 conference 16 dial 16 redial 16 settings 28 call key 10 call log 25 call timers 26 recent call lists 26 chat 21 clock 31 composer 34 contacts 24 1-touch dial 24 find names 24 settings 25 converter 33 countdown timer 33 covers 13 E end key 10 enhancements 38
Index R T reminders 32 text, predictive or traditional 18 time settings 28 tone settings 26 S scroll keys 10 security code 9 security settings 30 selection keys 10 settings call 28 contacts 25 cost 29 display 27 enhancements 30 phone 29 profiles 27 restore factory defaults 31 right navigation key 31 security 30 time 28 tone 26 shared memory 9 SIM card block and unblock 9 insert 10 special characters 19 standby mode 10, 15 stopwatch 33 U unlock the keypad 15 V voice messages 17 W write text 18 47