Microsoft Office 2010 Tutorial Contents Microsoft Office 2010 Tutorial.............................................................................................................. 1 Find your way through long documents with the new Document Navigation pane and Search ................ 4 Adjust the spaces between lines or paragraphs ....................................................................................... 5 Line spacing in Word 2010 .............................................................
Add or delete a table ............................................................................................................................. 20 Insert a table ..................................................................................................................................... 20 Draw a table ...................................................................................................................................... 21 Convert text to a table ..................................
Make changes to a PDF or XPS file ..................................................................................................... 50 Preview and print a file.......................................................................................................................... 51 Excel.............................................................................................................................................. 51 PowerPoint..............................................................
Find your way through long documents with the new Document Navigation pane and Search In Word 2010, you can quickly find your way around long documents. You can easily reorganize your documents by dragging and dropping sections instead of copying and pasting. And you can find content by using incremental search, so you do not need to know exactly what you are searching for to find it.
Drag and drop headings within your document to rearrange the structure. You can also delete, cut, or copy headings and their content. Easily promote or demote a given heading, or a heading and all of its nested headings, up or down within the hierarchy. Add new headings to your document to build a basic outline or insert new sections without having to scroll around in the document. Stay aware of the content being edited by others by browsing the headings that contain a coauthoring indicator.
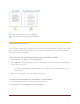
1.0 line spacing and no space between paragraphs 1.15 line spacing and a blank line between paragraphs Change the line spacing The easiest way to change the line spacing for an entire document is to apply a Quick Style set that uses the spacing that you want. If you want to change the line spacing for a portion of the document, you can select the paragraphs and change their line spacing settings. USE A STYLE SET TO CHANGE LINE SPACING FOR AN ENTIRE DOCUMENT 1.
3. Do one of the following: Click the number of line spaces that you want. For example, click 1.0 to single-space with the spacing that is used in earlier versions of Word. Click 2.0 to double-space the selected paragraph. Click 1.15 to single-space with the spacing that is used in Word 2010. Click Line Spacing Options, and then select the options that you want under Spacing. See the following list of available options for more information.
Change the spacing before or after paragraphs The easiest way to change the spacing between paragraphs for an entire document is to apply a Quick Style set that uses the spacing that you want. If you want to change the spacing between paragraphs for a portion of the document, you can select the paragraphs and change their spacing-before and spacing-after settings. USE A STYLE SET TO CHANGE PARAGRAPH SPACING FOR AN ENTIRE DOCUMENT 1. On the Home tab, in the Styles group, click Change Styles. 2.
Paragraph spacing options The spacing listed in this table is based on Calibri, 11-point text. OPTION SPACE AFTER THE PARAGRAPH LINE SPACING IN THE PARAGRAPH No Paragraph Space 0 1 Compact 4 1 Tight 6 1.15 Open 10 1.15 Relaxed 6 1.5 Double 8 2 CHANGE THE SPACING BEFORE AND AFTER SELECTED PARAGRAPHS By default, paragraphs are followed by a blank line, and headings have extra space above them. 1. Select the paragraph before or after which you want to change the spacing. 2.
Set the default to single-spacing for all new documents 1. On the Home tab, in the Styles group, click Change Styles. 2. Point to Style Set, and click Word 2003. 3. In the Styles group, click Change Styles, and then click Set as Default. NOTE If you try using another style set in your document and you want to return to your custom default setting, click Change Styles in the Styles group, point to Style Sets, and then click Reset to Quick Styles from Template.
2. Select the options that you want to apply to the default font, such as font style and font size. If you selected text in step 1, the properties of the selected text are set in the dialog box. 3. Click Set As Default, and then click OK. Create a document Getting started with a basic document in Microsoft Office Word 2007 is as easy as opening a new blank document and starting to type.
Start a document from a template The Templates site on Office.com provides templates for many types of documents, including resumés, cover letters, business plans, business cards, and APA-style papers. 1. Click the File tab. 2. Click New. 3. Under Available Templates, do one of the following: Click Sample Templates to select a template that is available on your computer. Click one of the links under Office.com. NOTE To download a template that is listed under Office.
3. In the Save As dialog box, click Templates. 4. In the Save as type list, select Word Template. 5. Type a name for the template in the File name box, and then click Save. Delete a document 1. Click the File tab. 2. Click Open. 3. Locate the file that you want to delete. 4. Right-click the file, and then click Delete on the shortcut menu. Add a heading The best way to add headings in Word is to apply styles. You can use the built-in styles, or you can customize them. Apply a heading style 1.
Customize a heading style You can change the font and formatting of a heading style. 1. Select the heading text that you want to customize. 2. On the Home tab, in the Styles group, click the heading style that you want to customize. 3. Make the changes that you want. For example, you can change the font, the size, or the color. 4. On the Home tab, in the Styles group, right-click the heading style that you customized, and then click Update Heading to Match Selection.
Insert a picture or clip art Pictures and clip art can be inserted or copied into a document from many different sources, including downloaded from a clip art Web site provider, copied from a Web page, or inserted from a folder where you save pictures. You can also change how a picture or clip art is positioned with text within a document by using the Position and Wrap Text commands. Insert clip art 1. On the Insert tab, in the Illustrations group, click Clip Art. NOTE 2.
4. Click Go. 5. In the list of results, click the clip art to insert it. To resize clip art, select the clip art you've inserted in the document. To increase or decrease the size in one or more directions, drag a sizing handle away from or toward the center, while you do one of the following: To keep the center of an object in the same location, press and hold CTRL while you drag the sizing handle. To maintain the object's proportions, press and hold SHIFT while you drag the sizing handle.
1. Click where you want to insert the picture in your document. 2. On the Insert tab, in the Illustrations group, click Picture. NOTE 3. Some commands shown are not available in Word Starter. Locate the picture that you want to insert. For example, you might have a picture file located in My Documents. 4. Double-click the picture that you want to insert. NOTE By default, Microsoft Word embeds pictures in a document. You can reduce the size of a file by linking to a picture.
A floating picture keeps its position relative to the page, and floats in that position as text flows around it. For example, if you position the picture halfway down on the left side of the page, and then you add two paragraphs at the top of the page, the picture will stay halfway down on the left side of the page. To make sure that the picture stays with text that references it — for example, a description above the picture, position the picture as an inline picture.
NOTE To keep a callout or text box with a picture, you must make the picture and the text box or shape floating, and group the picture with the callout or other shape. 1. If the picture is not on a drawing canvas, select the picture. If the picture is on a drawing canvas, select the canvas. 2. On the Format tab, in the Arrange group, click Position. If you don't see Position, click Arrange, and then click Position. 3.
Add or delete a table Insert a table In Microsoft Word, you can insert a table by in three ways: choosing from a selection of preformatted tables — complete with sample data — or by selecting the number of rows and columns that you want. You can insert a table into a document, or you can insert one table into another table to create a more complex table. Choose from a gallery of preformatted table templates. Use the Table menu to specify the number of rows and columns that you want.
USE THE INSERT TABLE COMMAND You can use the Insert Table command to choose the table dimensions and format before you insert the table into a document. 1. Click where you want to insert a table. 2. On the Insert tab, in the Tables group, click Table, and then click Insert Table. 3. Under Table size, enter the number of columns and rows. 4. Under AutoFit behavior, choose options to adjust the table size.
The pointer changes to a pencil. 3. To define the outer table boundaries, draw a rectangle. Then draw the column lines and row lines inside the rectangle. 4. To erase a line or block of lines, under Table Tools, on the Design tab, in the Draw Borders group, click Eraser. 5. Click the line that you want to erase. To erase the entire table, see Delete a table. 6. When you finish drawing the table, click in a cell and start typing or insert a graphic. Convert text to a table 1.
4. In the Convert Text to Table dialog box, under Separate text at, click the option for the separator character that you used in the text. Select any other options that you want. Add or delete rows or columns ADD A ROW ABOVE OR BELOW 1. Right-click in a cell above or below where you want to add a row. 2. On the shortcut menu, point to Insert, and then click Insert Rows Above or Insert Rows Below.
2. Select the row that you want to delete by clicking to the left of the row. 3. Right-click, and then click Delete Rows on the shortcut menu. DELETE A COLUMN 1. On the Home tab, in the Paragraph group, click Show/Hide. 2. Select the column that you want to delete by clicking the column's top gridline or border. 3. Right-click, and then click Delete Columns on the shortcut menu.
DELETE THE ENTIRE TABLE 1. In Print Layout View, rest the pointer on the table until the table move handle appears, and then click the table move handle. NOTE If you aren't sure whether you are in Print Layout view, click the Print Layout icon at the bottom of the window. 2. Press BACKSPACE. DELETE THE CONTENTS OF THE TABLE. You can delete the contents of a cell, a row, a column, or the whole table. When you delete the contents of a table, the table's rows and columns remain in your document. 1.
Add or remove headers, footers, and page numbers Add page numbers and headers and footers by using the gallery, or create a custom page number, header, or footer. For best results, decide first whether you want only a page number or whether you want information plus a page number in the header or footer. If you want a page number and no other information, add a page number. If you want a page number plus other information, or if you just want the other information, add a header or footer.
NOTE The Page Number gallery includes page X of Y pages formats, in which Y is the total number of pages in your document. ADD A CUSTOM PAGE NUMBER 1. Double-click in the header area or the footer area (near the top of the page or near the bottom of the page). This opens the Design tab under Header & Footer Tools. 2.
Add a custom page number that includes the total number of pages The gallery includes some page numbers that include the total page numbers (page X of Y pages). However, if you want to create a custom page number, do the following: 1. Double-click in the header area or the footer area (near the top of the page or near the bottom of the page). This opens the Design tab under Header & Footer Tools. 2.
7. On the Insert tab, in the Text group, click Quick Parts, and then click Field. 8. In the Field names list, click NumPages, and then click OK. 9. After the total number of pages, type a space, and then type pages. 10. To change the numbering format, click Page Number in the Header & Footer group, and then click Format Page Numbers. 11. To return to the body of your document, click Close Header and Footer on the Design tab (under Header & Footer Tools) .
2. Click the header or footer that you want to add to your document. 3. To return to the body of your document, click Close Header and Footer on the Design tab (under Header & Footer Tools) . ADD A CUSTOM HEADER OR FOOTER 1. Double-click in the header area or the footer area (near the top of the page or near the bottom of the page). This opens the Design tab under Header & Footer Tools. 2.
Examples of information that you can add by using fields include Page (for page number), NumPages (for the total number of pages in your document), and FileName (you can include the file path). 4. If you add a Page field, you can change the numbering format b y clicking Page Number in the Header & Footer group, and then clicking Format Page Numbers. 5. To return to the body of your document, click Close Header and Footer on the Design tab (under Header & Footer Tools) .
3. To start numbering with 1, click Page Number in the Header & Footer group, then click Format Page Numbers, and then click Start at and enter 1. 4. To return to the body of your document, click Close Header and Footer on the Design tab (under Header & Footer Tools) . START NUMBERING ON A DIFFERENT PAGE To start numbering on a different page, instead of on the first page of the document, you need to add a section break before the page where you want to begin numbering. 1.
3. Under Section Breaks, click Next Page. 4. Double-click in the header area or the footer area (near the top of the page or near the bottom of the page). This opens the Header & Footer Tools tab. 5. On the Header & Footer Tools, in the Navigation group, click Link to Previous to turn it off. 6. Follow the instructions for adding a page number or for adding a header and footer with a page number. 7.
ADD DIFFERENT HEADERS AND FOOTERS OR PAGE NUMBERS IN DIFFERENT PARTS 1. Click at the beginning of the page where you want to start, stop, or change the header, footer, or page numbering. You can press HOME to make sure that you're at the start of the page. 2. On the Page Layout tab, in the Page Setup group, click Breaks. 3. Under Section Breaks, click Next Page. 4. Double-click in the header area or the footer area (near the top of the page or near the bottom of the page).
ADD DIFFERENT HEADERS AND FOOTERS OR PAGE NUMBERS ON ODD AND EVEN PAGES 1. Double-click in the header area or the footer area (near the top of the page or near the bottom of the page). This opens the Header & Footer Tools tab. 2. On the Header & Footer Tools tab, in the Options group, select the Different Odd & Even Pages check box. 3. On one of the odd pages, add the header, footer, or page numbering that you want on odd pages. 4.
Create a table of contents You create a table of contents by applying heading styles — for example, Heading 1, Heading 2, and Heading 3 — to the text that you want to include in the table of contents. Microsoft Office Word searches for those headings and then inserts the table of contents into your document. When you create a table of contents this way, you can automatically update it if you make changes in your document. Microsoft Office Word 2007 provides a gallery of automatic table of contents styles.
If you don't see the style that you want, click the arrow to expand the Quick Style gallery. If the style that you want does not appear in the Quick Style gallery, press CTRL+SHIFT+S to open the Apply Styles task pane. Under Style Name, click the style that you want. Create a table of contents from the gallery After you mark the entries for your table of contents, you are ready to b uild it. 1. Click where you want to insert the table of contents, usually at the beginning of a document. 2.
To change the overall look of your table of contents, click a different format in the Formats list. You can see what your choice looks like in the Print Preview and Web Preview areas. To change the type of line that appears between the entry text and the page number, click an option in the Tab leader list. To change the way heading levels are displayed in the table of contents, click Modify. In the Style dialog box, click the level that you want to change, and then click Modify.
1. On the References tab, in the Table of Contents group, click Update Table. 2. Click Update page numbers only or Update entire table. Delete a table of contents 1. On the References tab, in the Table of Contents group, click Table of Contents. 2. Click Remove Table of Contents. Apply Themes to Word Documents You can quickly and easily give your document a professional look by applying a document theme.
2. Click the document theme that you want to use. NOTES If a document theme that you want to use is not listed, click Browse for Themes to find it on your computer or network. To automatically download new themes, click Enable Content Updates from Office.com. Create a cover page Microsoft Word offers a gallery of convenient predesigned cover pages. Choose a cover page and replace the sample text with your own.
To delete a cover page inserted with Word, click the Insert tab, click Cover pages in the Pages group, and then click Remove Current Cover Page. Save a document in Word You can use the Save and Save As commands to store your work, and you can adjust the settings that Microsoft Word uses to save your documents. For example, if the document is for your own use and you never expect to open it in an earlier version of Microsoft Word, you can use the Save command.
To save the document in a different location, click another folder in the Save in list in the Save As dialog box. If you want to change the default location where Word saves documents, adjust the settings for saving documents. TIP To make it easy to use one document as the basis for others, save the document where templates are stored. In the Save As dialog box, click Templates if your computer is running Windows Vista, or click Trusted Templates if your computer is running Windows XP, and then click Save.
NOTES Do not try to copy more files to the CD than it will hold. Check the CD packaging to see the capacity of each CD. For files that are too large to fit on a CD, you can copy files to a recordable DVD (DVD-R or DVD+R) or rewritable DVD (DVD-RW or DVD+RW). However, Windows XP does not support copying to a DVD, so you must use DVD authoring software. Make sure that you have enough disk space on your hard disk to store the temporary files that are created during the CD-writing process.
SAVE A DOCUMENT IN A NETWORK FOLDER 1. Click the File tab. 2. Click Save As. 3. Locate the network folder. If a network folder is mapped to your computer, in the list of locations, click Computer if your computer is running Windows Vista, or click My Computer if your computer is running Windows XP, and then click the name of the folder. NOTE You can easily access a network folder by mapping it to your computer.
NOTE FTP is a way of opening and saving files on Web servers. If you know the name and log-on credentials for a server, you can add the server to your FTP locations by clicking Add/Modify FTP Locations in the Save As dialog box. 4. Type a name for the document, and then click Save. Save a document so that it can be opened in an earlier version of Word If you save your document in the default .
Web pages Web pages are displayed in a Web browser. This format does not preserve the page layout of your document. As someone resizes the browser window, the layout of the document changes. You can save the document as a conventional Web page (HTML format) or as a single-file Web page (MHTML format). With HTML format, any supporting files (such as images) are stored in a separate folder that is associated with the document.
3. If you are publishing the document to a Web server, browse to the server name, and click it (do not double-click it). 4. In the File name box, type a name for the file. 5. In the Save as type box, click Web Page or Singe File Web Page. NOTE If you save the document as a Web page (HTML format) and later want to move it or send it as an e-mail message attachment, you must remember to include the folder that contains any supporting files.
NOTE These options control the default behavior the first time that you use the Open, Save, or Save As command when you start Word. Whenever you save a document, you can override these settings by specifying a different location or format in the Open, Save, or Save As dialog box. Save as PDF or XPS Sometimes you want to save files so that they cannot be modified, but you still want them to be easy to share and print.
exactly the format that you intended, and the data in the file cannot be easily changed. XPS embeds all fonts in the file so they appear as intended, regardless of whether the specified font is available on the recipient's computer, and has more precise image and color rendering on the recipient's computer than PDF. Save file as PDF or XPS EXCEL This information also applies to Microsoft Excel Starter 2010. 1. Click the File tab. 2. Click Save As. 3.
If you want the file to open in the selected format after saving, select the Open file after publishing check box. If the document requires high print quality, click Standard (publishing online and printing). If the file size is more important than print quality, click Minimum size (publishing online). 5. Click Options to set the page to be printed, to chose whether markup should be printed, and to select output options. Click OK when finished. 6. Click Save.
To change the PDF or XPS file: Open the original Office file in your Office program, make your changes, and then save the file in PDF or XPS format again. Use a third-party application, such as Adobe Acrobat for PDF, or visit Microsoft Office Marketplace to find other conversion products. After you purchase an third-party solution, follow the vendor's instructions about how to install and use it.
1. Click the File tab, and then click Print. TIP To go back to your presentation and make changes before you print it, click the File tab. 2. When the properties for your printer and presentation appear the way that you want them to, click Print. NOTE To change the properties for your printer, under the printer name, click Printer Properties.
3. Under Settings, click Print One Sided. If Print on Both Sides is available, your printer is set up for duplex printing. NOTES If you are printing to a combination copy machine and printer, and the copy machine supports twosided copying, it probably supports automatic duplex printing. If you have more than one printer installed, it is possible that one printer supports duplex printing and another printer does not.
When you print, Word will prompt you to turn over the stack to feed the pages into the printer again. PRINT ODD AND EVEN PAGES You can also use the following procedure to print on both sides: 1. Click the File tab. 2. Click Print. 3. Under Settings, click Print All Pages. Near the bottom of the gallery, click Only Print Odd Pages. 4. Click the Print button at the top of the gallery. 5. After the odd pages are printed, flip the stack of pages over, and then under Settings, click Print All Pages.
Illustrate your ideas Word 2010 brings many graphic enhancements to your work, so you can easily make the impact you want. New SmartArt graphic picture layouts In Word 2010, you can use the new SmartArt graphics picture layouts to tell your story with photographs or other images. Just insert your pictures in the SmartArt shapes of your picture layout diagram. Each shape also has a caption where you can add descriptive text.
New artistic effects With Word 2010, you can now apply sophisticated "artistic" effects to your picture to make the picture look more like a sketch, drawing, or painting. It's an easy way to enhance your images without using additional photo-editing programs. Some of the 20 new artistic effects include Pencil Sketch, Line Drawing, Watercolor Sponge, Mosaic Bubbles, Glass, Pastels Smooth, Plastic Wrap, Photocopy, and Paint Strokes.
Recover unsaved work It is now easier to recover a Word document if you close your file without saving, or if you want to review or return to an earlier version of the file you're already working in. As with earlier versions of Word, enabling AutoRecover will save versions while you are working in your file at the interval you select.