Surface 3 User Guide With Windows 8.1 Published: May 2015 Version 1.
© 2015 Microsoft. All rights reserved. BlueTrack Technology, ClearType, Excel, Hotmail, Internet Explorer, Microsoft, OneNote, Outlook, PowerPoint, OneDrive, Windows, Xbox, and Xbox Live are registered trademarks of Microsoft Corporation. Surface and Skype are trademarks of Microsoft Corporation. Bluetooth is a registered trademark of Bluetooth SIG, Inc. Dolby and the double-D symbol are registered trademarks of Dolby Laboratories. This document is provided “as-is.
Contents Meet Surface 3 ................................................................................................................................................................. 1 SURFACE 3 FEATURES ........................................................................................................................................................................................... 1 Set up your Surface 3 .............................................................................................
Connect accessories and devices .................................................................................................................................21 CONNECT A TV, MONITOR, OR PROJECTOR ..................................................................................................................................................... 21 CONNECT A USB ACCESSORY (PRINTER, MOUSE, AND MORE) ............................................................................................................
Accessibility ....................................................................................................................................................................41 EASE OF ACCESS ON THE SIGN-IN SCREEN ....................................................................................................................................................... 41 Care and cleaning .........................................................................................................................
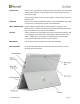
Meet Surface 3 Meet Surface 3, the tablet that can replace your laptop. Use this guide to get started with your Surface 3. For more Surface 3 details and how-to info, go online to Surface.com. Surface 3 features Power button Press the power button to turn Surface 3 on. When Surface 3 is on, press and hold the power button to shut down. You’ll also use the power button to put Surface to sleep, and to wake it when you’re ready to start working again.
Touchscreen Use the 10.8” ClearType full HD display, with its 3:2 aspect ratio and 1920 x 1280 resolution display, to watch HD movies, browse the web, and use your favorite apps. 10-point multi-touch lets you use your fingers to select, zoom, and move things around. Kickstand Flip out the 3-position kickstand to work or play comfortably at your desk, on the couch, or while giving a hands-free presentation. Wi-Fi and Bluetooth Surface supports standard Wi-Fi protocols (802.
Ports and connectors Software Surface 3 has the ports you expect in a full-feature laptop: Full-size USB 3.0 port Connect a USB accessory—like a mouse, printer, Ethernet adapter, USB drive, or smartphone. Micro USB charging port Charge Surface 3 using the Micro USB charging port and included Micro USB power supply. MicroSD card slot Use the microSD card slot and a microSD card (sold separately) for extra storage and transferring files. Mini DisplayPort version 1.
Set up your Surface 3 If you have a Surface 3 Type Cover, click it into place and open the kickstand. Plug the Micro USB connector into the Micro USB charging port with the power cord extending downward and the light on the connector facing toward you. Plug the full-size USB connector on the other end of the cord into the power supply, and plug the power supply into an electrical outlet. Press the power button to turn Surface 3 on. Windows starts, and guides you through the setup process.
The basics Power and charging To charge Surface 3: 1. Plug the Micro USB connector into the Micro USB charging port with the power cord extending downward and the light on the connector facing toward you. 2. Plug the full-size USB connector on the other end of the cord into the power supply. 3. Plug the power supply into an electrical outlet. . Allow 2-4 hours to charge Surface 3 fully from an empty state.
Make your battery last For info on how to conserve power and make your Surface battery last longer, see Surface Pro and Surface 3 battery and power on Surface.com. To learn about settings that control how your Surface uses power, see Power plans: Frequently asked questions on Windows.com. Touch, keyboard, pen, and mouse With Surface, you can easily switch between using touch, a keyboard, a mouse, or a pen. Touch. You can use your fingers on the touchscreen, the same as you would on a smartphone.
Connect to a wired network 1. Plug a USB to Ethernet adapter (sold separately) into the USB port on your Surface. 2. Plug an Ethernet cable into the adapter, and plug the other end of the cable into your router or an Ethernet network port. 3. Swipe in from the right edge of the screen, select Settings > wired network . 4. If prompted, enter your user name and password. 5. To see if you’re online, go to Start , and open Internet Explorer. Disconnect from a network 1.
First, though, think about whether any new account you create will be a local account that works only on this one Surface, or a Microsoft account (an email address and password that you use to sign in to Windows). A Microsoft account provides the best experience. Later, you can decide what level of control the account should have: Standard, Administrator, or Child.
If you’re not sure whether you have a Microsoft account, or you can't remember the email address you used with those services, you can easily sign up for a new, free email address. See Create a user account on Windows.com to learn how. Account types: Standard, Administrator, or Child The account type determines what you can do using that account. Choose one of these account types: Administrator.
To set an account type: 1. Sign in with an Administrator account. 2. Go to Start , and select PC settings account you want to change. > Accounts > Other accounts, and select the 3. Select Edit, and under Account type, choose the account type, and select OK. To delete an account: 1. Sign in with an Administrator account. 2. Go to Start , and select PC settings account you want to remove. > Accounts > Other accounts, and select the 3. Select Remove > Delete account and data.
Open an app Select a tile on Start to open the app. If you don’t see the app you want, select Search name of the app, and select it from the list. , enter the To see a full list of the apps on your Surface, swipe up on the Start screen to get to Apps view. (If you’re using a mouse, click the arrow near the lower-left corner of the screen.) For more info about apps, see Apps on your Surface.
Learn more about Windows To get up to speed with Windows 8.1, see Get to know Windows on Surface.com, and check out the Windows tutorial on Windows.com. To learn how to customize and personalize your Surface, sync and change your settings, and more, see Customization and settings.
Make sure you have the latest Surface updates To make sure you that you have all the latest Surface hardware updates successfully installed: 1. Go to Surface 3 update history on Surface.com and look in the table at the top of the page to see the latest available System Update. 2. Compare that to the last System Firmware or System Hardware update you see when you view your update history on your Surface 3. If you have trouble with updates, see Trouble installing Surface and Windows updates? on Surface.com.
Surface Pen features Top button. Click the top button to open OneNote. Double-click to capture a screenshot. Bluetooth technology links the top button of your Surface Pen to your Surface 3. Right-click button. This button acts like the right-click button on a mouse. Click it once in apps like OneNote to open a menu to choose pen color, thickness, and other options. You can also click and hold the button to select text. Eraser button.
Double-click the top button on Surface Pen to take a screenshot. Then, select what you want to capture in the screenshot by dragging the tip of the pen from one corner of your selection to the opposite corner. When you lift the pen tip, your selection appears in a new page in OneNote. You can use the Surface app to adjust your pen’s pressure sensitivity, or change which version of OneNote opens when you click the pen’s top button.
Use Surface Pen in other apps You can use your Surface Pen to draw and write or highlight text in Office apps. To learn more about using Surface Pen in Office apps (called inking), see Use a pen to draw, write, or highlight text on a Windows tablet on Office.com. You can use the Surface Pen in drawing apps, and many others—any app that supports inking. Even if your app doesn’t support inking, you can use your Surface Pen to enter text using the handwriting panel in the on-screen keyboard. Here’s how: 1.
Keys on the top row of the Surface 3 Type Cover make it easy to do common tasks. Key icon What it does Turns audio muting on or off Plays or pauses audio or video Decreases keyboard backlighting Increases keyboard backlighting Dims the screen Brightens the screen To lock and unlock the Fn keys: Press the Fn key (in the bottom row on the keyboard) to lock the Fn keys. Press Fn again to unlock them. A light on the Fn key lets you know you’ve locked the keys into function key mode.
Touchpad The touchpad on Surface 3 Type Cover has right-click and left-click buttons that work like a mouse. The left-click button area is larger, while the right-click button is smaller. The touchpad supports gestures like tap, double-tap, drag, scroll, and zoom. To learn how to use all the touchpad gestures and to see them demonstrated, see Get started with your Surface 3 on Surface.com.
Storage You have many storage options with Surface 3. In addition to the storage on the hard drive on Surface 3, you have external storage options like OneDrive (cloud storage), USB drives, and microSD cards. How much space do I have? The amount of storage space available on your hard drive depends on which size hard drive your Surface 3 has, what apps you’ve installed, and how much data you’re storing already.
Save files from any desktop app to a OneDrive folder by navigating to it when you save. When you open or save files from a Windows Store app, you can choose OneDrive or This PC as the location. Select the down arrow to choose your location. In the same way, you can open files from within an app. Get to your files from anywhere There are several ways to get to your OneDrive folders and files: Sign in to any PC with the Microsoft account you use on your Surface.
Use OneDrive to share files You can use OneDrive to share photos, Office docs, and other files with your friends or coworkers. They won’t need to install any special programs or sign up for a new account, and they can use any web browser to get to the files you share with them. 1. Go to Start , open OneDrive, and select the files or folders you want to share. (Swipe down on a file or folder to select it. Or if you’re using a mouse, right-click it.) 2.
HDTV. If your TV has an HDMI port, you’ll need an HDMI cable and a Mini DisplayPort to HD AV adapter or an HDMI to Mini DisplayPort cable. (Both are sold separately.) Projector or monitor. If your monitor has a DisplayPort, you can connect it to Surface using a Mini DisplayPort to DisplayPort cable (sold separately). If your monitor doesn’t have a DisplayPort or HDMI port, use a VGA cable and the Mini DisplayPort to VGA Adapter. A VGA adapter or cable is for video only.
Connect a USB accessory (printer, mouse, and more) Surface 3 has a full-size USB 3.0 port that you can use to connect a USB accessory such as a printer, camera, music player, smartphone, mouse, or external hard drive. The first time you plug in a USB accessory, Windows tries to install any software the accessory requires. For more info, see Connect a USB mouse, printer, and more on Surface.com. Full-size USB 3.
Print or scan To learn how to connect a USB printer or scanner, see Connect a USB accessory (printer, mouse, and more). For info on connecting a Bluetooth printer or scanner, see Add a Bluetooth accessory. To see if your printer is installed: 1. Go to Start , and select PC settings > PC and devices > Devices. 2. Look for your printer in the list of devices. If your printer is in the list, you’re ready to print something.
Record audio Two apps for recording sound are preinstalled on Surface 3: Sound Recorder app for Windows Sound Recorder desktop app To open either app: 1. Go to Start , select Search , and enter sound recorder. 2. In the search results, select the sound recording app you want to use. For info about the Sound Recorder app for Windows, see Sound Recorder app for Windows: FAQ. To learn more about the Sound Recorder desktop app, see Recording audio in Sound Recorder: FAQ. Both are on Windows.com.
Cameras and the Camera app Surface has two integrated cameras that you can use to take pictures, record videos, and make video calls. The built-in Camera app can help you get even more out of your cameras. Take a photo 1. Go to Start , and open the Camera app. You can tap the screen to focus on a spot. 2. Tap the on-screen Camera button to take a photo. 3. To exit, press the Windows button on your Surface. Take a panorama 1. Go to Start , open the Camera app, and select Panorama. 2.
Take a photo or video from the lock screen The perfect shot might not wait for you to unlock your Surface, but you can set up Surface to let you take photos and videos from the lock screen. Here’s how to set up and use this feature. To turn the lock-screen camera feature on: 1. Go to Start , and select PC settings > PC and devices > Lock screen. 2. Scroll to the bottom of the screen, and under Camera, select On. To take a photo or video from the lock screen: 1.
Apps on your Surface Apps to help you stay connected, entertained, informed, and productive come pre-installed and ready to use on your Surface 3. Find more apps quickly and easily in the Windows Store, or install your favorite desktop apps. Find and open an app Tap a tile on the Start screen to open the app. If you don’t see the app that you want, select Search , enter the name of the app, and select it from the list.
Close an app Close a Windows Store app Apps that you install from the Windows Store don’t slow down your Surface when you’re using them. If you want to close one of these apps, here’s how: Use touch. Swipe in from the left edge of the screen, and push back toward the left edge. Press and hold the app you want to close, and then slide your finger all the way down the screen and hold it there until the app flips over. Use a mouse or touchpad.
Built-in apps Internet Explorer 11 Surface comes with two versions of Internet Explorer—a touch-friendly version with oversized tabs and tiles for easy tapping, and a version for the desktop. Browse with touch-friendly Internet Explorer 1. Go to Start , and open Internet Explorer. 2. Swipe up from the bottom of the screen to open the address bar. 3. Tiles for your favorite sites and open tabs appear above the address bar (scroll to see all the tiles). 4.
Mail The Mail app organizes your inbox and offers quick views of your favorite people, flagged messages, folders, newsletters, and social updates. Here are some tips to get you started. For more info, see Set up and use Mail on Surface.com and the Mail app tutorial on Windows.com. If you’ve signed in to Surface with a Microsoft account, your mail account is already set up. You can then add other accounts, from Outlook, Gmail, AOL, Yahoo!, and even your work email (Exchange ActiveSync).
To learn how to add individual contacts, pin contacts to Start, use the People app to post updates, and more, see People app on Surface.com and People app help on Windows.com. Calendar The Calendar app brings all your calendars together in one place. Reminders and notifications help you remember what’s happening, so you never miss a thing. To add a calendar: 1. Go to Start , and open the Calendar app. 2.
Add contacts 1. In Skype, swipe up from the bottom of the screen, select Add contact, and search for people by name, Skype name, or email address. If you can't find the person, select Search directory. 2. Select the person you want to add, select Add to contacts, and follow the on-screen instructions. Start a call or chat Open Skype and select a contact name. Then do one of the following: Select Call to make a voice call. Select Video Enter a message in the chat window.
Music Xbox Music lets you access your music collection, stream music, or buy music from the Xbox store. Here are some tips to get you started. Xbox Music can play any music in your music library. The library can include files in any folder on your Surface, or even an external hard drive or removable media such as a USB drive or microSD card, but it’s best to copy the music to your Surface. Here’s how to add music to the library: 1. Go to Start Explorer.
More installed apps Lots more apps are available on your Surface 3. Here are a few: News Keep up to date with what’s happening in the world using this photo-rich app. For more info, see News app on Windows.com. Alarms Manage and keep track of time by using alarms, timers, or a stopwatch. For more info, see Alarms app on Windows.com. Maps See your current location, zoom in for more detail, zoom out for a bigger picture, and get directions. See Maps app on Windows.com for more info.
Install more apps You can also install apps on Surface 3 from the Windows Store, websites, CDs, or DVDs. Get apps from the Windows Store To find apps to install from the Windows Store, connect to the Internet and sign in using a Microsoft account. Your Microsoft account keeps track of the apps you install, your preferences, and your payment methods. Here’s how to find and install apps from the Windows Store: 1. Go to Start , and open the Windows Store. 2. Look for apps.
Install apps that you installed on other PCs 1. Go to Start , and open the Windows Store. 2. Select Account > My account > My apps. 3. Under Apps not installed on this PC, swipe down on (or right-click) the apps you want to install on Surface. 4. Select Install to install the selected apps. Buy apps for kids If your children use their own account to sign in to Surface, they probably don’t have a payment method attached to their account to buy apps.
Customization and settings Depending on the settings you want to make, you’ll use one of these options: PC settings. Go to Start , select PC settings Control Panel. Go to Start type. Settings. Swipe in from the right side of the screen, and select Settings > Change PC settings, and choose a setting type. Search. Go to Start from the list. Surface app. Open this app to adjust settings for the Surface Pen (sold separately), to disable the Windows button on your Surface, and more.
Rearrange tiles Press and hold (or right-click) any tile to open app commands (a menu of options at the bottom of the Start screen). With the commands in the menu, you can: Select one or more tiles and apply an action like Resize or Unpin from start to all of them. Drag tiles to new positions. Swipe up to see all your apps in Apps view. Press and hold (or-right click) a tile to open app commands, and choose an action like Pin to Start.
Add a language You can set up Surface to use more than one language, and switch between languages. Here’s how: 1. Go to Start , and select PC settings > Add a language. > Time and language > Region and language 2. Select a language from the list to add it to your Languages list. 3. To make the new language your primary language, under Languages select the language you want to make your primary language, and select Set as primary. You can do this now or later.
Accessibility Ease of Access features let you use your Surface the way you want. To set ease of access features: 1. Go to Start , and select PC settings > Ease of Access. 2. Choose among the settings you can make from the panel on the left: Narrator reads the text on your screen aloud. For more info, see Hear text read aloud with Narrator on Windows.com. Magnifier enlarges your screen or parts of it to make words and images easier to see.
Care and cleaning Protect your Surface from viruses Windows Defender and Windows SmartScreen are built into Windows 8.1 to help guard against viruses, spyware, and other malicious software in real time. For more info, see Security checklist for Windows and How can I help protect my PC from viruses? on Windows.com. To scan Surface manually, use Windows Defender. See How do I find and remove a virus? on Windows.com for how-to info.
Registration, repair, and warranty Register your Surface 3 and Surface 3 Type Cover If you haven’t already registered your Surface products, do so at microsoft.com/surface/support/register. You’ll need your Microsoft account (the email address and password that you use to sign in to your Surface and to download apps from the Windows Store), and the serial number of your Surface 3 or Surface 3 Type Cover.