
User Guide


© 2013 Microsoft Page 68
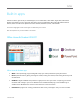
Networking
Surface has built-in Wi-Fi that you can use to get online. Once you connect to a wireless network, you can
browse the Internet, get apps from the Windows Store, send email, and access other computers and devices
on your network.
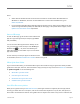
Connect to a wireless network
Use the following steps to connect to a wireless network:
1. Swipe in from the right-edge of the screen, tap Settings, and then tap or click the wireless network
icon ( ). A list of available wireless networks appears.
2. Tap or click a network to connect to it.
3. If you want Surface to automatically connect to the network when it’s available, tap or click Connect
automatically.
4. Tap or click Connect.
5. If prompted, type your network security key (network password), and then tap or click Next. If you
need help finding your wireless network password, see the topic How to find your wireless network
password on Surface.com.
6. Choose whether or not you want to share with other computers and devices on the network. Choose
No if you’re connecting to a network in a public place like a café.
If you have problems connecting to a wireless network, see Can’t connect to a wireless network on Surface.com.
Tip
If a wireless network isn’t available, you might be able to use your phone’s Internet connection. For info
about this, see the Tethering section in this guide.
Disconnect from a wireless network
Follow these steps to disconnect from a wireless network:
1. Open the Settings charm, then tap or click the wireless network icon ( ). If you’re already connected to a
network, the network name appears below the wireless bars.
2. Tap or click the network with a Connected status.