
Specifications


Microsoft System Center Virtual Machine Manager 2008 R2 Reviewer’s Guide 17
Installation
This section provides step-by-step instructions for installing VMM components, including:
VMM server
VMM Administrator Console
VMM Self-Service Portal
VMM agent
For detailed installation help, reference the Setup Help file included with the VMM download or product
DVD.
Important
Before installing VMM components, see the System Requirements section to make sure you have all
prerequisite software and hardware installed.
Installing the VMM Server
1. Sign on using a domain administrative account with local privileges.
2. From the product DVD or network share, double-click setup.exe.
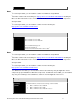
3. In the Setup menu, click VMM Server.
4. On the License Terms, page click I accept the terms of this agreement.
5. On the Customer Experience Improvement Page (CEIP) page, click Yes to participate or No
to opt out of the CEIP.
6. On the Product Registration page, enter your name and the name of your company.
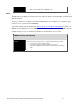
7. On the Prerequisites Check page, review any alerts or warnings about inadequate hardware or
uninstalled software prerequisites. You can continue if you receive warnings, but alerts must be
resolved before you can proceed with the installation.
8. On the Installation Location page, select the appropriate path for your System Center
VMM2008 program files location.
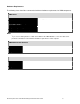
9. On the SQL Server Settings page, select Install SQL Server 2005 Express Edition SP3 or
Use a supported version of SQL Server. If you choose an existing SQL Server system, you
must enter the corresponding authentication information for it.
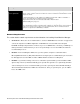
10. On the Library Share Settings page, select the option to either create a new library share or
use an existing library share. If you select to use an existing share then you must supply the
share name.