
User Guide
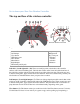
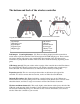

The bottom and back of the wireless controller
Original Xbox One Wireless Controller
Xbox One Wireless Controller
2 Left bumper
4 USB charge port
7 Right bumper
9 Expansion port
11 Right trigger
12 IR window
13 Wireless
enrollment button
14 Left trigger
15 Battery cover
16 3.5-mm port
Left bumper (2) and right bumper (7): These are oblong-shaped pressable controls that
reside on the top of the controller to the left and right of the USB charging port. These controls
are used to interact with games, apps, and the Xbox One interface. They are often used as
accelerators to jump between sections of the UI but have varied functionality depending on the
game.
USB charge port (4): This port resides on the top edge of the controller above the Xbox button.
It's a recessed mini USB port, which connects your wireless controller to the console using a
mini USB cable. For more information, see About the Xbox One Play & Charge Kit.
Expansion port (9): This is a recessed port that resides on the bottom-side edge of the
controller. It's used to connect other accessories, such as an Xbox One Chat Headset.
Infrared (IR) window (12): Hidden behind the “smoked” plastic next to the USB port are
infrared LEDs used for auto-pairing users to the controller via the Kinect sensor. To learn more
about this feature, see How to assign an account to an Xbox One Wireless Controller.
Wireless enrollment button (13): This small, slightly raised button resides just to the left of the
USB port on the top edge of the controller. Used to wirelessly connect the controller to a console
and to enroll in Bluetooth pairing on a Windows 10 PC. For more information, see Connect a
wireless Xbox One controller to your console.