
User`s manual


8
C. How to Use Multiple Frames
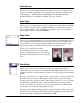
1. Place the single-sheet color print to be scanned on either the scanner glass
surface, or from the ADF’s document feed tray.
2. Launch ScanWizard DI (either as a stand-alone by clicking on the program icon,
or by using the File-Import or Scan command from an application program.
3. Specify your scanning requirements in the ScanWizard DI control panel once
ScanWizard DI is launched.
a) Select your image output device (e.g., Flatbed)
in the Scan Source.
- Select Flatbed to scan the image from the
scanner’s glass surface.
- Select ADF (Simplex) to scan the image from the ADF’s document feed
tray.
b) Select RGB Color (24 bits) in the Scan Type as
your image output type.
c) Select a dimension in the Paper Size as your preview image size.
d) Select a desired resolution in the Resolution for your image output resolution.
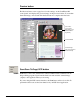
4. Click the Preview button to perform a preliminary view of the entire image. When
done, a preview image appears in the preview window.
5. Click the Select Frame tool button to adjust the size of the scan frame (enclosed
within the dotted lines and labeled with the tag “Main”). Drag on the edge or
corner to determine the final size of the actual scan.
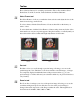
6. Select Photo in the Attribute as your image type for
the main frame.
7. If necessary, adjust image quality using the image
correction tools.
8. Specify the first subframe.
a) Click the Create Subframe tool button. Move the mouse pointer to the text
area, then drag to create a rectangle and enclose the text area.
b) Select Text in the Attribute as your image type
for the selected frame.
c) If necessary, adjust image quality using the
image correction tools.
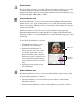
9. Specify the Second subframe.
a) Click the Create Subframe tool button. Move the mouse pointer to the
drawing picture area, then drag to create a rectangle and enclose the picture
area.