
User`s guide


IntroductionIntroduction
IntroductionIntroduction
Introduction
The Unsharp masking filter is used to adjust the contrast of
edge detail, creating the illusion of more image sharpness.
This filter can be useful for refocusing an image that has
become blurry from interpolation or scanning, and it is an
essential tool for doing CMYK color separation. In general,
Unsharp masking is needed to render sharp color
reproductions, especially when you wish to make a large
color reproduction from a small original.
How to use the Unsharp
Masking filter
The Unsharp Masking filter is available only when the
Advanced Control Panel is activated. Choose
UnsharpUnsharp
UnsharpUnsharp
Unsharp
Masking Masking
Masking Masking
Masking filter from the Filter tool in the Settings window.
Advanced Control Panel
1)1)
1)1)
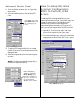
1) From the settings window, click the
Filter Filter
Filter Filter
Filter tool button,
then choose
Unsharp MaskingUnsharp Masking
Unsharp MaskingUnsharp Masking
Unsharp Masking from the list of options.
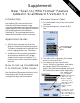
Supplement
New “Unsharp Masking filter” Feature
Added in ScanWizard 5 Version 5.1
2)2)
2)2)
2) The
Unsharp MaskingUnsharp Masking
Unsharp MaskingUnsharp Masking
Unsharp Masking dialog box appears.
3)3)
3)3)
3) Enter a value in the
Strength Strength
Strength Strength
Strength box to specify the degree
of the filter’s effect. The higher the value, the stronger
the effect of the filter.
4)4)
4)4)
4) Select a mask size in the
Mask SizeMask Size
Mask SizeMask Size
Mask Size box. This param-
eter determines the depth of pixels that will be affected
at the edge. Available selections are 3x3, 5x5, and 7x7.
For small, low-resolution image files,
3x33x3
3x33x3
3x3 is sufficient.
For high-resolution, or large-scale image files, use
7x77x7
7x77x7
7x7.
5)5)
5)5)
5) Enter a value in the
ThresholdThreshold
ThresholdThreshold
Threshold box. This option allows
you to specify a tolerance range to prevent overall
sharpening that might generate noise or cause other
unexpected results. The Threshold defines the required
image of contrast between adjacent pixels before
sharpening is applied to an edge. A lower value
produces a clearer effect.
6) 6)
6) 6)
6) The
Light Light
Light Light
Light and
DarkDark
DarkDark
Dark option control the sharpness
effect to be applied to the light and dark edges of the
images, respectively. In general, doing too much
Unsharp Masking on light edges would make images
seem unnatural, as the human eye is sensitive enough
to perceive them resulting changes in bright areas of
the image beyond a certain threshold. If both values
are 0, Unsharp Masking effect is disabled.
7)7)
7)7)
7) Click
OK OK
OK OK
OK to apply the settings.
Original
Unsharp Mask
3 x 3
Unsharp Mask
5 x 5
Windows
33
33
3
55
55
5
77
77
7
66
66
6
44
44
4