Contents 4 8 9 10 10 10 11 11 12 12 13 14 15 15 15 16 16 16 16 17 17 18 18 19 20 20 20 20 20 20 20 Important Safety Information Package Contents SHOWWX+™ Laser Pico Projector Introduction Getting Started Install Battery Charge Battery Power ON or OFF Connect to a Video Source How To Connect To An iPod, iPhone, or iPad Connecting To Other Composite (TV-Out) VideoSources Usage Guidelines Advanced Controls Menu Controls Onscreen Menu How To Adjust Brightness How To Change Color Mode How To Adjust Aspect Rat
Important Safety Information PLEASE READ, UNDERSTAND AND FOLLOW ALL SAFETY INFORMATION IN THIS USER GUIDE BEFORE YOU USE THIS PROJECTOR. FAILURE TO PROPERLY SET UP, USE, AND CARE FOR THIS PROJECTOR CAN INCREASE THE RISK OF INJURY, OR DAMAGE TO THE PROJECTOR. KEEP THIS USER GUIDE FOR FUTURE REFERENCE.
To avoid risks associated with fire and explosion: » » » » » » » » » Do not immerse the projector or battery in any liquid or allow either to get wet. Use only AC adapter and battery provided by MicroVision. Do not disassemble the battery or modify it in any way. Do not attempt to short out the battery. Do not expose the battery to temperatures under -20°C or above 60°C. Do not crush the battery. Do not overcharge or rapidly discharge the battery. Do not dispose of the battery by incineration or fire.
Safety Labels The SHOWWX+™ Laser Pico Projector is a CLASS 2 LASER PRODUCT as defined in IEC 60825-1, 2007-03. MicroVision has designed the SHOWWX+ to be safe for general use as a mobile projector. IEC and CDRH Statements of Compliance The SHOWWX+ complies with IEC 60825-1, 2007-03. The device also complies with 21 CFR 1040.10 and 1040.11 except for deviations pursuant to Laser Notice No. 50 dated June 24, 2007. The following safety labels are affixed at the factory.
FCC Declaration of Conformity This device complies with Part 15 of the FCC Rules. Operation is subject to the following two conditions: (1) this device may not cause harmful interference (2) this device must accept any interference received including interference that may cause undesired operations. This applies to all product options.
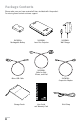
Package Contents Please make sure you have received all items included with the product. For missing items contact customer support.
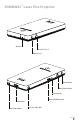
SHOWWX+™ Laser Pico Projector Window Down/Hot Key 2 Up/Hot Key 1 Power Button Menu/Select Button LED Indicators Micro-USB/Power Input Video Input Wrist Strap Holder 3.
Introduction Thank you for purchasing the MicroVision SHOWWX+™ laser pico projector. The SHOWWX+ projects big, bright, and colorful images that are always in focus, yet is small enough to fit in your pocket. Connect the SHOWWX+ to a video output-capable device to spontaneously share photos and videos, presentations and more, in a big screen experience. What is the PicoP® Display Engine? The PicoP display engine is the world’s first ultra miniature laser-based projector engine.
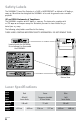
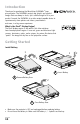
Charge Battery 1 Plug Wall Charger Into Outlet 3 2 Connect To Micro-USB/Power Input Orange LED: Battery charging Green LED: Battery fully charged Note: » Allow for a minimum of 4 hours charging before first time use. » The wall charger will not charge the battery while the SHOWWX+ is powered ON. » The supplied battery is designed specifically for the SHOWWX+ and no other battery should be used. Power ON or OFF Note: Do not have the SHOWWX+ connected to any video device before turning ON.
Connect to a Video Source The SHOWWX+™ can connect to a variety of devices with TV-out such as an iPod, iPhone, iPad, a laptop, cell phone, camera, and more. The following describes the connectivity options available with the SHOWWX+. Cable Connect SHOWWX+ to...
Connecting to Other Composite (TV-out) Video Sources The SHOWWX+ can connect to other video sources that have Composite (TV/Video-Out) using the included Composite adapter. To display content, make sure the source device has TV/Video-Out set to “ON” or “Enabled”. To learn if your video source device is capable of TV/Video-Out and how to enable, refer to its User Guide.
Usage Guidelines There are two main factors to consider when using the SHOWWX+. Ambient light » It is recommended to shut blinds, close curtains and turn lights down to make the room dark so the projected image looks the best. Distance from screen » The projector distance from the screen will impact the appearance of the image brightness. The closer to the screen the brighter the image will appear.
Advanced Controls Menu Controls The SHOWWX+ was designed as a plug-and-play device, however, some users may want to make adjustments to the settings such as change colors, adjust aspect ratio, and adjust brightness. The following information will help you understand how to fully operate the SHOWWX+. Hot Keys The SHOWWX+ includes two hot keys to allow the user to quickly adjust the image depending on the type of content being shown.
How To Adjust Brightness The image brightness can be reduced for close distance viewing in darker environments. 1 button to bring up the on screen menu. Press the 2 Use the 3 Select the desired setting and press or buttons to navigate to BRIGHTNESS and press . to accept. How To Change Color Mode The SHOWWX+ has 3 default color modes. Brilliant Colors: Bright and vivid colors. Standard Colors: More accurate flesh tones and grey scales. Inverted Colors: All colors are inverted.
How To Adjust The Color Alignment Users can adjust horizontal or vertical alignment of each individual color (red, green, and blue). 1 Press the 2 Use the or buttons to navigate to SYSTEM and press 3 Use the or buttons to navigate to COLOR ALIGNMENT and press 4 An image of a vertical and horizontal crossed in the middle will appear in the center of the screen. 5 or buttons to select the desired color (Red Adjust, Green Adjust, Use the .
How to Check Remaining Battery Life Follow these instructions to view how much battery life is remaining. 1 button to bring up the on screen menu. Press the 2 Use the or buttons to navigate to SYSTEM and press 3 Use the or buttons to navigate to PROPERTIES and press 4 Use the or buttons to navigate to BATTERY INFORMATION and press . . . How to Adjust The Green and Magenta Color The image may appear to have green shadows or a magenta color when it should be white.
Troubleshooting Problem Cause Solution The projector does not turn on. Battery not inserted correctly. Make sure the battery is correctly inserted. Battery not charged. Make sure the battery is fully charged. The projector colors look incorrect. Different Color Mode may be selected. Change to preferred Color Mode. The projector randomly turns off but the Blue LED stays on. The projector may be out of the recommended operating range.
LED Status & Meaning LED Status Meaning Solid Blue SHOWWX+ is powered on Blinking Blue SHOWWX+ is powering up Solid Orange Battery is charging Solid Green Battery is fully charged Blinking Orange Battery is low Blinking Red Temporary problem Solid Red System failure Customer Support For Technical Questions, service and support please visit us online at http://www.MicroVision.com/showwx/support/ Please have your Serial Number and purchase information available.
MicroVision Limited Warranty MicroVision warrants that the following Products will be free of defects in material and workmanship under normal use for the period stated below beginning on the date of purchase by the original purchaser (“Warranty Period”): Product and Warranty Period SHOWWX+ Laser Pico Projector One (1) year SHOWWX+ Accessories (including battery, AC adapter, cables) Ninety (90) days If a valid warranty claim is received by MicroVision or its authorized service representative during the Warr
6222 185th Avenue NE Redmond, WA 98052 USA www.microvision.com DA0129234-001 Rev.