
User Manual


Use a 9-pin RS-232 null-modem cable to connect the communication path between the RCU
and the HDX-1100.
A receptacle at the rear of the controller supplies DC power to the RCU. Vislink provides the
2-pin Weidmuller connector (Part # 52104-2) to connect to the power receptacle at the rear of
the controller. The required power range is from +10—+50 Vdc (negative ground only).
If the RCU displays a C in the preset window, the HDX-1100 has lost power or a communication
error has occurred. If this happens, check the power and serial cable connections.
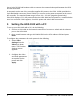
5 Setting the HDX-1100 with a PC
To set up your HDX-1100 with a PC, do the following:
1. Connect a LAN cable to the network connection of a router or switch and the ethernet
port on the HDX-1100.
2. Open a web browser and type 192.168.4.150 into the URL address field and press
Enter.
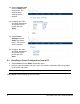
To configure the parameters for each preset do the following:
1. Select Video
Settings from the
Video drop down
menu. The Encoder
Settings screen
appears.
2. Configure the video
and audio parameters
as required for the
preset and click
Apply.
5 HDX-1100 User and Technical Manual