
Operation Manual


15
DL371 Audio System Engine
Operator Manual
Chapter 4: Getting Started
This chapter shows you how to connect up and switch on the DL371 Audio System
Engine unit.
Connecting up
Refer to Figure 2 “Standard system configuration” on page 50.
Connect up the your DL371 Audio System Engine unit as follows:
• Snake — connect the two fibre optic/copper snakes to the required X and Y sockets
on the rear panel of the DL371 Audio System Engine unit and then to the rear of the
PRO6 Control Centre. See “Connector panel” on page 12.
• AES50 — connect the four AES50 audio sockets (1 to 4) on the rear panel of the
DL371 Audio System Engine unit to the corresponding AES50 audio sockets on the
rear panel of the DL351 Modular I/O unit. See “Router panel” on page 13.
• Synchronisation (optional) — connect the word clock or AES3 sync connectors
to the required clock source.
• Mains power supply — connect the mains cables. See “Powering the unit” on
page 15.
Powering the unit
This section shows you how apply power to the unit, and also how to completely isolate
the unit electrically.
Caution:
You must ensure that a minimum of two power supply modules are
powering the unit for correct operation (see “Switching the PRO6
Control Centre on/off” on page 52).
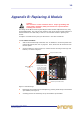
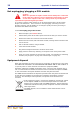
>> To apply power to the unit
Observing the Caution above, carry out the following to power up the unit.
1 Insert the mains plugs of
the mains leads into
mains power outlets
(see “Power” on
page xi).
2 Making sure the power
supply is off at the mains
power outlets, plug their
IEC connectors into the
mains input sockets in
the rear panel of the
DL371 Audio System
Engine unit.
3 Switch on the mains
power outlets.
Mains
plug
Mains
outlet
1
2
Rear panel of DL371 Audio
System Engine