
User Manual


19 M32 DIGITAL CONSOLE User Manual
The ASSIGN screen contains the following separate tabs:
home: This screen provides a general overview of the 12 assigned controls
for all three control sets at the same time.
set A: This screen allows assignment of dierent console parameters to the
12 custom controls for Set A.
set B: Works as described above, but for custom controls Set B
set C: Works as described above, but for custom controls Set C
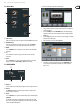
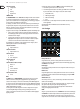
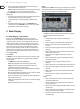
HOME
The ASSIGN screen’s home tab provides a visual overview of the 12 assigned
controls for all three sets at the same time.
The home tab oers visual feedback of the controls that have been assigned
to all three sets of custom controls, without having to bank between the three
sets one-by-one, or relying on abbreviated syntax shown in the custom control’s
dedicated LCD displays.
To adjust the various settings on the home tab, perform the following steps:
1. Turn any of the push encoders 1-5 to move screen focus to dierent custom-
assignable rotary controls and buttons in the A, B and C sets. The controls
currently selected with each of the four rotary controls are highlighted with
an orange outline.
2. Tap any of the push encoders 1-5 to switch to the edit screen for the specic
custom control that was highlighted on the home tab screen.
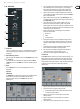
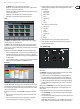
SET A, B & C
The set A, B & C tabs allow mapping of specic console parameters to the eight
assignable buttons and four assignable rotary controls. Using these screens the
user can map the exact parameters that are most useful to them to the desired
controls, in the desired order.
To adjust the various settings on the set A, B & C tabs, perform the following
steps:
1. Adjust the rst push encoder to select the colour used for the LCD screens
within that set.
2. Adjust the second push encoder to select to which of the 12 assignable
controls in the appropriate set you wish to map a parameter.
3. Adjust the third push encoder to scroll through a list of parameter categories
to which the selected assignable control can be mapped. Choices for the
buttons include:
• Not Assigned
• Jump to Page
• Mute Channel
• Inserts
• Eect Button
• MIDI
• Remote.
Choices for the rotary controls include:
• Not Assigned
• Panorama
• Sends
• Dynamics
• FX Parameters
• MIDI
• Remote.
4. Tap the third push encoder to select the desired type of parameter.
5. Where applicable, tap/select the fourth, fth and sixth push encoders to
assign the specic parameter.
1.15 Mute Groups
Use these buttons to select and activate or deactivate one of the user-dened
Mute Groups.
The MUTE GRP screen allows for quick assignment and control of the console’s
six mute groups, and oers two separate functions:
1. It disables the buttons in the MUTE GROUPS section during the process
of assigning channels to mute groups. This ensures that no channels are
accidentally muted during the assignment process in a live performance.
2. It oers an alternative interface for muting or unmuting the mute groups
while the dedicated mute group buttons on the console’s control surface
areblocked.
When activated, the MUTE GRP screen only covers the bottom portion of the
Main Display, allowing the middle portion to continue displaying the usual
screencontent.
To assign channels to one of the six mute groups, perform the following steps:
1. Press the MUTE GRP screen selection button to switch the main display to
the Mute Groups view.
2. Press and hold the desired mute group button on the lower right-hand side
of the console’s control surface.
3. While holding the mute group button, press the SEL button of any input or
output channel, on any layer, that you wish to assign to that mute group.