
Operation Manual


28 Chapter 3: Using The VeniceF With FireWire
VeniceF
Operator Manual
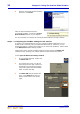
Step B — Connecting the VeniceF to your Mac
Important:
The VeniceF must be switched off before the FireWire cable is connected to it.
>> To connect the Mac to the console
Do not attempt the following procedure until you have completed Step A
(see “Step A — Installing the device driver on your Mac” on page 25).
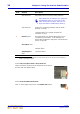
1 Switch off the VeniceF.
2 Connect the VeniceF to the Mac using the appropriate FireWire cable (see
Figure 3 “Some typical FireWire connectors” on page 20), while observing the
following precautions
Make sure you use the correct FireWire cable connector with your Mac.
When plugging the FireWire connector into your Mac, make sure the
connector is the correct way up and take great care not to exert too much
force.
Step C — Configuring the FireWire settings for the VeniceF
In general, you should be able to use your recording software application quite
successfully using the default FireWire settings. However, you can change the settings
if you want (for example, if you have audio problems) in the Midas FW FireWire
settings window. For details of how to configure the VeniceF’s FireWire settings, see
“Step C — Configuring the FireWire settings for the VeniceF” on page 22.
Updating the FireWire driver
The latest version of the FireWire driver for the VeniceF will be available on the Midas
website (address is on the front cover of this manual).
>> To update your PC/Mac with the latest driver
1 Download the latest VeniceF FireWire driver from the Midas website onto your
PC/Mac. There should be two drivers available — one each for a PC and Mac — so
make sure you download the correct one.
2 Install the latest VeniceF FireWire driver (see “Installing FireWire on a PC” on
page 17 or “Installing FireWire on a Mac” on page 25). You don’t have to
uninstall the existing VeniceF FireWire driver, as this it will be overwritten by the
new one.