
Microwave Oven User Manual


123
ENGLISH
5
VII. GAS LEAK TEST
1. Restore the electrical and gas utility connections to the
oven.
2. Paint all gas pipe connections from the union to the
venturi mounting plate, as well as the pilot tubing,
bypass tubing, and pressure tap plug, with a rich
solution of soap and water (2/3 soap, 1/3 water is
recommended). Any visible bubbles indicate a gas
leak.
3. If a gas leak is detected, tighten the affected joints and
connections. If tightening the connection(s) fails to stop
the leak:
Turn off the electric power supply to the oven.
Turn off the gas supply at the service valve behind
the oven.
Replace the affected component(s).
Repeat the gas leak test.
WARNING - FIRE/EXPLOSION HAZARD
HIDDEN GAS LEAKS CAN CAUSE A FLASHBACK
IN THE MACHINERY COMPARTMENT. THIS
CAN CAUSE SEVERE INJURY OR DEATH.
STAND WELL CLEAR WHEN SWITCHING ON
THE HEATING CIRCUIT.
4. If no leaks are detected by the test, depress the safety
switch(es) and switch on the oven. Then, switch on the
heating circuit to ignite the burner.
5. With the burner in operation, paint all gas pipe joints with
the solution of soap and water.
6. If any further gas leaks are detected, shut down the
oven. Reseal and tighten the affected joints and
connections. If tightening the connection(s) fails to stop
the leak:
Turn off the electric power supply to the oven.
Turn off the gas supply at the service valve behind
the oven.
Replace the affected component(s).
Repeat the gas leak test.
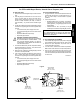
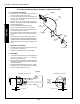
VIII. INLET PRESSURE CHECK
1. Using a manometer, check the inlet pressure at the inlet
pressure tap. See Figure 6. An inlet pressure of 11-14
W.C. (27.4-34.9mbar) is recommended for propane
operation.
2. If the inlet pressure is:
HIGHER THAN 14 W.C. (34.9mbar) - This pressure
may damage the combination gas control valve
(safety regulator). The gas supply pressure should
be decreased.
LOWER THAN 11 W.C. (27.4mbar) - It may be
necessary to increase the supplied gas pressure.
CAUTION
IF IT IS NECESSARY TO ADJUST THE GAS LINE
PRESSURE, HAVE THE CUSTOMER CONTACT THE
GAS UTILITY SUPPLIER.
Figure 6
Measure pilot
pressure here
(under cap plug)
Adjust pilot
pressure here
(under cap screw)
Measure inlet
pressure here
Measure
manifold
pressure here
Adjust manifold
pressure here
(under cap screw)
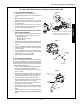
IX. PILOT PRESSURE ADJUSTMENT
1. Unscrew the cap plug from the pilot pressure tap (pilot
tee), and attach a manometer to the tap. See Figure 6.
2. Remove the pilot adjustment cap screw from the
combination gas control valve.
3. Turn the oven on, and allow it to heat to temperature.
Make a note of the customers set point temperature.
4. After the oven has heated, adjust the set point of the
oven far lower than its current (operating) temperature.
This ensures that the pilot flame will be at its lowest level
for some time.
Continued...
SECTION 3 - SERVICING COMPONENTS
Appendix - Instructions for All Gas Conversion Kits
for Ovens with Wayne Burner, Natural Gas to Propane, 8/00