Model:EMB17G5MA-S Read these instructions carefully before using your microwave oven, and keep it carefully. If you follow the instructions, your oven will provide you with many years of good service.
PRECAUTIONS TO AVOID POSSIBLE EXPOSURE TO EXCESSIVE MICROWAVE ENERGY (a) Do not attempt to operate this oven with the door open since open-door operation can result in harmful exposure to microwave energy. It is important not to defeat or tamper with the safety interlocks. (b) Do not place any object between the oven front face and the door or allows soil or cleaner residue to accumulate on sealing surfaces. (c) Do not operate the oven if it is damaged.
IMPORTANT SAFETY INSTRUCTIONS When using electrical appliances basic safety precautions should be followed, including the following: WARNING - To reduce the risk of burns, electric shock, fire, injury to persons or exposure to excessive microwave energy: 1. Read all instructions before using the appliance. 2. Read and follow the specific: "PRECAUTIONS TO AVOID POSSIBLE EXPOSURE TO EXCESSIVE MICROWAVE ENERGY" found on page 2. 3. This appliance must be grounded. Connect only to properly grounded outlet.
THIS COULD RESULT IN VERY HOT LIQUID SUDDENLY BOILING OVER WHEN THE CONTAINER IS DISTURBED OR A UTENSIL IS INSERTED INTO THE LIQUID. To reduce the risk of injury to persons: 1) Do not overheat the liquid. 2) Stir the liquid both before and halfway through heating it. 3) Do not use straight-sided containers with narrow necks. 4) After heating, allow the container to stand in the microwave oven for a short time before removing the container.
RADIO INTERFERENCE 1. Operation of the microwave oven may cause interference to your radio, TV or similar equipment. 2. When there is interference, it may be reduced or eliminated by taking the following measures: 1) Clean door and sealing surface of the oven 2) Reorient the receiving antenna of radio or television. 3) Relocate the microwave oven with respect to the receiver. 4) Move the microwave oven away from the receiver.
12. Do not use this microwave oven for commercial purpose. This microwave oven is made for household use only. 13. To prevent delayed eruptive boiling of hot liquids and beverages or scalding yourself, stir liquid before placing the container in the oven and again halfway through cooking time. Let stand in the oven for a short time and stir again before removing the container. 14. Use carefully when cooking food in the microwave oven to avoid burning due to excessive cooking. 15.
Materials you can use in microwave oven Utensils Remarks Aluminum foil Shielding only. Small smooth pieces can be used to cover thin parts of meat or poultry to prevent overcooking. Arcing can occur if foil is too close to oven walls. The foil should be at least 1 inch (2.5cm) away from oven walls. Follow manufacturer* instructions. The bottom of browning dish must be at least 3/16 inch (5mm) above the turntable. Incorrect usage may cause the turntable to break. Microwave-safe only.
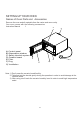
SETTING UP YOUR OVEN Names of Oven Parts and Accessories Remove the oven and all materials from the carton and oven cavity. Your oven comes with the following accessories: Instruction Manual 1 A A) Control panel B) Observation window C) Safety interlock system D) Ceramic board E) Filter F) Plug G) Ventilation C E B G F D Note: 1) Don't press the ceramic board forcibly. 2) Take and put the utensils gently during the operation in order to avoid damage to the ceramic board.
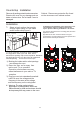
Countertop Installation Remove all packing material and accessories. Examine the oven for any damage such as dents or broken door. Do not install if oven is damaged. Cabinet: Remove any protective film found on the microwave oven cabinet surface. Installation 1. Fig 1 2. Stacking and installation of the microwave oven. The maximum height of stacking shall be two layers.
Cleaning Instructions Always keep the oven clean 1. Cleaning the glass viewing window, the inner door panel and oven front face. For best performance and to maintain the high degree of safety, the inner door panel and oven front face should be free of food or grease build-up. Wipe these parts with a mild detergent, rinse and wipe dry. Never use abrasive powders or pads. 2. Cleaning the control panel and plastic parts.
OPERATION Control Panel(with braille) and Features (1) (7) (6) (2) (3) (4) (5) (8) (9) (1) Defrost Button (2) USB Buttons (3) Power Level Button (4) Time Entry Button (5) Double Quantity Button (6) Triple Quantity Button (7) Number Buttons (8) Stop/Reset Button (9) Start Button 11
OPERATION INSTRUCTION Appendix. A User Options Items bolded below are the default values.
Appendix. B Default Cook T imes The oven shall ship with the following Preset Cook Times unless otherwise noted in the product Specification.
1. Power Up When the oven is electrified for the first time, the voltage will display for 3 times and " button pressed, the oven will change to idle then " _ _ _ _ _ _ _ " will display. If " mode. Note: Under idle mode, any button press will no response. 2. Idle Mode 1) Entry.The oven shall enter idle mode after a set of seconds have expired in Ready Mode without a keyboard press or a door open and close. The number of seconds is determined by the keyboard Timeout Window, set by User Option 4.
5. Pause Mode 1) This mode allow the users to temporarily stop the cooking cycle to inspect or stir the food item. 2) While in Manual Cook Mode or Preset Program Cook Mode, if the door is open and then closed, or if the " " pad is pressed, the oven will enter Pause Mode. 3) While paused, the screen will display the remaining cooking time. 4) Pause Mode will expire back to Idle Mode in the exact fashion as Ready Mode, dependent on User Option 4.
8. End of Cook Cycle Mode 1) After the time has expired in a Manual Cook Mode, or a Preset Program Cook Mode, the oven shall go into The End of Cook Cycle Mode. 2) During this mode, "DONE" displays. 3) If either User Option OP:11 or "OP:12" is selected, the oven shall continue to sound until the user acknowledges this by either opening and closing the door or pressing the " pad. If User Option OP:10 is selected, after the 3 second beep, the oven shall display "DONE".
11. Time Defrost Function (1) In Ready Mode, Press " DEFROST " button, screen will display "00.00". (2) Press number buttons to input defrosting time. The maximum time is 99 minutes and 99 seconds. (4) Press " " to start defrosting. The default power is power level 20%. (4) The remained cooking time will be displayed. When cooking program finish, the oven will enter End of Cook Cycle Mode. If you press " " button under this mode,the oven will enter Pause Mode. 12.
7) Close the door, the oven will turn back to Ready Mode. If press " " button during setting process, the oven turn to Door Open Mode. The program that not saved will be lost. If there is program saved as memory procedure, press the related number button, the saved program will start. If no saved program, the buzzer will alarm when pressing number button and it will not work. For example: set the program as memory cooking. Power level 70% and cooking time is 1 minute and 25 seconds.
14. Stage Cooking Programming This allows the user to cook food items at manual cook mode and programming mode. 1) Three stages can be set at most under cooking mode or programming mode. Aftet setting the power and time for the first stage, press " Time Entry " to set the second stage. And the same step to set the third stage. 2) When setting the second, third stage, press " Time Entry", "STAGE-2","STAGE-3" displays. 3) Press " " button to start cooking.
16. USB Function (1) During Ready Mode, insert the U disk which saved the "Utable" file. (2) Press "USB" button to update the data of computer board. "LOADING" displays. (3) If the update is successful, the screen will display "SUCCESS". Otherwise, "Fail" will display. (4) Press " " or open the door to finish it. 17. Use Option Mode This allows the user choose between various ways for the oven to operate. 1) Open the oven door and press "2" pad for 5 seconds. The buzzer sounds once and enter this mode.
Filter cleaning Caution! Make sure the splash shield is installed correctly before use of the microwave oven! Filter Filter screws The front filter serves as the air inlet; the filter should be cleaned on time to keep the chamber clean. 1. Turn counterclockwise to unscrew and take down the filter ; and wash it with warm soap water; 2. Install the filter screen Tighten clockwise the screws to fix the filter ; 3. Make sure the filter is installed before use of the microwave oven; 4.
Installation (supplement) 1. The switching operation of this microwave oven can cause voltage fluctuations on the supply line. The operation of this oven under unfavorable voltage supply conditions can have adverse effects. This device is intended for the connection to a power supply system with a maximum permissible system impedance Zmax of 0.2 Ohms at the interface point of the user’s supply.
MAINTENANCE Troubleshooting Check your problem by using the chart below and try the solutions for each problem. If the microwave oven still does not work properly, contact the nearest authorized service center. TROUBLE POSSIBLE CAUSE Oven will not start a. Electrical cord for oven is not plugged in. b. Door is open. c. Wrong operation is set. a. Plug into the outlet. b. Close the door and try again. c. Check instructions. Arcing or sparking a. Materials to be avoided in microwave oven were used. b.