Window Air Conditioner MAW USER MANUAL Download the app & activate product MAW08U1QWT MAW10U1QWT MAW12U1QWT Warning notices: Before using this product, please read this manual carefully and keep it for future reference. 7KH GHVLJQ DQG VSHFL´FDWLRQV DUH VXEMHFW WR FKDQJH ZLWKRXW SULRU QRWLFH IRU SURGXFW LPSURYHPHQW &RQVXOW ZLWK \RXU GHDOHU RU PDQXIDFWXUHU IRU GHWDLOV 7KH GLDJUDP DERYH LV MXVW IRU UHIHUHQFH 3OHDVH WDNH WKH DSSHDUDQFH RI WKH DFWXDO SURGXFW DV WKH VWDQGDUG
THANK YOU LETTER Thank you for choosing Midea! Before using your new Midea product, please read this manual thoroughly to ensure that you know how to operate the features and functions that your new air conditioner offers in a safe way. CONTENTS THANK YOU LETTER ............................................................................................ 2 SAFETY INSTRUCTIONS ...................................................................................... 3 PRODUCT INSTALLATION .......................
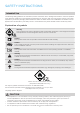
SAFETY INSTRUCTIONS SAFETY MANUAL FOR R32 REFRIGERANT MODEL North America Products IMPORTANT NOTE:Read this manual CAUTION: A2L Risk of fire flammable materials carefully before installing or operating your new appliance unit. Make sure to save this manual for future reference. Explanation of symbols displayed on the unit CAUTION This symbol shows that the operation manual should be read carefully.
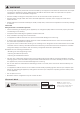
WARNING • Servicing shall only be performed as recommended by the equipment manufacturer. Maintenance and repair requiring the assistance of other skilled personnel shall be carried out under the supervision of a person competent in the use of flammable refrigerants. • DO NOT modify the length of the power cord or use an extension cord to power the unit. • DO NOT share a single outlet with other electrical appliances. Improper power supply can cause fire or electrical shock.
SAFETY INSTRUCTIONS Intended Use The following safety guidelines are intended to prevent unforeseen risks or damage from unsafe or incorrect operation of the appliance. Please check the packaging and appliance on arrival to make sure everything is intact to ensure safe operation. If you find any damage, please contact the retailer or dealer. Please note modifications or alterations to the appliance are not allowed for your safety concern. Unintended use may cause hazards and loss of warranty claims.
WARNING • Be sure the air conditioner has been securely and correctly installed according to the installation instructions in this manual. Save this manual for possible future use in removing or installing this unit. • Plug in power cord plug properly. Otherwise, it may cause electric shock or fire due to excess heat generation. • Do not modify power cord length or share the outlet with other appliances as it may cause electric shock or fire due to overheating. • Always ensure effective grounding.
CAUTION • When the air filter is to be removed, do not touch the metal parts of the unit. It may cause injury. • When the unit needs cleaning, switch off, and turn off the circuit breaker. Do not clean unit when power is on as it may cause fire, electric shock or injury. • Do not place obstacles around air inlets or inside of air outlet. It may cause failure or accident. • Clean with a soft cloth only. Do not use strong detergents that contain wax or thinners as it may damage the product.
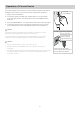
Operation of Current Device The power supply cord contains a current measuring device that detects damage to the power cord. Test your power supply cord as follows: 1. Plug in & press RESET Plug in the air conditioner. RESET 2. The power supply cord will have TWO buttons on the plug head. Press the TEST button. You will notice a click as the RESET button pops out. TEST 3. Press the RESET Button. You will notice a click as the button engages. 4.
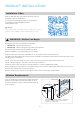
PRODUCT INSTALLATION Installation Video Scan the QR code with your mobile device to watch an installation video of the Midea U. It is highly recommended to watch the video before proceeding with the installation process. Video duration: 7:24 NOTE The product used in the video may vary slightly from your product. The installation process will remain the same. WARNING - Before You Begin Read these instructions completely and carefully. • IMPORTANT - Save these instructions.
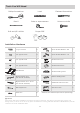
Tools You Will Need Phillips Screwdriver Level Flathead Screwdriver Pencil Ruler or tape measure Scissors or knife Drill and 1/8” drill bit Proper PPE Installation Hardware 1” Type A Screw 2* Open Window Bracket – RH 1 1/2” Type A Screw 3* Open Window Bracket – LH 1 1/2” Type B Screw 2* Window Sash Lock 1 1/4” Type B Screw 2* Window Sash Foam 1 Main Bracket 1 Window Sealing Foam 1 Right Extension Arm (For 26”-36” windows) 1 Bracket Sealing Foam 1 Right Extension Arm – Short (
Rear Cross Brace Main Support Righ Extension Arm Spring Push Pin Horizontal Bracket Left Extension Arm Angled Support Arms Fig. 1 1. Prepare the Bracket – Install Video Time 1:48 Remove the top foam insert containing the bracket and hardware from the carton. NOTE The spring push pin on the left extension arm will utilize the holes on the right side of the center bracket for 22”-26” wide windows. Adjust Center Adjust Fig. 2 A.
2. Prepare the Window – Install Video Time 1:58 Lower sash must open sufficiently to allow a clear vertical opening of 13.75 inches. Side louvers and the rear of the AC must have clear air space to allow enough airflow through the condenser for heat removal. The rear of the unit must be outdoors, not inside a building or garage. Find the center of your window and lightly mark with a pencil. 3. Install Support Bracket – Install Video Time 3:12 A. Install the Main Support Bracket into the window opening.
D. Check the level again and ensure the bracket feels secure. After making any necessary adjustments, insert the cotter pins into the Main Support Pins. Cotter Pin Fig. 7 If your window has a lip, make sure the bracket is placed as shown in Fig. 8. Secure the bracket to the windowsill by drilling 1/8” pilot holes and installing the 1/2” Type A screws as shown in Fig. 9.
4. Install Air Conditioner – Install Video Time 4:36 A. Set the air conditioner on top of the support bracket. Ensure the grooves on the bottom of the air conditioner align with the Main Supports. Using a level, check for proper tilt towards the outside. This side faces indoors Fig. 11 WARNING Do not leave the unit unattended during installation. Fig. 12 B. Pull the window down into the slot to help align the unit in the correct location.
5. Foam Installation – Install Video Time 5:33 A. Measure the distance between the Side Arm Hinge and the closest part of the window frame in line with the Side Arm. Add 1/4” to this distance and cut the Side Arm Foam to length. WARNING Do not leave the unit unattended during installation. Fig. 15 B. Apply Window Sealing Foam to the Side Arm Foam as shown. Note that the Window Sealing Foam attaches to the side next to the air conditioner.
D. In figure 18, the blue arrow points to the spot where the foam should be installed. Figure 19 shows the final installed position of the foam. Fig. 18 NOTE Repeat the side arm foam installation steps on the other side of the unit as well. E. The Anti-Tip Brackets (located in the U channel) must be extended into the window track opening (vertical track your window slides up and down in) until they stop. First remove the screw that is already in place.
F. Install a strip of Window Sealing Foam to the bottom of your lower sash sealing any small gaps between the window and air conditioner. Then close the window and check for gaps. Fill any gaps with the included foam as needed. G. Extend the Integrated Window Locks (located in the U channel) until they contact the window. Fig. 22 H. (Optional) To secure the lower sash in place, attach the Window Sash Lock with 1/2” Type A screws as shown. OR Window Sash Lock Fig. 23 I.
Final Check: Review the installation and check for any gaps or openings to the outdoor air. Cover these gaps with the provided foam ensuring no outdoor air leaks inside. See image for areas to check for gaps. Check for Gaps Check for Gaps Fig. 25 IF AC IS BLOCKED BY STORM WINDOW Add wood as shown, or remove storm window before air conditioner is installed. If storm window frame must remain, be sure the drain holes or slots are not caulked or painted shut.
OPERATION INSTRUCTIONS Normal Sounds Vibration High Pitched Chatter Unit may vibrate and make noise because of poor wall or window construction or incorrect installation. +LJK HI´FLHQF\ FRPSUHVVRUV may have a high pitched sound during cooling cycle. Sound of Rushing Air In front of the unit, you may hear the sound of rushing air being moved by the fan. Trickling Sound Droplets of water hitting condenser during normal operation may cause a trickling sound.
To begin operating the air conditioner, follow these steps: 1. Plug in the air conditioner (be sure to follow the power cord instructions) on page 8. 2. Turn the power on to the air conditioner, using the ON/OFF button. 3. Set the thermostat to the coldest temperature setting. 4. Select the Cool mode setting. 5. Adjust the louver for comfortable air flow (see Air Directional Louvers). 6. Once the room has cooled, adjust the thermostat to the setting you find most comfortable. 7.
Air Conditioner Features ELECTRONIC CONTROL OPERATING INSTRUCTIONS Before you begin, thoroughly familiarize yourself with the control panel as shown below and all its functions, then follow the symbol for the functions you desire. The unit can be controlled by the control panel, remote control, smart phone app or voice control. LED Display 3 4 5 6 6 7 8 1 2 Description 1 ON / OFF • Press to turn unit on or off.
4. ENERGY SAVER Feature The energy saver feature is on by default, pressing the button turns it off. This function is available on COOL, DRY, and AUTO (only AUTO-COOLING and AUTOFAN) modes. In this mode, the fan will continue to run for 3 minutes after the compressor shuts off. • The air conditioner will automatically control the room temperature according to the temperature you’ve set.
Displays LED Display: Shows the set temperature in “°C” or “°F” and the Auto-timer settings. While on Fan Only mode, it shows the room temperature. If the room temperature is too high or low, it will display “ HI” or “ LO”. To change between °F and °C, press and hold the UP ( ) and DOWN ( ) buttons at the same time for 3 seconds. Error codes: The unit may stop operation due to a malfunction with the unit. If this occurs, an error code may appear on the display like below.
REMOTE CONTROL AND APP INSTRUCTIONS Handling the Remote Control Location of the remote control Use the remote control within a distance of 26 ft. (8m) from the air conditioner, pointing it towards the unit. The unit will beep when it receives a signal. CAUTION • The air conditioner will not operate if curtains, doors or other materials block the signals from the remote control to the unit. • Prevent any liquid from spilling onto the remote control.
Notes For Using Remote Control The device could comply with the local national regulations. • In Canada, it should comply with CAN ICES-3(B)/NMB-3(B). • In USA, this device complies with part 15 of the FCC Rules. Operation is subject to the following two conditions: (1) This device may not cause harmful interference,and (2) This device must accept any interference received, including interference that may cause undesired operation.
Function Buttons MODE Switches the operating modes as follows: Auto Cool Dry Fan ON/OFF Turns the unit on or off. TEMP Increases temperate in 1°F (1°C) increments. Max. temperature is 86°F (30°C). ENERGY SAVER Press this button to toggle energy saver mode. SET Scrolls through operation functions as follows: Comfort Sense ( ) AP mode ( ) ... OK Press to send the desired settings to the AC unit. The selected symbol will flash on the display area, press the OK button to confirm.
Remote Screen Indicators Information is displayed when the remote controller is used. Sleep mode display Comfort Sense feature display Wireless control feature display Low battery detection display (If flashes) MODE display Displays the current mode, including: Transmission Indicator Lights up when remote sends signal to indoor unit. Note: Heat function not available for this unit. ECO display Not available for this unit TIMER ON display LOCK display Displays when LOCK feature is activated.
Setting the TIMER TIMER ON/OFF Set the amount of time after which the unit will automatically turn on/off. TIMER ON Setting Press TIMER button to initiate the ON time sequence. Press up or down button multiple times to set the desired time to turn on the unit. Point remote to unit and wait 1sec, the TIMER ON will be activated. x5 1sec TIMER OFF Setting Press up or down button multiple times to set the desired time to turn off the unit. Press TIMER button to initiate the OFF time sequence.
SET Function • Press the SET button to enter the function setting, then press SET button or TEMP or TEMP to select the desired function. The selected symbol will flash on the display area, press the OK button to confirm. • To cancel the selected function, just perform the same procedures as above.
Matter Instructions 1. What is Matter Matter is a connectivity technology that unifies the smart home by allowing devices and ecosystems (such as Alexa, Google Home and Apple Home) to speak the same language thus creating exciting new features and use cases. Top industry brands such as Apple, Google, Amazon, Midea and others collaborated to create Matter which provides the following benefits: • Seal of approval that smart home devices will work seamlessly together – today and tomorrow.
STEP 2: Turn On Bluetooth Turn on Bluetooth on your mobile device. STEP 3: Enter AP Mode Windows AC: Hold down the CONNECT button for 3 seconds to begin the pairing process (“AP” will appear on the AC’s display). NOTE Entering AP pairing mode may vary between different AC models, please follow the instructions of the AC panel. Window AC STEP 4: Open App Open the Alexa, Google Home or Apple Home app on your mobile device.
STEP 5: Scan Matter QR code Tap the “+” and “Add Device/ Accessory” or tap “+Add” in your app and then select Matter device and scan the Matter QR code found on the side of the AC device. Follow the respective instructions in the Alexa, Google Home or Apple Home app to complete the pairing process. Add Device/Accessory scan Matter QR code Add found on the side of your device STEP 6: Control Device After pairing is successful, you can control your AC’s temperature and mode settings, etc.
3. How to Use SmartHome App Ensure that your mobile phone is connected to the wireless network. Bluetooth must be turned on. The device must also be powered up. STEP 1: Download the SmartHome App Scan the QR code below to download the SmartHome app from the app store or search for it directly on the Google Play Store or Apple’s App Store. Download the app & activate product STEP 2: Log in Open the SmartHome app. Log in directly if you have an existing SmartHome account or create a new account.
2) If no such message appears, proceed as follows: Tap on “+” and select your device in the list of nearby available devices. If your device is not listed, please add your device manually, rst selecting the device category e.g. Window AC. 3) Follow the steps in the app to connect your device to the wireless network. If your device fails to connect, follow the additional instructions in the app.
Declaration of Conformity FCC ID: 2ADQOMDNA23 IC: 12575A-MDNA23 This device complies with Part 15 of the FCC Rules and Industry Canada’s licence exempt RSSs. Operation is subject to the following two conditions: (1) This device may not cause interference; (2) This device must acceptany interference,including interference that may cause undesired operation of the device. Only operate the device in accordance with the instructions supplied.
CLEANING AND MAINTENANCE CAUTION Clean your air conditioner occasionally to keep it looking new. Be sure to unplug the unit before cleaning to prevent shock or fire hazards. Air Filter Cleaning The air filter should be checked at least once every two weeks to see if cleaning is necessary. Trapped particles in the filter can build up and reduce performance by restricting airow through the coils. • Grasp the filter by the center and pull up and out. • Wash the filter using warm water.
TROUBLESHOOTING TIPS Before calling for service, review this list. It may save you time and expense. This list includes common occurrences that are not the result of defective workmanship or materials in this appliance. Problem Solution Wall plug disconnected. Push plug firmly into wall outlet. Circuit breaker tripped. Reset circuit breaker. Air conditioner does not start. Check if the light on the plug is on. If it is off, press the RESET button. Power is OFF. Turn power ON.
Problem Solution Dirty air filter- air restricted. Clean air filter. Air conditioner turns on and off rapidly. Outside temperature extremely hot. Set FAN speed to a higher setting to bring air past cooling coils more frequently. Check for potential obstructions blocking the outdoor intake/exhaust. Clear any obstructions. Air movement sound. This is normal. If too loud, set to a slower FAN setting. Noise when unit is cooling. Window vibration - poor installation.
WARRANTY Air Conditioner Limited Warranty Your product is protected by this Limited Warranty: Warranty service must be obtained from Midea Consumer Services or an authorized Midea servicer. Warranty • One Year Limited Warranty from original purchase date. Five Year Limited Sealed System Warranty (includes components containing refrigerant) from original purchase date. Three Year Limited Compressor Warranty from original purchase date.
TRADEMARKS, COPYRIGHTS AND LEGAL STATEMENT logo, word marks, trade name, trade dress and all versions thereof are valuable assents of Midea Group and/or its affiliates (“Midea”), to which Midea owns trademarks, copyrights and other intellectual property rights, and all goodwill derived from using any part of a Midea trademark. Use of Midea trademark for commercial purposes without the prior written consent of Midea may constitute trademark infringement or unfair competition in violation of relevant laws.
DATA PROTECTION NOTICE For the provision of the services agreed with the customer, we agree to comply without restriction with all stipulations of applicable data protection law, in line with agreed countries within which services to the customer will be delivered, as well as, where applicable, the EU General Data Protection Regulation (GDPR).
www.midea.