Instruction Manual Model Code: MDWF1SS MDWF1W 14place settings 8 Wash Programs Push Button Controls Service Call: 1800 886 010
Quick Operation Guide For detailed operating guide, read corresponding contents in the Instruction Manual. Switch on the appliance Open the door, press the On/Off button to switch on the appliance. Compartment A: For each washing cycle. Use tablet or liquid fill the detergent dispenser Compartment B: For programs with pre-wash only. (Follow the user instructions) Check the rinse aid level Mechanical indicator C. Electric indicator on control panel (if provided).
Read this Manual 1) Safety Information..................................................... 1 2) Operating Instructions ............................................. 2 Dear Customer, This appliance is intended to be used in household and similar applications such as: - Staff kitchen areas in shops, offices and other working environments; - Farm houses; - By clients in hotels, motels and other residential type environments; - Bed and breakfast type environments.
IMPORTANT SAFETY INFORMATION READ ALL OF THE INSTRUCTIONS BEFORE USING WARNING! When using your dishwasher, follow the precautions listed below: GROUNDING INSTRUCTIONS This appliance must be grounded. In the event of a malfunction or breakdown, grounding will reduce the risk of an electric shock by providing a path of least resistance of electric current. This appliance is equipped with a cord having an equipmentgrounding conductor and a grounding plug.
2. Operating Instructions MPORTANT To get the best performance from your dishwasher, read all operating instructions before using it for the first time. Control Panel 8. Water tap indicator: The tap is not open or water inlet is not working. 1. On/Off: To turn on/off the power supply. 2. Alt function button: Dual zone wash function, press the button to select either upper basket or lower basket loaded, and the response indicators will light up. 9. Program indicators: Shows the program you choose; 10.
3. Prior to Using for the First Time Before using your dishwasher for the first time: A. Fill the rinse aid dispenser B. Add the detergent A. Rinse Aid Dispenser Rinse Aid Dispenser The rinse aid is released during the final rinse to prevent water from forming droplets on your dishes, which can leave spots and streaks. It also improves drying by allowing water to roll off the dishes. Your dishwasher is designed to use liquid rinse aids.
NOTE: Clean up any rinse aid spilled during filling with an absorbent cloth to avoid excessive foaming during the next wash. Don't forget to replace the cap before you close dishwasher door. Adjusting Rinse Aid Dispenser Adjust lever (Rinse) Adjust lever (Rinse). The rinse aid dispenser has six or four settings. Always start with the dispenser set on "4". If spots and poor drying are a problem, increase the amount of rinse aid dispensed by removing the dispenser lid and rotating the dial to "5".
Adding Detergent into Dispenser Push latch to open Add the Detergent Fill the detergent dispenser with detergent. For main wash detergent. The marking indicates the dosing level, as illustrated on the right: For pre-wash detergent. Use only detergent specifically made for the use in dishwashers. Keep your detergent fresh and dry. Don't put powdered detergent into the dispenser until you're ready to wash dishes.
4. Loading the Dishwasher Baskets Recommendation Consider buying utensils which are identified as dishwasher-proof. Use a mild detergent that is described as 'kind to dishes'. If necessary, seek further information from the detergent manufacturers. For particular items, select a program with as low temperature as possible. To prevent damage, do not take glass and cutlery out of the dishwasher immediately after the program has ended.
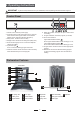
The Method of Loading Normal Dishware Loading the Upper Basket The upper basket is designed to hold more delicate and lighter dishware such as glasses, coffee and tea cups and saucers, as well as plates, small bowls and shallow pans (as long as they are not too dirty). Position the dishes and cookware so that they will not get moved by the spray of water.
5. Starting a Washing Program Washing Cycle Table NOTE: ( ) Means: need to fill rinse aid into the Rinse-Aid Dispenser. Cycle Selection Information Program Auto Intensive Heavy For heavily soiled loads, such as pots, plates, glasses and lightly soiled pans. (*AS/NZS 2007.1) Detergent Running Pre/Main Time(min) Energy (Kwh) Water (L) 150 0.9~1.3 11~15 5/27.5g (Or all in1) 170 1.5 17.5 5/27.5g (Or all in1) 160 1.3 13.5 5/27.5g (Or all in1) 170 0.7 12 5/27.5g (Or all in1) 125 0.
NOTE: When you press the Start/Pause button to pause during washing, the LED display window " " will stop blinking and the dishwasher will beep every minute unless you press the Start/Pause button again to start. Changing the Program Premise: A cycle that is underway can only be modified if it has only been running for a short time. Otherwise, the detergent may have already been released, and the appliance may have already drained the wash water.
6. Maintenance and Cleaning Filtering System The filter prevents larger remnants of food or other objects from getting inside the pump. The residues may block the filter. In this case they must be removed. The filter system consists of a coarse filter, a flat filter (main filter) and a micro filter (fine filter). Main filter Food and soil particles trapped in this filter are pulverized by a special jet on the lower spray arm and washed down to drain.
Notes: - Inspect the filters for blocking after every time the dishwasher has been used. - By unscrewing the coarse filter, you can remove the filter system. Remove any food remnants and clean the filters under running water. NOTE: The entire filter assembly should be cleaned once a week. Cleaning the Filter To clean the coarse filter and the fine filter, use a cleaning brush.
How to Keep Your Dishwasher in Shape After Every Wash When Not in Use for a Long Time After every wash, turn off the water supply to the appliance and leave the door slightly open so that moisture and odours are not trapped inside. Removing the Plug It is recommend that you run a washing cycle with the dishwasher empty and then remove the plug from the socket, turn off the water supply and leave the door of the appliance slightly open.
How to Connect the Safety Supply Hose The appliance must be connected to the water mains using new hose-sets. The old hose-sets should not be reused. Water pressure must be between 0.04 MPa and 1 MPa. If the pressure is below the minimum, consult our Service Department for advice. 1. Pull the safety supply hoses completely out from storage compartment located at the rear of the dishwasher. 2. Tighten the screws of the safety supply hose to the faucet with thread 3/4 inch. 3.
How to Drain Excess Water from Hoses If the sink is more than 1000mm higher than the floor, the excess water in hoses cannot be drained directly into the sink. It will be necessary to drain excess water from hoses into a bowl or suitable container that is held outside and lower than the sink. Water Outlet Connect the water drain hose. The drain hose must be correctly fitted to avoid water leaking. Ensure that the water drain hose is not kinked or squashed.
Troubleshooting Tips Before Calling for Service Reviewing the charts on the following pages may save you from calling for service. Possible Causes What to Do Fuse blown, or the circuit breaker acted Replace fuse or reset circuit breaker. Remove any other appliances sharing the same circuit with the dishwasher. Power supply is not turned on Make sure the dishwasher is turned on and the door is closed securely. Make sure the power cord is properly plugged into the wall socket.
Problems Possible Causes What to Do The dishes are not clean The dishes are not loaded correctly. See notes in "Loading the Dishwasher Baskets ". The program is not powerful enough. Select a more intensive program. See" Washing Cycle Table ". Not enough detergent is dispensed. Use more detergent, or change your detergent. Items are blocking the path of spray arms. Rearrange the items so that the sprayer can rotate freely. The filter combination is not clean or is not correctly fitted.
Technical Information it 610(w ed) r clos doo h the Height: 845mm Width: 598mm Depth: 610mm (with the door closed) Water pressure: 0.04-1.
1 6 IN 5 9 2. Lower basket: IN 3 1 1. Upper basket: 42 2 1 3 1 7 7 8 3 1 3 1 4 Glasses 3 Saucers 2 1 Cups Oval platter 10 Soup plates 9 Dinner plates 8 Dessert dishes 7 Large serving bowl 6 Medium serving bowl 5 Small serving bowl Loading the baskets according to En 50242: 10 18 8 Gravy ladles Capacity: 14 place settings Upper basket position: lower Program: Normal Rinse aid setting: 6 Detergent (pre/main): 5 g/27.